Thursday, August 29, 2013

Stylin' Stampin' INKspiration Blog: My Digital Studio, Hybrid Projects

Good morning, I'm so excited we've made it half way through the week and we're getting closer to the start of our holiday weekend.  Today I'm sharing a couple of cards I created for today's Stylin' Stampin' INKspiration blog and today it's all about My Digital Studio.  I love all the different things you can create with this amazing software.  For these cards I used predesigned digital downloads (so easy) and had them printed out using Stampin' Up!'s professional print services and then added them to cards for fun and easy cards.  Also the chalkboard effect is very popular right now and both these cards use digital downloads with this design so all the hard work is done.
 
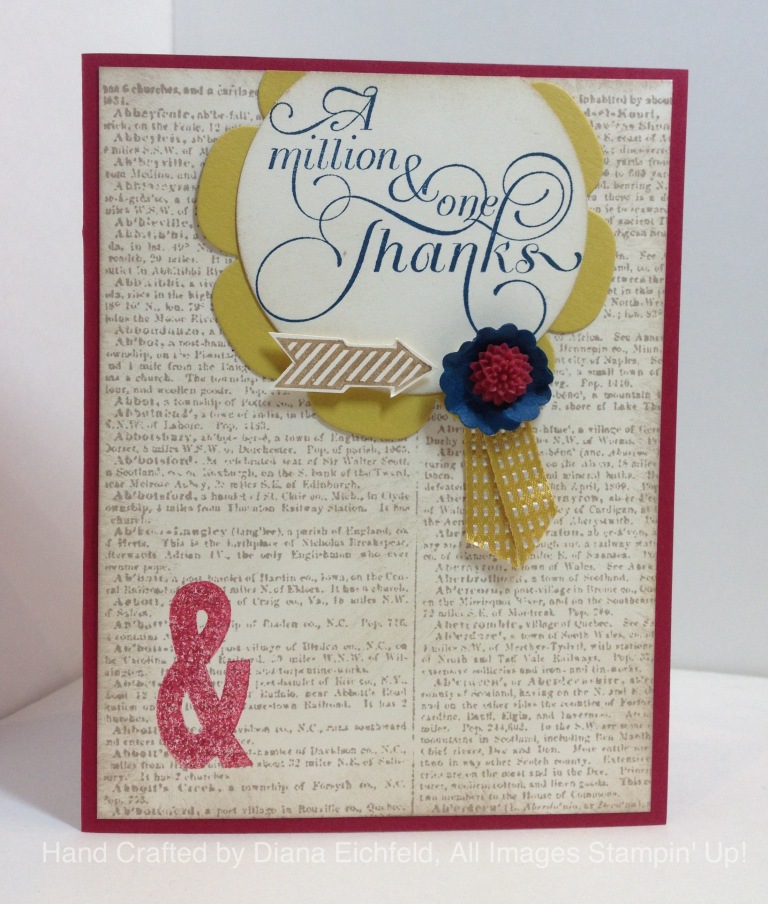
This  first card uses the To You From Me Designer Template - Digital Download  and I punched out the image with the 2 1/2" Circle Punch (I have to admit when I had this printed I cut part of the top off on the edge but I was still able to use it by using the smaller punch).  The cardbase is Smoky Slate and it's layered with a piece of Island Indigo Textured Cardstock as well as a piece of Winter Frost Specialty Designer Series Paper.  The final touch was to add a piece of Whisper White 5/8" Organza Ribbon

My second card came together just as quickly and uses the Free For You From Us Designer Template - Digital Download (this download is FREE so make sure to get yours).  For the tag after it was printed I just hand cut it out, so easy, and remember with MDS you can resize images so you could easily make the tag smaller or bigger to fit your specific project.  The cardbase of this card is Baked Brown Sugar and I added a piece of Coastal Cabana cardstock that was embossed with the Big Shot and the Stylish Strips Embossing Folder.  For an accent to this card I added a piece of Cherry Cobbler 3/4" Chevron Ribbon and an extra large Rhinestone.
 
I love the colors and looks of these cards, and the best part is you could easily mass produce these if you needed a large quantity of cards, tags, etc. so they are perfect for any holiday or project you have.  Remember, if you don't currently have My Digital Studio you can download a FREE 30 day trial program of the software that you can enjoy and use all you want (including printing out completed projects).
 
I hope you enjoyed these projects and make sure to check out what other projects the Stylin' Stampin' INKspiration blog design team created, they're so great!
 
Happy stamping,
 
Diana

Pin It!

Tuesday, August 27, 2013

Stylin' Stampin' INKspiration: Hexagon Get Well Wishes

Good morning friends!  Today over at the Stylin' Stampin' INKspiration blog it's all about hexagons and not only are they so popular and "in" right now but I love them and use them on projects frequently.  They're so great on all types of cards, including masculine and feminine cards alike.  For my card I have a friend who's been ill recently so I decided to combine the hexagons with the Tag It! stamp set to send her special greetings that will hopefully have her on the mend soon. 
 
The cardbase is Island Indigo and I added a layer of Whisper White cardstock that was embossed with the Big Shot and the Hexagon Embossing Folder.  Next I used the Six Sided Sampler stamp set to stamp several of the hexagon images in Basic Gray and Island Indigo ink before punching them out with the coordinating Hexagon Punch.  I used the same punch to punch out a couple of hexagons out of the Real Red Designer Series Paper.  I added a piece of Real Red 1/4" Stitched Grosgrain Ribbon for a fun touch.
 
The greeting is from the Tag It! stamp set (this stamp set is this years Ronald McDonald stamp set so Stampin' Up! donates money from each stamp set sold to this fabulous charity so you get to help a worthy cause when you purchase this great stamp set) and I used Stampin' Write Markers to color directly on the rubber and then cut out the image with the Big Shot and the coordinating Chalk Talk Framelits (these work so great with the new Magnetic Big Shot Platform).  The greeting was attached to the card with dimensionals so it really pops up.
 
If you haven't tried using the products including hexagon images you've got to give it a try, I'm sure you'll love them and fall in love them.  Enjoy!


Pin It!

Monday, August 26, 2013

Hand Stamped Sentiments Color Challenge: Truly Grateful

All good things must come to an end and that means that our vacation is over and it's back to work and camp this week for the family.  We had a fabulous time and really feel rested and recharged.  I'm also back so several fun projects this week, including this card for the Hand Stamped Sentiments Color Challenge.  These are three unique colors combined in a way that I would not have come up with but it made me think of fall so it was perfect to pair with the new Truly Grateful stamp set.

The cardbase is Pear Pizzazz and I added a layer of Early Espresso and then Very Vanilla that I had used Crumb Cake ink and the chevron wood stamp from the Truly Grateful set.  I also added the tree circle in Early Espresso that was great to offset the greeting that was stamped in Crushed Curry, punched out with the oval punch (sponged with Early Espresso ink) and matted with the Scalloped Oval Punch with Pear Pizzazz cardstock. 
 
Along the top I took a piece of Crushed Curry cardtock that was punched with the Scallop Trim border punch, embossed with the Perfect Polka Dot Embossing Folder and sponged with Crumb Cake ink.  I also added a piece of 1/8" Early Espresso Taffeta Ribbon around this layer to break up the Crushed Curry layer.  For a fun accent I stamped the acorn image in Early Espresso Ink on Crumb Cake cardstock, punched it out with the 1" circle punch and attached it to the card with linen thread.

I love how this card turned out and can't wait to use this stamp set on lots of other projects and will be using this color combination again in the future.  Hope you enjoy and feel free to play around with this color combination to see what you can create.
 
Enjoy!
 
Diana
Pin It!

Friday, August 23, 2013

Another Thank You Photopolymer Stamp Set, Now Available!

Stampin' Up! has released the next stamp set in the Photopolymer Set set collection, Another Thank You.  This set has some perfect greetings to help you send the perfect appreciation greetings.  If you haven't given the Photopolymer stamps a try you really should, they work with our clear blocks and stick like nothing you've seen before.  Plus they are completely clear so you know exactly where you're stamping and what it will look like. 


Pin It!

Thursday, August 22, 2013

Fab Friday Color Challenge: Gorgeous Grunge

Good morning, where is this week going?  We're having so much fun and really enjoying the beach.  Today I wanted to pop on to share the card I made for this weeks Fab Friday color challenge.  I wanted to make a special thank you and these colors were perfect for my friend.  I started with a cardbase that's Baked Brown Sugar and added a piece of Whisper White that I had stamped with the Gorgeous Grunge stamp set and Baked Brown Sugar, So Saffron, Crisp Cantaloupe, and Pistachio Pudding (love how this stamp set has all these different images that work so well together.

I also used a piece of Pistachio Pudding designer series paper and So Saffron cardstock along the bottom as well as some Baked Brown Sugar Stretched Ruffle ribbon.  The greeting is from the Lots of Thanks stamp set and was punched with the 1 1/4" and 1 3/8" circle punches.  This piece was accented with one of Chalk Talk stamp set and was cut with the matching Chalk Talk Framelits.

This card is so fresh and fun, perfect for the occasion.

Enjoy and have a great day!

Diana
Pin It!

Wednesday, August 21, 2013

New Christmas Single Stamps Available for A Limited Time

Just in time to start thinking about your upcoming Holiday projects Stampin' Up! has released a new set of single stamps that will provide you additional options in addition to all the stamp set in the Holiday catalog.  You can purchase one or all of these single stamps and you can be on your way to making quick and easy tags, cards, and other projects that people will cherish.  Remember these stamps are only available in clear mount so you'll need clear blocks to use these stamps (suggested block sizes are indicated next to the stamp title).


 Remember these stamps are only available through January 31, 2014 so you'll want to add these stamps to your stamping toolbox before time runs out.

Pin It!

Tuesday, August 20, 2013

Paper Craft Crew Sketch Challenge: Toil and Trouble Halloween Greetings

Happy, happy Tuesday!  I have to say, this has been one of the most unusual August's I've experienced on the East Coast.  It's been so cool and pleasant that it keeps making me think of fall, and what comes along with fall but Halloween.  For the this weeks Paper Craft Crew sketch challenge I decided to channel these fall feelings for a Halloween card.  I drew the color inspiration from directly from the Witches Brew Designer Series paper.  The cardbase is Summer Star fruit and I layered that with Basic Gray and a layer of Very Vanilla that I stamped with the Dictionary stamp set and sponged around the edges with Smoky Slate ink.
 
The striped layer is from the Witches Brew DSP and is matted with Basic Black.  Next I inked up the large image in the Toil and Trouble stamp set with Pumpkin Pie ink and stamped it and cut it out with the Oval Collection Framelits to just highlight a piece of the pattern.  The greeting is from the Halloween Hello stamp set and was punched out with the Oval Punch and matted with the Scallop Oval punch and Basic Black cardstock.  The final touch was to add a knot bow I tied with the Smoky Slate Chevron ribbon (this ribbon is AWESOME!)
 
I have to say, I absolutely love this years Halloween collection of products and am looking forward to using it for lots of other projects in the upcoming months.
 
Enjoy and happy stamping,
 
Diana


Pin It!

Sunday, August 18, 2013

Stylin' Stampin' INKspiration: Scrapbook Sketch Challenge

Good evening friends!  I hope you had an enjoyable weekend, we've officially started our beach vacation and are so excited for a nice, restful getaway.  Don't worry, I'll be sharing several projects with you this week so you'll still have lots of inspiration.  Today I'm sharing the a scrapbook page I made for this month's scrapbook sketch challenge on the Stylin' Stampin' INKspiration blog.  There are some great ideas on the blog so make sure to take the time to check out the other ideas.  I stayed pretty close to the sketch design for this one since it worked perfectly for a Christmas page from Aidan making his annual gingerbread house. 
 
The cardbase is Crumb Cake and I used the Six Sided Sampler stamp set to randomly stamp the hexagons all over the background. I also used the Gorgeous Grunge stamp set and Early Espresso ink to stamp the little splatter.  The designer series paper is the Season of Style DSP and has some wonderful non-holiday specific images.  I used the DSP for the flags in the top left corner along with the decorative strip cut from the Tasteful Trim Bigz XL die.  The pictures are matted on Old Olive and Cherry Cobbler cardstock and the journaling block is Whisper White.  I also added an Old Olive button with an Early Espresso Baker's Twine bow as an accent to the journaling block.

For the title I used the new Joy to the World stamp set and cut it out with the Apothecary Accents framelits, and trimmed along the top and bottom to make it a little shorter.  Cute little Neutrals candy dots accent the edges.  Isn't that little banner accent cute?  I used the new Label Thinlit die to cut it out and it's great since it includes the score lines so it makes it a breeze to cut and fold.  The final touch was to add three rhinestones in different sizes since everyone loves a little bling (Aidan loves to use rhinestones on his projects!)

This page turned out so fun, I love it.  I have to admit I don't scrapbook nearly enough and it's one of the things I've been working this year, I would love to get "caught up" if that's possible.  I hope you enjoyed this page and you could certainly use this sketch for a card or other project just as easily.
 
Happy stamping,
 
Diana


Pin It!

Stylin' Stampin' INKspiration: Photopolymer Stamps


Good morning friends!  We are up and out of here early this morning headed to a fun weekend at the beach but I wanted to let you know that you need to head over to the Stylin' Stampin INKspiration Blog today.  We're showcasing the Photopolymer Stamp Sets today so you can get lots of great ideas and you'll see the four cards I've created using the Bombs Away Birthday set, have fun!

Diana
Pin It!

Thursday, August 15, 2013

Envelope Punch Board, Coming Soon Preorder Your's Today!


One of the exciting new product announcements at last month's convention was the upcoming release of the Envelope Punch Board.  Anticipated to be available for purchase in September this envelope punch board will help you make custom envelopes in 66 different sizes in just seconds.  This tool is so fun and easy and includes all the information on the back of the board about paper dimensions needed for each envelope size (so you’ll never lose the information).  It also includes a corner rounder punch at the top of the board so you can round the corners of your flaps. 

Now you’ll be able to make customized envelopes for your cards using coordinating designer series paper, cardstock, even kids artwork (what Grandparent would love that!)  The board will be sold for $19.95 plus shipping and tax and I’m taking preorders for the boards now (you won’t be charged until the order is placed). 

Plus as an added bonus everyone who preorders the board through me will receive a DSP sampler package for FREE to help get you started making beautiful envelopes.  I can’t wait to be able to add this tool to my studio (will also be a great way to use up all the paper I’ve been hording, I mean saving! This way you can make sure to be one of the first to get your hands on this great new tool, I know I'm anxiously waiting until we can order.

Please let me know if you have any questions.

Thanks,

Diana
Pin It!

Tuesday, August 13, 2013

Stylin' Stampin' INKspiration: Back to School Survival Kits


UPDATE:  I've updated this post to include pictures of the files I used to make these projects as a special gift to you to help you make kits for your kids and teachers.  Please note this is my design and while you can use it for personal projects I ask that you not use it to enter contests to to sell.

Good evening friends!  I’m so excited to share my inaugural posting on the new Stylin’ Stampin’ INKspiration Blog.  I’ve joined a fabulous group of artists on the design team and we’ll be sharing challenges, projects, techniques, and ideas with you 5 days a week.  The blog was officially launched last week and already we’re having lots of fun.  Today’s team is “Back to School” and Pam and I are sharing some fun ideas now that summer is winding to an end and the kiddos will be heading back to school.  For some reason I’m in love with the idea of “Survival Kits” right now and made some for the kids that will be at the beach with us next week so I thought I would make two different “Survival Kits” for back to school, one for my son Aidan, and the other for his new teacher.  The best part of these kits was I used My Digital Studio (MDS) to create them so they were a breeze (trust me the hardest part was finding all the contents for the kits.

For the bag topper I made the same one for each kit and used lots of fun digital elements (I’ve included the full supply list of MDS “products” used at the end of this post).  I used the search function (love it) in MDS to find all the different elements including the lined paper, paperclips, A+ embellishment, etc.  I used the recolor tool on the embellishments (i.e. the apple and the first day pencil) to add lots of color.  After printing out the toppers I cut them out and matted them on a piece of Real Red Cardstock so I could staple the bags closed.  I used the 1” circle punch to punch out the apple element and matted that on a piece of Chocolate Chip cardstock that was cut out with the 1 ¼” scallop circle punch and attached it to the topper with a dimensional.

I added so much loot to the kits that I ended up having almost a half sheet of paper for each list but they fit great into the bags and added some structure to the bag.  I used the same lined paper as the bag topper and then typed the poem directly in MDS (I got the actual poems by searching the internet; unfortunately I’m not that clever!)  I used a different color, size, and font to highlight each of the items that’s in the kit for a fun twist.

For Aidan’s survival kit I used the 6x8 cello bag and for the teacher kit (since it had more “supplies” in it I used the gusseted cello bag which provided plenty of room).  I added a little extra to the Starbuck’s gift card and just stamped the coffee cup from the Perfect Blend stamp set and cut it out in Whisper White, added the coffee collar in Crumb Cake, and colored in the lid with a Soft Suede Stampin’ Write Marker.  And the best thing about these projects?  I have the files saved so if I want to make them again all I need to do is reprint them and I’m good to go and you can make 20 just as easily as one (but you’d need a lot more supplies), or I can modify them for any other occasion.
 
Back of Aidan's Back to School Survival Kit 

Front of Teacher Back to School Survival Kit

Back of Teacher Back to School Survival Kit
 

I’m really excited because now my projects are DONE (whoo hoo!) and I can relax until school starts in a couple of weeks, love it when a plan comes together.  I hope you enjoyed these projects and they gave you some ideas to help your students and teachers start the New Year off right.

Enjoy,

Diana
 
Page 1 Supply ListEmbellishments
_Designer Kits\Back to School - embellishments\Back to School - lined paper

Stamps
_Designer Kits\Back to School\Back to School - paper clips, Color = 0,0,0
School Days\School Days - A+, Color = WILD WASABI 140,166,95

Page 2 Supply ListEmbellishments
_Designer Kits\Back to School - embellishments\Back to School - lined paper

Stamps
School Days\School Days - apple
School Days II\School Day II - scissors, Color = CHOCOLATE CHIP 104,73,71
School Days II\School Days II - first day
So Happy For You\So Happy For You - good luck, Color = REAL RED 199,44,58
_Designer Kits\Back to School\Back to School - paper clips, Color = 0,0,0
School Days II\School Day II - scissors, Color = CHOCOLATE CHIP 104,73,71
School Days II\School Days II - first day
So Happy For You\So Happy For You - good luck, Color = REAL RED 199,44,58
_Designer Kits\Back to School\Back to School - paper clips, Color = 0,0,0
School Days\School Days - apple


Pin It!

Create with Connie and Mary: Bring on the Cake Birthday Greetings

It's time to get up early to get my run in before heading to work.  I don't know if I've mentioned before but I'm currently training for my first half marathon which will be in exactly one month so I've been working hard to be ready and with all the heat and humidity of summer here in Northern VA it's amazing the difference it makes in getting up early (i.e. 4 AM to run before the heat and humidity get really bad).  So today I'm sharing a card I made for a little boys birthday we went to this past weekend and I used the Create with Connie and Mary sketch challenge as the starting point.  The cardbase is Crisp Cantaloupe and drew all the colors for this card from the Birthday Basics Designer Series Paper.  Next I took a piece of Bermuda Bay cardstock and ran it through the Big Shot with the Hexagon Embossing Folder (I absolutely love this folder and especially using the pattern in reverse so it's debossed).   

I used four different patterns of the Birthday Basics DSP for the design elements along the side.  The greeting is from the Bring on the Cake stamp set and I stamped it in Basic Gray ink before punching it out with the 2 1/2" circle punch.  I used the same punch to punch a piece of Gumball Green cardstock to accent the stamped image.  I used the Gumball Green Stampin' Write Marker to color in the 6 for the sixth birthday of our little friend.  I also sponged around the edge with Crisp Cantaloupe ink.  I added a little arrow accent in Summer Starfuit and I cut it out with the Big Shot and the new Label Thinlit Card die (not only are these new card thinlits perfect to make swing cards but they have lots of cute, fun little accents you'll love for all sorts of projects.
 
I love the fun, whimsical elements in this card and I'm sure our friend enjoyed it as well.  It's so fun to see kids enjoy helping their friends celebrate birthday, so sweet.
 
Enjoy and happy stamping,
 
Diana
Pin It!

Monday, August 12, 2013

Paper Craft Crew Sketch Challenge: Bombs Away Birthday Photoploymer Stamps

Happy Monday!  So for once I'm really looking forward to a Monday.  Want to know why, because I only have one more week before our family vacation and I can't wait to get away and enjoy the beach with friends and family.  There are lots of things I'm trying to get wrapped up before we head out of town so I decided to use this weeks Paper Craft Crew sketch challenge as the inspiration for a birthday card I needed for a friend who's birthday we're celebrating while at the beach.  This card starts with a Crumb Cake cardbase and I added a layer of Island Indigo before adding three strips of Soho Subway designer series paper (I love the more masculine images in this paper pack, it's perfect for guy cards).  I added three of the new Candy Dots to the top right colors in various colors from the DSP.
 
Next I added a piece of 1 1/4" Burlap Ribbon and I cut off the edges and frayed them to add some added texture.  The greeting uses the Bombs Away Birthday Photopolymer Stamp set (if you haven't noticed yet, I LOVE this set because of it's "snarky" messages, so out of the box.  I colored in the stamp with Stampin' Write Markers before stamping to add all the colors and then used the Big Shot and the Oval Collection framelits to cut the greeting out.  Next I sponged around the edge with Crumb Cake ink.  I added a little piece of the same Soho Subway DSP that was punched out with the Artisan Label Punch and sponged around the edge with both Crumb Cake and Summer Starfruit ink.  The final touch was to add an Early Espresso Button (had to use a retired one since I don't have the new Neutrals Buttons yet) and tied a bow with linen thread.

This card turned out so awesome, I love it!  It's got lots of texture and dimension that all work together and I know it will be perfect to send birthday wishes for our friend.  This sketch challenge works so well with all our designer series paper and you could make all types of cards by just changing the patterns, inks, and greetings, love the versatility.
 
Hope you enjoy and have a great day!
 
Diana
Pin It!

Thursday, August 8, 2013

Stylin' Stampin' Squad August Blog Hop: Holiday Catalog Preview, Toil and Trouble


Good morning friends!  It's that time of the month, the Stylin' Stampin' Squad blog hop starts today and we're so excited to share lots of fun ideas using the products in the newly release Holiday catalog.  There are so many fabulous products in this catalog for Halloween, Fall/Thanksgiving, and Christmas as well as so many kits and bundles to help you save time and money on projects there is really something for everyone.  If you've been moving along this hop you're joining me from Bree's site (I love all her projects), if you're just starting the hop from my site you can continue around the hop so you don't miss anything.

For my project I decided to make a halloween card (I love decorating for Halloween and giving cards and gifts it's a great way to kick off the full holiday season).  This card uses the new Toil and Trouble stamp set.  I started with a cardbase of Crumb Cake and used my Paper Piercer to pierce the design in the top and bottom right corners.  Next I took a piece of Basic Black cardstock and stamped the skeleton in Versamark and heat embossed with Whisper White embossing powder.  I also added strips of Witches Brew Designer Washi Tape (this tape is so fun and easy).  I matted this layer on a piece of Pumpkin Pie cardstock that I sponged around the edges with Basic Gray ink.
 
The main stamped image is also from the Toil and Trouble stamp set and was stamped with Smoky Slate ink on Very Vanilla cardstock.  I cut this element out with the Big Shot and the Apothecary Accents framelits before sponging around the edge (and all over) with Crumb Cake ink.  Next I selected random words on the image to highlight and stamped them again in different color in and/or paper and cut them out (sponged around all the edges) and attached them to the card with dimensionals so they pop up.  The final touch was to add a greeting from the Delightful Dozen stamp set that was stamped on Summer Starfuit cardstock (I used a Stampin' Write Marker to color in just the greeting since the stamp also has a pumpkin which I didn't want to use on this card and punched it out with the Word Window Punch (once again sponged round the edges) and popped it up with dimensionals as well. 
 
I played around with this card a lot but in the head I'm absolutely in love with how it turned out, it has a fun design without being either too scary or kiddish which I love.  With all the great coordinating Halloween projects in the Holiday catalog it's going to be so fun and simple to make fabulous projects, I can't wait.
 
Thanks for taking the time to stop by and I hope I've inspired you with fun ideas using products from the Halloween suite (I would love for you to leave a comment and let me know what you thought of my project) and please take the time to follow along the hop, Annie is next up and you'll definitely want to see what she has to share. 
 
Thanks and happy stamping!


Blog Hop Participants:
  1. Shellie G. of Craft Smashup
  2. Pam S. of Stampin' in the Sun!
  3. Rose C. of Stamp with Rose
  4. Tonya B. of Stampin' with Tonya
  5. Dawn S. of Dawn's Creative Chalet
  6. Darcy J. of DJ's Stampin' Place
  7. Pamela W. of Stinky Tofu
  8. Kim R. of Stamping with Kim
  9. Heidi B of Stuck on Stampin'
  10. Jennifer B. of NW Stamper
  11. Bree R. of Craft-somnia
  12. Diana E. of Stampin' Fun with Diana
  13. Annie L. of Love Me Cards
  14. Jennifer C. of Happy 2 Scrap 4 Life
Pin It!

Wednesday, August 7, 2013

August Just Cards Class Projects

Good morning friends!  I'm loving the continued cooler weather we're experiencing this month (very rare for August) so I want to make sure to enjoy it while it lasts (lots of walks/runs outside, working in the garden, and enjoying time with friends and family).  I'm also really excited to share with you the projects for this months Just Cards class which will be this Sunday, August 11 at 2:00 PM.  We'll be making lots of fun card using items from the newly released Holiday catalog as well as all occasion cards.   


There is still time to RSVP so please let me know no later than Friday, August 9 if you want to come to reserve your spot.  When you register please don't forget to let me know if want the Christmas card add on option.  It'll be a fun, relaxing afternoon of stamping, can't wait!

Hope to see you Sunday!

Diana
Pin It!

Tuesday, August 6, 2013

2013 Christmas and Holiday Catalog has Been Released, It’s Sure to Knock Your Socks Off!


The new Holiday catalog was released this month and it is completely fresh and fabulous!  There are so many great ideas and products you won’t know where to start.  Plus with the catalog there are even more kits and bundles available than ever before which will make all your crafting a breeze. There are numerous Christmas, Thanksgiving, and Halloween project inspirations that can get you started for lots of fun and beautiful projects, gifts, décor, cards, etc. (whatever you’re looking for).

You can check out the beautiful 40-page catalog HERE, and below are just some of the highlights that are so fun and beautiful!

          * NEW “Season of Style” This & That scrapbook tools (this is especially designed to have you completely organized for the entire holiday season)
  
N          * NEW Chevron Punch

         * NEW “Festive Flurry” snowflake stamp set and coordinating Big Shot Framelits

        * NEW Bracket Label Punch and coordinating “Tags 4 You” stamp set (can purchase this as a bundle for a 15% savings)

         * NEW Exclusive Thinlets and Framelits for the Big Shot (now you can make swing cards that are sure to WOW in seconds!)

        * NEW Embossing Folders (Aidan has already decided that the Stylish Stripes embossing folder is “wonderful”)

    * NEW Silver and Gold Foil Paper, 12 x 12, that you can punch, cut with the Big Shot, etc. for an elegant touch
 
        * NEW Holiday Banner Kits, Tablesetting Kit, and gift packaging galore (even a Big Shot die to make custom bows).
        
                  * PLUS of course lots of fabulous new Stamp Sets for any occasion!

B    Below are some pictures of display boards from convention showing off some of the fabulous projects in this catalog.

 Halloween Collection

Thanksgiving Collection

 Season of Style This and That Journal Collection

 
Another view of the This and That Holiday Collection


Create a Banner Kit


Also new to this catalog is a great new augmented reality feature--available today--to see videos that show our products in action. It's easy enough for newbies, fun enough for tech-savvy users, and free!
  1. Install the free Layar app to your smartphone or tablet.
  2. Using the Layar app, scan any catalog page that has the Stampin' Up! Interactive icon on it.
While you're using this feature, be sure to share your favorite products and videos on social media so your friends can see what there is to love about Stampin' Up! products. I've tried this new feature out and it's pretty cool!

You should have received your catalog in the mail but if you didn’t, let me know and I can get one to you, you can contact me at cdeichfeld@msn.com.  I’m finalizing the details on lots of fun projects using products from this catalog so you’ll want to make sure to mark them on your calendar and save the date.  And let me know, I would love to schedule a personalized party for you and your friends and we could develop the theme together so it would be a great evening out!
Pin It!

Monday, August 5, 2013

Create with Connie and Mary Color Challenge: Spread the Joy

Happy Monday friends!  August is really starting off with a bang and we're looking forward to lots of fun this month.  We celebrated Aidan being awarded his black belt in Tae Kwon Do on Saturday (so proud of him and all the hard work he put into preparing for this) and Chris' birthday is this week so we have lots of fun things planned for this weekend as well.  So when I sat down to work on my card for this weeks Create with Connie and Mary Color challenge I saw the newly released stamp set Spread the Joy on my desk and knew it would be perfect for how I'm feeling.  This is a great stamp set that was designed my Stampin' Up! employee Emily Montoya as part of the first round of In with You stamp design contest.  The images in this set are so unique and really fresh and fun.  This card starts with a Smoky Slate cardbase and then I added a piece of Basic Black cardstock that was embossed with the Big Shot and the newly released Stylish Stripes embossing folder.

I added a piece of Bermuda Bay Designer Series Paper along the middle that I matted with some Silver Glimmer Paper for a little bling.  I also added some Smoky Slate Chevron Ribbon and Basic Black 3/8" Taffeta Ribbon.  The greeting was inked with Stampin' Write markers before being stamped on Whisper White cardstock and being matted with Smoky Slate.  The final touch was to add a Bermuda Bay Designer Button with a bow made from Whisper White Baker's Twine.

I have to admit, I'm so in love with the colors and end result of this card, it just makes me smile every time I look at it.  I hope you enjoy and you still have time to play along with this color challenge, or check out some of the other great ideas.

Have a great day,

Diana

Pin It!

Friday, August 2, 2013

Fab Friday Sketch Challenge: Million & One

Happy Friday stamping friends!  I'm glad you could stop by this morning, I have a fun card to share with you for this weeks Fab Friday sketch challenge.  This sketch  gives a fun idea to start but really leaves open lots of possibilities.  My cardbase is Raspberry Ripple and I added a piece of Very Vanilla cardstock that was stamped with the Dictionary stamp set in Crumb Cake and sponged around the edge and all over the layer so it's nice and distressed.  To this layer I also added the ampersign from the Hello, Lovely stamp set (this is a great new set that has some great images) stamped in Raspberry Ripple, stamped off once for a lighter effect. 

The greeting is from the new Million & One stamp set and was stamped in Midnight Muse and punched out with the 2 1/2" circle punch, and sponged around the edge with Crumb Cake.  I matted this piece with a flower that was cut with the Big Shot and the Floral Frames Framelits in Summer Starfruit.  I attached this piece to the top of the card and then used the paper trimmer to trim off the top.  For the decorative accent I added a piece of Summer Starfruit Stitched Satin Ribbon, an arrow stamped with the same Hello, Lovely stamp set in Crumb Cake ink and cut out with my Paper Snips.  The flower uses the 7/8" scallop circle punch and the cardstock is Midnight Muse and I crumpled it up to add some texture before adding a Raspberry Ripple Dalia to the center of the flower.
 
I think this card is soft and elegant while being fun and whimsical at the same time, I really like how this turned out.  This layout is great since you could change the colors, elements, and greetings, for any occasion.  You should definitely save this sketch to give you inspiration in the future.
 
Have a great weekend and happy stamping!
 
Diana

Pin It!

Thursday, August 1, 2013

Thinlit Card Dies have Arrived, I'm in Love!

 
One of the exciting announcements from our annual convention earlier this month was the upcoming release of new Thinlit Card Die Framelits.  I was so excited when I saw these as they allow you to make fabulous swing type cards nice and simply using the Big Shot and the Thinlit.  I'm so excited for these that I decided to change the plan for our family Christmas cards and will be using these dies for our family card.  I'm placing my order early so I can get my hands on these. 
 
Also, remember I'm offering a special, see details HERE, for orders placed by the end of this weekend using the special hostess code and you can take advantage of this special to purchase these thinlits, or any other items on your wish list.

There is a lot more information on these dies below, including several stamp sets that coordinate with these dies to make fun, beautiful projects.

THINLITS CARD DIES

They've been called flip cards, flip flop cards, swing cards, and more-but they have always been a bit tricky to create. Not anymore! Our amazing new Thinlits Card Dies cut and score to create a card that flips in just one step.


Item Description Price
133479 Label Card Thinlits Die $40.95
133480 Circle Card Thinlits Die $40.95

Available August 1, 2013

These new card dies come with extra die pieces that have versatile designs, so you can use them on other projects, not just flip cards. (The Circle Card Thinlits Die comes with 10 total pieces; the Label Card Thinlits Die comes with nine total pieces.)
With the number of dies you're getting, plus the die that creates the card itself, the price is a great value-especially to create an interactive card!
  • They would make great announcements, invitations, or Christmas cards.
  • The main shape in the cards (circle and label) can work with a lot of our stamp images so you can create tons of different kinds of cards using many different stamp sets. Here are just a few suggestions to get you started:
Label Card Thinlits Die (item 133479):
  • Happy Day Stamp Set (item 130294 W item 130297 C)
Circle Card Thinlits Die (item 133480):
  • Worth the Wait Stamp (item 131094 W)
  • Five-Way Flower Stamp (item 131088 W)
Both card dies pair well with:
  • Oh, Hello Stamp Set (item 131931 W item 130733 C)
  • Yippee-Skippee! Stamp Set (item 131341 W item 131344 C)
  • Really Good Greetings Stamp Set (item 130330 W item 130333 C)
  • Regarding Dahlias Stamp Set (item 130324 W item 130327 C)
  • These dies also work well with our new magnetic platform (item 130658) so you can place the dies exactly where you want them!
Pin It!

Search This Blog