Sunday, November 30, 2014

30-Day Gratitude Challenge: Get Your Santa On

Good morning, it's Sunday and we've reached the last day of November and the end of my 30-Day Gratitude challenge.  How have you been doing?  We got home safely yesterday and are working on getting everything in place to start the new work/school week and month.  For my last card of this challenge of course I had to make a holiday card and the new Get Your Santa On stamp set is so cute I had to pull it out, along with my Blendabilities Markers (by the way, Blendabilities will be on sale for one day only tomorrow, so make sure to take advantage). 

I used Wild Wasabi for the cardbase and then embossed a piece of Whisper White cardstock with the Big Shot and Filigree Frame Embossing Folder.  I did also lightly sponge around the embossing with Cherry Cobbler ink.  Next I stamped the Santa from the Get Your Santa On with the Momento Ink pad and then colored it in with Blendabilities Markers.  I also used the Gold Pen to color in the buckle of Santas belt.  The greeting is from the Lots of Thanks stamp set, was stamped with Momento Ink on Wild Wasabi ink and then punched out with the Large Oval Punch and attached to the card with dimensionals.

This Santa is so cute (but I gave him a brown mustache and we all know it should be white) and I can't wait to use more of this set.  Have you been following along with this gratitude challenge?  Remember I'm offering a drawing of FREE blog candy for anyone who plays along with the challenge and shares their card either on my blog or FB Business page so you still have some time.

Below are easy ordering links for the products used on today's card:


Built for Free Using: My Stampin Blog


I hope you enjoyed this months challenge and the rest of your holiday weekend.

Happy crafting,

Diana
Pin It!

Saturday, November 29, 2014

Fab Friday Sketch Challenge: Bright & Beautiful

Happy Saturday!  Did you survive Black Friday shopping?  Black Friday is one of my favorite days, I love heading out with a friend in the middle of the night and strategically planning our stores so we can get the deals and cross as many gifts off the list as possible (usually I’m about 95% done after this one weekend which is awesome!)  There are just two more days left in the month and the 30-Day Gratitude card challenge and since Thanksgiving is over I’m moving on to Christmas cards for my last two posts.  Today’s card was designed using the FabFriday Sketch challenge layout and uses some of my favorite items (stars, yeah I know!).  I started with Cherry Cobbler for the cardbase and then added a layer of Early Espresso (it’s been a long time since I’ve used this color, don’t know why).  To this I added a piece of Under the Tree Speciality Designer Series Paper (can’t believe I’ve had this DSP package since July and this was the first time I’ve used it, oh my!) and matted the DSP with Garden Green cardstock.  This DSP is also awesome since it’s extra think which makes it perfect for making gift boxes and other 3D items where you need something to be more sturdy.

For the star I used the Bright and Beautiful stamp set and stamped the middle size star with Early Espresso ink on Cherry Cobbler cardstock and the small star was stamped with Versamark ink on Garden Green cardstock and heat embossed with the Heat Tool and Gold Embossing Powder.  Both the stars were cut out with the Big Shot and Star Collection Framelits and attached to the card with dimensionals (each star has dimensionals.  The greeting is from the Lots of Thanks stamp set and I used my Stampin’ Write marker to just in the part of the stamp that I needed (love being able to do this, makes the stamps even more versatile).  I used Paper Snips to trim the sides of the paper and sponged around the edge with Garden Green cardstock before attaching it with dimensionals.

There are so many different options with this sketch and I love to see what everyone comes up with based on the same sketch as a starting point

Below are easy ordering links for the products used on today’s card:

Built for Free Using: My Stampin Blog


Enjoy,

Diana
Pin It!

Friday, November 28, 2014

Sketch Frenzy Friday Sketch Challenge and Stylin' Stampin' INKspiration Friday Favorites: Big News

Happy Black Friday!  Now that we've all relaxed and enjoyed the turkey it means it's time to get serious since we're less than a month away from Christmas.  I've been shopping all night long and by the time you ready this I should be finished up and heading home to hit the hay.  Of course I can't leave you hanging, we have 3 days left in the 30-Day Gratitude challenge and it's also Sketch Frenzy Friday Day so I have a fun card for you.  Over on the Stylin' Stampin' INKspiration blog it's Friday Favorites so I decided to piggyback these all together and use some of my favorite items (and the stamp I used Big News, is currently on sale as part of the Online Extravaganza, can't beat that!)

The cardbase is Pistachio Pudding and I added a piece of Whisper White cardstock matted with Basic Gray cardstock for the greeting.  The greeting, from the Big News stamp set, is stamped in Bermuda Bay.  The "thank you" is from the same stamp set and is stamped in Strawberry Slush ink.  I punched it out with the Modern Label punch before sponging around the edge in Tangelo Twist ink and attaching it with dimensionals.

For some fun accents I added several flags using the Confetti Celebration Designers Series Paper.  For the star I used some Silver Glimmer Paper, the Big Shot, and the Star Collections FramelitsDimensionals help the star pop off the card.

This card is so bright and cheery, I love it!  An who doesn't like to hear how awesome they are?  This stamp set is a must have, it has great images for all types of occasions so you'll definitely use it a lot.

Make sure to check out the other design team cards and play along in the fun!  Also, in addition to the stamp set being on sale the Star Collection Framelits and Silver Glimmer Paper are both part of the Online Extravaganza (saving money on awesome products you already want, it's a win-win!!)


Below are easy ordering links for the products used on today's card.
Built for Free Using: My Stampin Blog


Have a great day!

Diana
Pin It!

Thursday, November 27, 2014

Proverbial Stampers Sketch Challenge: Mingle All the Way Thanksgiving Greetings

Happy Thanksgiving!   This is a holiday I love for the relaxing and slow approach to it (it does help that I’m not the chef in our house so everything I make is done in advance) and we always get together with friends which is always a lot of fun.  As a cardmaker I like to make and send cards to family for all holidays so I thought today I would share the card I made for my family Thanksgiving card, it’s my 30-Day Gratitude card challenge and I used the Proverbial Stampers November card sketch as the layout for this card.  I started with Soft Suede for the cardbase and then added a piece of Very Vanilla cardstock that I sponged around the edge with Cajun Craze ink.  I added two pieces of Color Me Autumn Designer Series Paper (you’ve probably been able to tell I’m really enjoying this DSP and the colors). 

For the main stamped image I used the Mingle all the Way stamp set and used Stampin’ Write Markers to color on the stamp before stamping on Very Vanilla cardstock.  I used the Chalk Talk Framelits and Big Shot to cut out the greeting (always stamp before cutting out with the framelits to ensure perfect alignment and then sponged around the edge with Cajun Craze ink.  I added a piece of Mossy Meadow 3/8” Stitched Satin Ribbon as a flag behind the stamped image.

I really like this card and used several different patterns of DSP for each of the cards and they all look great.  Plus these cards are pretty flat and “mailable” which the postman will appreciate.


Below are easy ordering links for the products used on today’s card:
Built for Free Using: My Stampin Blog


Enjoy and have a happy and safe holiday,

Diana
Pin It!

Wednesday, November 26, 2014

Hand Stamped Sentiments Card Sketch: Seasonally Scattered

It’s Thanksgiving Eve, and like millions of others we’ll be traveling today to visit friends (we love this annual tradition and the ability to reconnect and relax).  Before we head out I wanted to share today’s card for the 30-Day Gratitude challenge and I decided to use the Hand StampedSentiments sketch challenge as the starting point for today’s card.  Since I only have a couple more days for “fall” cards so today is another one.  I started with Crumb Cake for the cardbase and added a piece of Soft Suede cardstock that was used as a mat for a piece of Color Me Autumn Designer Series Paper. I added a strip of Mossy Meadow cardstock that was embossed with the Big Shot and Chevron Embossing Folder and then wrapped some Baked Brown Sugar Thick Baker’s Twine around the cardfront.

For the main stamped image I decided to change things up by using a different shape.   I started by cutting a large leaf out of Very Vanilla Cardstock using the Big Shot and Autumn Accents Bigz Die.  Next I used my Stampin’ Write Markers to color in the stamp from the Seasonally Scattered stamp set and stamped on the leaf (using your Stamp-a-majig allows for perfect placement!).   I used a sponge and Cajun Craze ink to sponge around the edge of the leaf for a soft effect.  Dimensionals were used to attached the leaf to the cardfront and helped it span over the Thick Baker’s Twine.

I didn’t know how this card would turn out with the leaf shaped greeting but it’s really fun, I’m going to have to keep this in mind for the future.

Below are easy ordering links for the products used on today’s card:

Built for Free Using: My Stampin Blog


 Enjoy and have a happy and safe day,

Diana
Pin It!

Tuesday, November 25, 2014

30-Day Gratitude Challenge: Rice Paper Technique

Good morning!  Today I'm over on the Stylin' Stampin' INKspiration blog sharing a super fun and easy technique that you'll love!!!  This is call the rice paper technique and adds some great texture to your card. 
For this technique you start by taking a piece of Whisper White cardstock and you stamp all over it (in this case I used Everything Eleanor and Lost Lagoon ink.  Next I take a piece of tissue paper (this technique is perfect this time of year since we have lots of tissue in our gift bags and packages) and I scrunch it up.  I take one of our glue sticks and add glue all over the front of the cardstock before attaching the tissue paper.  It's OK if the tissue is isn't straight, in fact it adds to the effect if it's not and you just rub the cardstock until the tissue paper is fully attached and all the air bubbles are removed.  Then all you have to do is trim off the extra tissue paper (doesn't this look cool??)  Now you can just use this like a regular piece of paper for your project.
 
 This is a close up of the finished paper

I decided to use my rice paper piece for the gratitude card I made for the 30-Day gratitude challenge I'm currently participating in.  The cardbase is Blackberry Bliss and I added a piece of Lost Lagoon cardstock that's embossed with the Big Shot and Polka Dot Embossing Folder.  My rice paper piece s matted with Basic Gray cardstock and then I added some Blackberry Bliss 3/8" Stitched Satin Ribbon.

The greeting is from the Blooming with Kindness stamp set and was cut out with the Big Shot and Ovals Collection Framelits before sponging around the edge with Basic Gray ink and attaching the greeting with dimensionals.  For a little extra I stamped one of the flowers from the Everything Eleanor stamp set in Blackberry Bliss and cut it out with my Paper Snips.  I added a few small pearls to the center of the flower for some bling and a dimensional was used to attach the flower to the cardfront.

Isn't this a fun technique?  It works great with so many different images and helps soften it.  You've got to give it a try.

Below are easy ordering links for the products used on today's card:

Built for Free Using: My Stampin Blog


Enjoy!

Diana
Pin It!

Monday, November 24, 2014

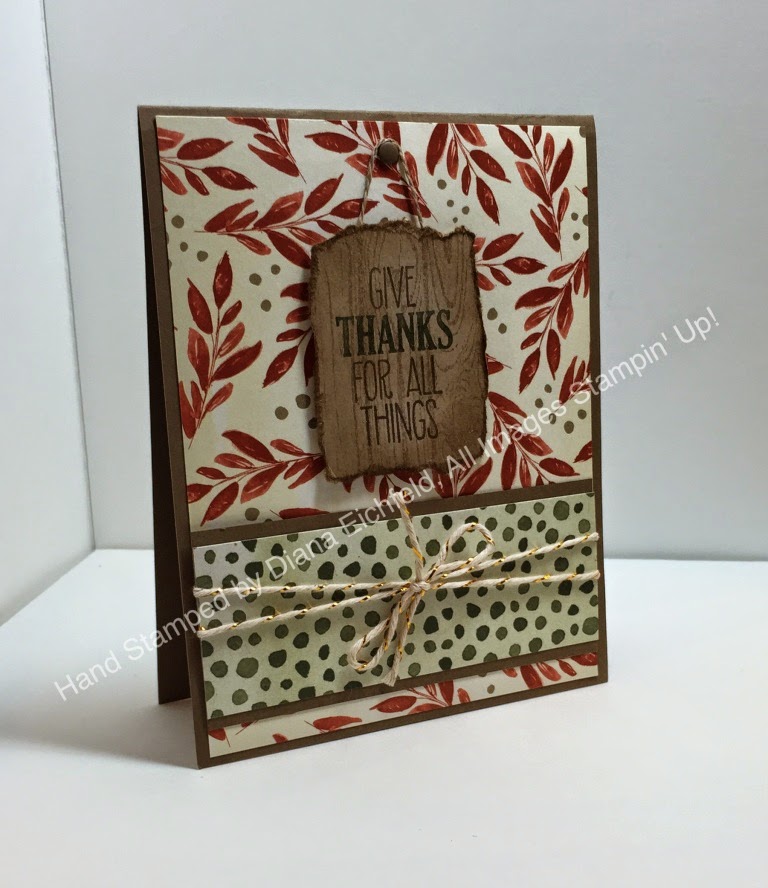
Stylin' Stampin' INKspiration Masculine Monday Gratitude Card: For all Things

Good morning!  What a crazy weekend, I don't think I stopped for more than a few minutes at a time but I was able to get lots of thinks crossed off my to do list (I love the feeling of crossing things off once they're complete, don't you?)  Today I'm sharing one of the cards I made this weekend.  Over on the Stylin' Stampin' INKspiration blog it's Masculine Monday and fit's always fun to see what the designers come up with for the "dudes" in our lives.  I also combined this with my 30-Day Gratitude challenge for a double bang.

The cardbase is Soft Suede and then I added a piece of Color Me Autumn Designers Series Paper (it really provided the color palate for the card.  I added another piece of DSP and matted it with Soft Suede cardstock before adding some Gold Baker's Twine.

For the greeting I took a piece of Crumb Cake cardstock and stamped the Hardwood stamp in Crumb Cake.  The greeting is from the For all Things stamp set and I used Stampin' Write markers to color on the stamp.  Next I tore around the edges and then sponged with Crumb Cake ink so it really gave the look of a wooden plank.  I used a Soft Suede Candy Dot and some Linen Thread to make it look like the greeting is a plank hanging on the wall.

This card turned out so fun, I really like it!

Below are easy ordering links for the products used on today's card:

Built for Free Using: My Stampin Blog


I hope you enjoy and have a fabulous day!

Diana
Pin It!

Sunday, November 23, 2014

Online Extravaganza Begins Tomorrow, Don't Miss Out on this Once a Year Sale!

Just in time for the holidays and to help you get a head start on your shopping Stampin' Up!'s annual Online Extravaganza begins tomorrow and runs through December 2 and you can save up to 50% off some fabulous products.  Also there are door busters that are being offered for one day only, for each of the Mondays for additional savings.  Also, for the first time you can perfect select refill kits from past Paper Pumpkin kits an you don't need to be a current Paper Pumpkin subscriber to buy the refill kits.  Just a reminder these products are only available while supplies last so don't wait to get those items that are on your wish list.  Happy shopping!!!!
 

Pin It!

30-Day Gratitude Card Challenge: Day 23

Happy Sunday!  What a productive day yesterday, I had lots of fun in the studio and even started bringing up the Christmas decorations to start getting the house ready for the holidays (we always try to have the Christmas decorations up before Thanksgiving so we have less to worry about).  I got up early this morning and was working on several of my Thanksgiving projects on my to do list so I grabbed my October Paper Pumpkin kit and made some fun treat holders for the kids.  Since I had some extra pieces I decided to use this kit for today's gratitude card. 

All I did was add a piece of Crumb Cake cardstock for the cardbase, some Old Olive cardstock that I embossed with the Big Shot an Chevron embossing folder.  The feathers, string, tag, and stamp are all from the Paper Pumpkin kit.  I did feel the card needed a little something extra so I added a wooden leaf from the Wooden Accents that I colored with Cajun Craze ink before attaching to the cardfront.

I love these Paper Pumpkin kits, you get a predesigned and prepped project delivered to you each month, plus you can use the pieces for lots of different projects if you would prefer (in this months kit there was actually an insert providing pictures of alternate project ideas using the kits.

Paper Pumpkin subscriptions would be a great gift to give yourself or a friend (these are also great for kids of all ages).

I hope you enjoyed today's card and have a wonderful Sunday!

Diana
Pin It!

Saturday, November 22, 2014

30-Day Gratitude Card Challenge: Day 22

Good morning!  It's time to get started and conquering my to do list and get all set for Thanksgiving next week.  I have to admit, there are times when we don't have lots of time to play and create the perfect card, sometimes we are short on time but still want to give something that is handmade and personal.  For today's gratitude card I decided to challenge myself to see what I could make in 5 minutes from start to finish (without anything started).  I started with Crumb Cake for the cardbase and stamped some of the images from the Gorgeous Grunge stamp set with Crumb Cake and Tangerine Tango ink.  Next  added a couple strips of the Retro Fresh Washi Tape (washi tape is so fun and easy, just rip and place). 

For the greeting I used one of the stamps from the Hip Hip Horray card kit and stamped the thanks in Tangerine Tango on Whisper White ink before punching it out with the 2" Circle Punch.  I used the same punch and cut out a circle of Coastal Cabana cardstock and embossed it with the Big Shot and Argyle Embossing Folder.  Both circles were attached to the card with Mono Liquid Adhesive.  The final touch was to add a small strip of rhinestones underneath the greeting to help accent it.

This card is so fun, you could whip up a  few in just a short time and will be set for any occasion (or wrap some up as a card set and give it as a gift).

Below are easy ordering links for the products used on today's card: 

Built for Free Using: My Stampin Blog


Enjoy your day!

Diana
Pin It!

Friday, November 21, 2014

Sketch Frenzy Friday Sketch Challenge: Seasonally Scattered

Another Friday is here and this is the last Friday to get everything done before the holidays start, how long is your To Do list?  Mine is crazy but I’m taking it one step at a time to make progress.  Today I have card I made for this weeks Sketch Frenzy Friday sketch challenge, quick and easy cards on the Stylin' Stampin' INKspiration blog, and decided to use it for my 30-Day Gratitude challenge card also (multitasking as much as possible!)  I decided to change things up and make a Christmas themed card that’s so soft and pretty, and it fits right in with all the cold and snow that has been in parts of the country this week.  I started with Smoky Slate for the cardbase and then added a piece of Lost Lagoon cardstock that I embossed with the Big Shot and Stylish Stripes Embossing Folder.  Next I added a piece of All is Calm Specialty Designer Series Paper.  In the bottom corner I added three snowflakes from the Frosted Sequins Embellishments and then added rhinestones to the center of each snowflake for some extra sparkle.

For the stamped image I used the Seasonally Scattered Stamp set and added ink to the stamp (Pool Party, Lost Lagoon, and Pear Pizzaz) with sponge daubers to create a fun ink effect.  I cut this piece out with the Big Shot and Ovals Collection Framelit and made a mat using the Silver Glimmer Paper and the Labels Collection Framelits.  Since I wanted to make this a gratitude card I stamped the thank you greeting from Teeny Tiny Wishes, punched it out with the Small Oval Punch.  I sponged around the edge with Pear Pizzaz ink before attaching the oval to the cardfront with a dimensionals.

I have to admit this card looks over the top but I was able to pull it together in no time (that’s the beauty of making your own cards and projects, they look fancy and no one has to know how long they took, it’s our secret!!).


Below are easy ordering links for the products used on today’s card:

Built for Free Using: My Stampin Blog


Enjoy and have a wonderful weekend,

Diana
Pin It!

Thursday, November 20, 2014

30-Day Gratitude Challenge: Day 20 Mingle all the Way

Thanksgiving is a week from today, how is it possible?   Since I’m running out of time to enjoy all the great fall themed products we have I decided to use that as the inspiration for today’s 30-Day Gratitude card challenge creation.  When I first saw the Mingle all the Way stamp set in the Holiday catalog I knew I had to have it and would have so much fun with all the greetings, in particular this Thanksgiving saying (how many Thanksgiving sentiments do we really have???)

The cardbase is Cajun Craze and I added a piece of Mossy Meadow that was embossed with the Big Shot and Woodgrain Embossing Folder.  Next I added a couple of flags using the Color Me Autumn Designer Series Paper as well as a piece of Mossy Meadow 3/8” Stitched Satin Ribbon.

For the stamped image I used Stampin’ Write markers to color in the greeting from the Mingle all the Way stamp set and stamped it on Whisper White cardstock punched it out with the 2 ½” Circle Punch and then sponged around the edge with Cajun Craze ink.  I cut a mat for the greeting with the Big Shot and Decorative Window Collection Framelit and Crushed Curry cardstock before embossing it with the Perfect Polka Dot Embossing Folder and then sponging around the edge with Cajun Craze ink.  This piece was attached to the cardfront with dimensionals.

For a fun accent I tied a double bow using Linen Thread and the fabulous Autumn Wooden Elements and then attached it to the card with a Glue Dot.

I love all the different textures and elements in this cards, gives your eye lots to enjoy.

Below are easy ordering links for the products used on today’s card:

Built for Free Using: My Stampin Blog


Enjoy and have a great day,

Diana
Pin It!

Wednesday, November 19, 2014

Holiday Gift Card Holder: Santa Suits Up

Sometimes just one’s is not enough and I’ve been having fun making lots of projects that are so cute.  So today on the Stylin’ Stampin’ INKspiration blog we’re sharing gift card holders and the designers have lots of great ideas to help you package your gift card so it really impresses.  One of the great new items in the Holiday catalog that isn’t getting a lot of love right now is the new Gift Card Envelope and Trims Thinlit Die.  This set makes a super cute and easy gift card envelope along with several different tags and enclosures to finish the envelope.  I’ve also figured out that these envelopes perfectly hold a fun size back of plain M&M’s or Skittles so I’ll be using it for school class gifts in the future.  I’m in love with the classic look if Santa’s suit so I used that for inspiration for this gift card holder.  I used the die and a piece of Smoky Slate cardstock to cut the envelope and then cute two of the circles in black for the back enclosure.

To decorate the front I took a piece of Real Red cardstock and embossed it with the Big Shot and Perfect Polka Dot Embossing Folder.  Next I added a strip of Basic Black cardstock, a square of Silver Glimmer Paper, and then a small square of Basic Black on top (love how that easy layering make the buckle look.  For the greeting I used the Project Life Holiday Cheer stamp set and stamped it in Real Red cardstock and cut it out with the Big Shot and Itty Bitty Framelits (I trimmed off one side) and attached it to the front with a dimensional before tying a small know in 1/8” Silver Ribbon and attaching it with a Glue Dot.

For the back I kept it pretty basic, I used my paper piercer to make the holes in the black circles and the envelope flaps and used the Mini Silver Brads to attach them so I could add some Basic Black Baker’s Twine for the ties and they would wrap around the circles to hold everything in place.  Of course I had to add a “to” and “from” so I used the Many Merry Stars stamp set (from the Holiday Supplement) and stamped them in Real Red.

I have to admit I absolutely love how easy and fast it is to make gift card envelopes with this die, maybe I should do less shopping and give more gift cards so I can make more of these (haha, that’s a whole other story!)

Below are easy ordering links for the products used on today’s card:

Built for Free Using: My Stampin Blog


I hope you enjoyed this project and it’s given you an idea to help with your upcoming holiday gift giving need. 

Happy creating,

Diana
Pin It!

Create with Connie and Mary Sketch Challenge Meets 30-Day Gratitude Challenge: Another Thank You

Welcome Wednesday!  I’ve been enjoying a busy but productive week so far, there’s a lot I want to take care of before Thanksgiving so I’m trying to fit it all in or make up project kits to take with me (if you see my car on the highway on Wednesday afternoon I’ll be the one making Christmas cards in the passenger seat, haha!)  I today I’m sharing two different projects this is my 30-Day Gratitude card challenge card and I have another project that you’ll have to come back to enjoy.  Today I decided to play along with the Create with Connie and Mary Sketch challenge to provide some fresh inspiration for today’s card.  I used Pool Party for the cardbase and then embossed a piece of Smoky Slate cardstock with the Big Shot and Modern Mosaic Embossing Folder before matting it with Real Red cardstock.  Next I used two different patterns of DSP from the Flashback Designer Series Paper for some fun patterns.  For the greeting I used the Another Thank You Photopolymer stamp set and stamped in in Real Red ink on Very Vanilla cardstock and cut it out with the Circle Collection Framelits.  It’s matted with a piece of Real Red cardstock that had been cut out with the Starburst Framelit Collection.  The final touch was to add some Silver Baker’s Twine that I tied into a bow (I used two pieces for a doubly fancy bow, haha!)


This card is so bright and cheery it really helps on these cold fall days when I just want to snuggle under the blankets.  I hope you’re still playing along with this challenge, if you are you should have quite the collection of cards to show your appreciation.


Below are easy ordering links for the products used on today’s card:

Built for Free Using: My Stampin Blog


Enjoy,

Diana
Pin It!

Tuesday, November 18, 2014

Paper Craft Crew Sketch Challenge Meets SSI Stamp Focus for Fall Gratitude Greetings


Good morning!   I have to admit I love doing this gratitude challenge each year but it’s a lot of work, I’m impressed with people who are able to craft and be creative every day.  I wish I had the time but like most of us there are lots of priorities that all pull on my time and we’re managing priorities to get everything done, but showing appreciation is so important.  For today’s gratitude card, I decided to combine the Paper Craft Crew Sketch Challenge and the Stylin' Stampin' INKspiration blog stamp set focus, Truly Grateful for a really pretty card.  I used Sahara Sand for the cardbase and then added a layer of Cajun Craze cardstock that’s embossed with the Big Shot and Chevron Embossing Folder.  I added a piece of Color Me Autumn Designer Series Paper that was matted with Mossy Meadow cardstock and some Mossy Meadow 3/8” Stitched Satin Ribbon was wrapped around the DSP layer.  I also added a couple flags of DSP showcasing the coordinating colors and patterns.

For the main stamped image I took a piece of Very Vanilla cardstock and I stamped the Chevron woodgrain image from the Truly Grateful stamp set (love this image!!) in Sahara Sand ink.  I stamped the greeting in Cajun Craze ink and the acorn was stamp in Soft Suede ink twice (once on the background stamped piece and a second time on a piece of scrap Very Vanilla cardstock).  I used Stampin’ Write Markers and a blender pen to color in the acorn before cutting it out with Paper Snips.  The acorn was attached with a dimensional.  The final touch was to add 3 pearls along the bottom of the DSP piece (I used the darkest Wisteria Wonder Blendabilities Pen to color the pearl before attaching it to the cardbase).

This is such a great stamp set, I’ll admit when it was first released I wasn’t WOW’d by it but then I started playing and really fell in love (and was so happy when the stamp set was carried over into this catalog).  Not only does it make great fall cards but it works great for masculine cards as well.


Below are easy ordering links for the products used on today’s card:

Built for Free Using: My Stampin Blog


Have a great day and enjoy,

Diana

Pin It!

Monday, November 17, 2014

30-Day Gratitude Card Challenge: Day 17

I'm back again (I promised) to share today's gratitude card.  I like make quick and easy cards just as much as over the top detailed cards since they can still pack a WOW!  I subscribe to Stampin' Up!'s Paper Pumpkin subscription program (I love receiving different, predesigned projects in the mail each month, just ready to create).  A couple of months ago we received this fun card kit that had these die cut cardfronts and I hadn't made these cards so I decided to make this one for today's card.  I used all the elements in the card kit and just added the stamped polka dots using the Dotty Angles stamp set. 


This is such a bright and cheery card and I love the added pink sequins, so fun!

Enjoy the rest of your day!

Diana
Pin It!

Stylin' Stampin' INKspiration Scrapbook Sketch Challenge: Snow Day Fun

Good morning!  After  fast paced, fun filled weekend it's back to the weekly routine (it's it really possible that Thanksgiving is less than 2 weeks away???)  Over on the Stylin' Stampin' INKspiration blog it's time for the monthly scrapbook sketch challenge and Jennifer gave us another fun sketch that really lets you focus on a great picture.  Since it's cold hear and they're actually talking that we may see some snowflake this week I thought it would be fun to look back at the snow fun last winter.  This page shows a great snow day Aidan enjoyed playing with a friend and building a snow tunnel.


Once again I used My Digital Studio for this page and started with a predesigned layout and then removed all the elements and extra photo boxes and rebuilt the page (I really liked the background, thought the hexagons reminded me of snow.  It's great to try to use items for something they were not originally intended for and see what you come up with.

Below is a list of the downloads used on this page:

Background
     Card Stock/Baja Breeze

Embellishments
    _Designer Kits/Keep This Memory - frames/Keep This Memory - hexagon frame
    _Designer Kits/Keep This Memory - frames/Keep This Memory - hexagon frame
    _Designer Kits/Keep This Memory - frames/Keep This Memory - hexagon frame
    _Designer Kits/Keep This Memory - frames/Keep This Memory - hexagon frame
    _Designer Kits/Keep This Memory - frames/Keep This Memory - hexagon frame
    _Designer Kits/Keep This Memory - frames/Keep This Memory - hexagon frame
    Burlap Ribbon\Burlap Ribbon - folded
    Top Notch Woodcuts\Top Notch - top notch
    Staple & Stitching\Chocolate - Simple Stitches line 13

Stamps
    _Designer Kits/Keep This Memory - stamps/Keep This Memory - flower, Color = 117,157,161
    _Designer Kits/Keep This Memory - stamps/Keep This Memory - flower, Color = 117,157,161
    _Designer Kits/Keep This Memory - stamps/Keep This Memory - flower, Color = 117,157,161
    _Designer Kits/Keep This Memory - stamps/Keep This Memory - flower, Color = 117,157,161
    _Designer Kits\Frosty Day II\Frosty Day II - snow day, Color = 230,WATERMARK 255,255,255

Punches
    Basics\Hexagon Punch, Fill Color = 124,166,171
    Basics\1.25 Square Punch,  Filled with: Designer Series Paper\_Designer Kits\Keep This Memory - designer series paper\Keep This Memory - paper 7
    Basics\1.25 Square Punch,  Filled with: Designer Series Paper\_Designer Kits\Keep This Memory - designer series paper\Keep This Memory - paper 4
    Basics\1.25 Square Punch,  Filled with: Designer Series Paper\_Designer Kits\Keep This Memory - designer series paper\Keep This Memory - paper 8
    Basics\1.25 Square Punch, Fill Color = BASIC BLACK 19,27,29

The designers are sharing some great ideas so make sure to check them out for additional inspiration. I'll be back later today with my gratitude card so make sure to check back.

Enjoy!

Diana 
Pin It!

Sunday, November 16, 2014

30-Day Gratitude Card Challenge: Day 16

What a great Saturday!  Despite the cold weather we had some great family time and enjoyed seeing all the lights to get us ready for the holidays (and get a little exercise at the same time, BONUS!!!)  I’m now all warmed up and looking forward to a workout and then relaxing today before we head back to work, but not before I share with you today’s gratitude card.  Today’s card is another all occasion card that’s so fun and easy (and you could make lots of them very quickly and get different effects by changing the colors, paper, etc.  I used Sahara Sand for the cardbase (I really like to use light colors for the cardbases so they’re easy to write in, remember the point of these is to send them to friends and loved one’s).  Next I added a piece of Hello Honey cardstock that was embossed with the Big Shot and the Decorative Dots Embossing Folder.  Next I added a piece of DSP from the Moonlight Designer Series Paper Stack and matted it with Blackberry Bliss cardstock.  I wrapped a piece of Hello Honey 3/8” Stitched Satin Ribbon around the DSP and tied a knot using the Hello Honey and Blackberry Bliss 3/8” Stitched Satin Ribbon.

The greeting is from the Yippee-Skippee stamp set and I used the Stampin’ Up! Markers to color on the stamp before stamping on Whisper White cardstock.  The greeting was punched out with the Large Oval Punch and then matted with a piece of Sahara Sand cardstock punched out with Decorative Label Punch.  This piece was attached with dimensionals to the cardfront for a perfect accent!
 
There are so many times you just need to say thanks for something someone does and I love to have this type of card ready to go so I don’t miss the opportunity to share my appreciation.

Below are easy ordering links for the products used on today’s card:

Built for Free Using: My Stampin Blog


Enjoy the rest of your weekend,

Diana
Pin It!

Saturday, November 15, 2014

Scrappy Saturday: Halloween Project Life Style

I told you I would be back….of course it’s Saturday so I also have my Scrappy Saturday project to share.  I decided to change things up and not use My Digital Studio for today’s page (don’t worry I have another layout to share soon) but today I’m embracing the Project Life style of memory keeping.  Stampin’ Up! sells some great products to help make your memory keeping quick and fun.  What’s also great is you can use our traditional products as well with this approach.  I recently participated in a demonstrator swap where we made our own Project Life cards using our Stampin’ Up! products.  Today’s page uses the two cards I made for this swap, perfect for Halloween and I designed them to coordinate so I was able to finish the page in less than 5 minutes. 


I like my layouts to have dimension and with our framelits, ribbon, baker’s twine, and stamps I was able to create pocket inserts that match my need and have the extra layers and texture I enjoy.

Below is a list of products used on today’s layout and pocket inserts:

Built for Free Using: My Stampin Blog


Even if you aren’t into traditional or digital scrapbooking the Project Life approach is so fun and easy you should give it a try.  Stampin’ Up! has released some new limited edition projects for the Daily December memory keeping and I’m giving it a try and would love to show you how to take all those fabulous pictures you have on your phone (let’s be honest how often do they come off your phone to a medium you can enjoy in the future??) and into an album to enjoy and cherish.

Take care,

Diana
Pin It!

Search This Blog