

UPDATE: I've updated this post to include pictures of the files I used to make these projects as a special gift to you to help you make kits for your kids and teachers. Please note this is my design and while you can use it for personal projects I ask that you not use it to enter contests to to sell.
 Good
evening friends! I’m so excited to share
my inaugural posting on the new Stylin’ Stampin’ INKspiration Blog. I’ve joined a fabulous group of artists on
the design team and we’ll be sharing challenges, projects, techniques, and
ideas with you 5 days a week. The blog
was officially launched last week and already we’re having lots of fun. Today’s team is “Back to School” and Pam and
I are sharing some fun ideas now that summer is winding to an end and the
kiddos will be heading back to school.
For some reason I’m in love with the idea of “Survival Kits” right now
and made some for the kids that will be at the beach with us next week so I
thought I would make two different “Survival Kits” for back to school, one for
my son Aidan, and the other for his new teacher. The best part of these kits was I used My Digital Studio (MDS) to create them
so they were a breeze (trust me the hardest part was finding all the contents
for the kits.
Good
evening friends! I’m so excited to share
my inaugural posting on the new Stylin’ Stampin’ INKspiration Blog. I’ve joined a fabulous group of artists on
the design team and we’ll be sharing challenges, projects, techniques, and
ideas with you 5 days a week. The blog
was officially launched last week and already we’re having lots of fun. Today’s team is “Back to School” and Pam and
I are sharing some fun ideas now that summer is winding to an end and the
kiddos will be heading back to school.
For some reason I’m in love with the idea of “Survival Kits” right now
and made some for the kids that will be at the beach with us next week so I
thought I would make two different “Survival Kits” for back to school, one for
my son Aidan, and the other for his new teacher. The best part of these kits was I used My Digital Studio (MDS) to create them
so they were a breeze (trust me the hardest part was finding all the contents
for the kits. For
the bag topper I made the same one for each kit and used lots of fun digital
elements (I’ve included the full supply list of MDS “products” used at the end
of this post). I used the search
function (love it) in MDS to find all the different elements including the
lined paper, paperclips, A+ embellishment, etc.
I used the recolor tool on the embellishments (i.e. the apple and the
first day pencil) to add lots of color.
After printing out the toppers I cut them out and matted them on a piece
of Real Red Cardstock so I could staple the bags closed. I used the 1” circle punch to punch out the apple element and matted that on a
piece of Chocolate Chip cardstock that was cut out with the 1 ¼” scallop circle punch and attached
it to the topper with a dimensional.
For
the bag topper I made the same one for each kit and used lots of fun digital
elements (I’ve included the full supply list of MDS “products” used at the end
of this post). I used the search
function (love it) in MDS to find all the different elements including the
lined paper, paperclips, A+ embellishment, etc.
I used the recolor tool on the embellishments (i.e. the apple and the
first day pencil) to add lots of color.
After printing out the toppers I cut them out and matted them on a piece
of Real Red Cardstock so I could staple the bags closed. I used the 1” circle punch to punch out the apple element and matted that on a
piece of Chocolate Chip cardstock that was cut out with the 1 ¼” scallop circle punch and attached
it to the topper with a dimensional.
I
added so much loot to the kits that I ended up having almost a half sheet of
paper for each list but they fit great into the bags and added some structure
to the bag. I used the same lined paper
as the bag topper and then typed the poem directly in MDS (I got the actual
poems by searching the internet; unfortunately I’m not that clever!) I used a different color, size, and font to
highlight each of the items that’s in the kit for a fun twist.
For
Aidan’s survival kit I used the 6x8 cello
bag and for the teacher kit (since it had more “supplies” in it I used the gusseted cello bag which
provided plenty of room). I added a
little extra to the Starbuck’s gift card and just stamped the coffee cup from
the Perfect Blend stamp set and cut
it out in Whisper White, added the coffee collar in Crumb Cake, and colored in
the lid with a Soft Suede Stampin’ Write
Marker. And the best thing about
these projects? I have the files saved
so if I want to make them again all I need to do is reprint them and I’m good
to go and you can make 20 just as easily as one (but you’d need a lot more
supplies), or I can modify them for any other occasion.

Back of Aidan's Back to School Survival Kit
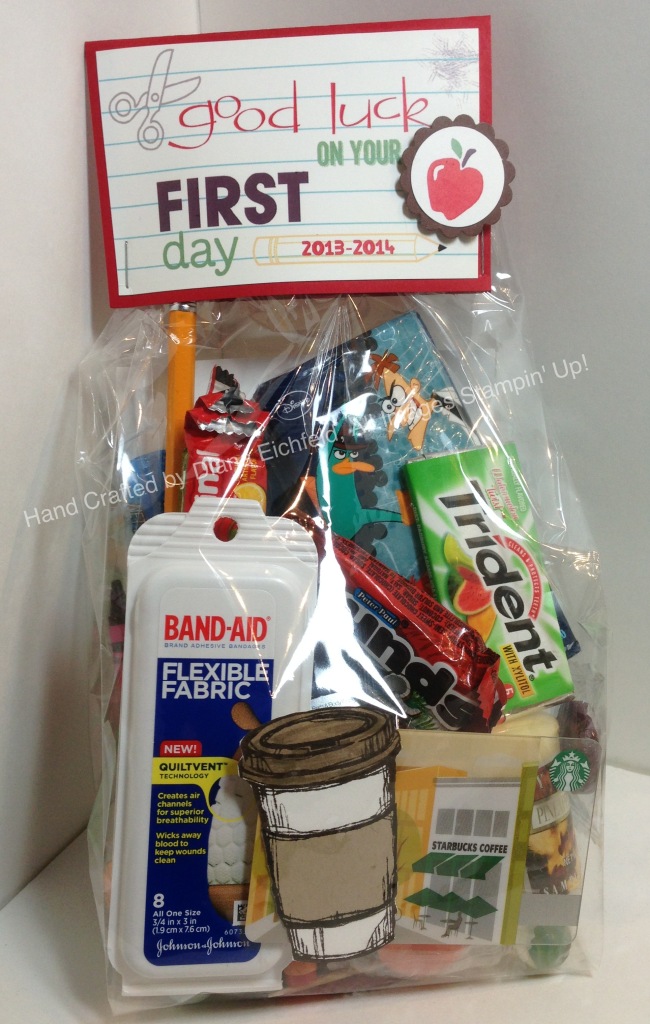
Front of Teacher Back to School Survival Kit

Back of Teacher Back to School Survival Kit
I’m
really excited because now my projects are DONE (whoo hoo!) and I can relax
until school starts in a couple of weeks, love it when a plan comes
together. I hope you enjoyed these
projects and they gave you some ideas to help your students and teachers start
the New Year off right.
Enjoy,
Diana
_Designer Kits\Back to School - embellishments\Back to School - lined paper
_Designer Kits\Back to School - embellishments\Back to School - lined paper
Stamps
_Designer Kits\Back to School\Back to School - paper clips, Color = 0,0,0
School Days\School Days - A+, Color = WILD WASABI 140,166,95
School Days\School Days - A+, Color = WILD WASABI 140,166,95
Page 2 Supply ListEmbellishments
_Designer Kits\Back to School - embellishments\Back to School - lined paper
_Designer Kits\Back to School - embellishments\Back to School - lined paper
Stamps
School Days\School Days - apple
School Days II\School Day II - scissors, Color = CHOCOLATE CHIP 104,73,71
School Days II\School Days II - first day
So Happy For You\So Happy For You - good luck, Color = REAL RED 199,44,58
_Designer Kits\Back to School\Back to School - paper clips, Color = 0,0,0
School Days II\School Day II - scissors, Color = CHOCOLATE CHIP 104,73,71
School Days II\School Days II - first day
So Happy For You\So Happy For You - good luck, Color = REAL RED 199,44,58
_Designer Kits\Back to School\Back to School - paper clips, Color = 0,0,0
School Days\School Days - apple


Great idea Diana!!! I'm going to be making some of these for my kids and their teachers :-)
ReplyDeleteLove these Back to School Kits! SO CUTE!!! Might have to copy for my Daughter's Preschool Teacher! :)
ReplyDeleteFabulous!! I love that you you did all of this in MDS...I need you to teach me! ;) My favorite part is that you changed the font/color of each supply included. Great job, Diana!
ReplyDeleteHeidi
Thanks Heidi! It's great how easy MDS makes projects.
DeleteThis is a great idea. The bags look fabulous. I also want to purchase one for my Son. I really like the idea.
ReplyDelete