Friday, February 27, 2015

Sketch Frenzy Friday Sketch Challenge: For Peeps Sake

Happy Friday!  What a crazy week, I have to say winter sure make resisting leaving but boy I’m ready for spring.  In order to help get us starting to think spring thoughts I decided to break out one of the new Easter sets, For Peeps Sake, for this weeks Sketch Frenzy Friday Sketch challenge.  This is a fun sketch and really let’s you play with multiple elements and accessories to really dress things up.  I started with Crisp Cantaloupe for the cardbase and then added a piece of Stacked with Love Designer Series Paper.

For 
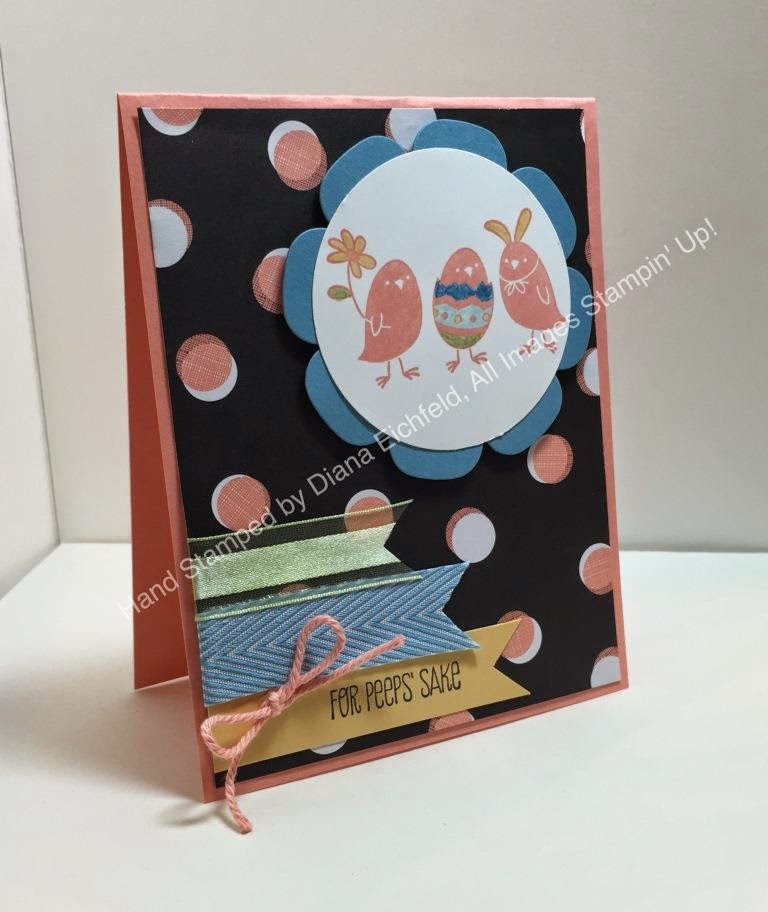
the main stamped image I stamped the little peeps in Crisp Cantaloupe on Whisper White cardstock and then used Stampin’ Write Markers to color elements in.  A 2” Circle Punch was used to punch out the design and then I matted it with a piece of Marina Mist cardstock that was cut out with the Big Shot and the Floral Frames Framelits.

For the greeting I used the For Peeps Sake stamp set and stamped with Black Memento Ink on So Saffron cardstock.  Then I decided to add several different ribbon elements, Marina Mist Chevron Ribbon, and Whisper White Organza Ribbon (that I died with Pear Pizzaz ink), as well as a bow made with a piece of Crisp Cantaloupe Thick Baker’s Twine.

This card is really helping start to think spring really is just around the corner (21 days) so we can make it.  I was actually born on Easter Sunday so this holiday has special meaning and I can’t wait to make more projects for the season.  The design team has shared some great cards so go check them out for inspiration and then play along and see what you can create.


Below are easy ordering links for the products used on today’s card:

Built for Free Using: My Stampin Blog


Have a great day and relaxing weekend!

Diana
Pin It!

Thursday, February 26, 2015

Stylin' Stampin' INKspiration Stamp Set Focus: Big on You

Good morning!  It's time for more snow today, I have said how ready I am for spring to arrive?  The nice thing about this cold weather is that it provides the perfect opportunity to stay inside where it's warm and craft.  Today on the Stylin' Stampin' INKspiration blog we're focusing on the Big on You stamp set and showing lots of great options using this stamp set.  Instead of a card, I decided to change things up and share a couple of Project Life style inserts.  I designed these to fit into one of our 6"x8" album pages and just need to add a couple of pictures.

The small insert is 3"x4" and started with a piece of Coastal Cabana cardstock.  I used the Heart Border Punch to punch along the edge and then added a strip of Real Red cardstock behind the punched out hearts.  I used Memento Ink to stamp the "I Do Love You" image from the Big on You stamp set so it could be the focal point of the insert.  Then I added a small heart that I punched out of Gold Glimmer Paper and the Itty Bitty Accents Punch Pack for a little bling.

The larger insert uses a different stamp set, You Plus Me and coordinates with the smaller insert by using the same colors, glimmer paper, and punch.

It's fun to use our traditional stamps, punches, papers, etc. to make inserts for our Project Life albums so you can completely customize your page.  There are several other samples the design team is sharing using this stamp set so make sure to check them out.

Below are easy ordering links for the products used on today's project: 

Built for Free Using: My Stampin Blog


Enjoy!

Diana
Pin It!

Wednesday, February 25, 2015

Project Life by Stampin' Up! Daily December: Finished Album

Good morning!  We’re back home and back to the daily routine (and secretly missing the warm weather and hoping for spring to arrive soon!)  So I realized the other day that in December I shared the start of my Daily December project (using the Project Life by Stampin’ Up! items) with you and promised I would share the finished album and haven’t.  So today’s your lucky day!  I finished the majority of my album on December 26 (sent all my Christmas pictures out to be printed Christmas night so they were ready the next morning).  Unfortunately I forgot one and then wanted to add pages from the rest of our holiday break so I just finished it.  Mainly I used the December Daily Project Life Card Kit and matching Accessory Pack but did also add some elements of my own to fit what I wanted.
So here’s my entire album: 


I have to say I absolutely love how this turned out and love that I have a finished album for us to enjoy right away, not having the pictures whiled away on my computer and phone where we can’t enjoy them.  I won’t be doing this daily photo concept for our entire year (let’s admit it our life isn’t that exciting) but for special times this is perfect and will definitely be going this again next year.
Even though this kit isn’t available for sale anymore Stampin’ Up! has some great Project Life items that can help you with your memory keeping, just ask me how!  Even better, schedule a ladies night for a fun with wine and photos and you and your friends can leave with pages completed and ready to enjoy!

Enjoy!

Diana
Pin It!

Monday, February 23, 2015

Stylin' Stampin' INKspiration Masculine Monday: Boys will be Boys

Good morning!  It’s Monday and we’re heading home today so I can’t really call it “Happy Monday” since it’s always sad leaving Disney but we’ve had a fabulous time with the races and celebrating Aidan’s birthday, lots of memories!  Today over on the Stylin' Stampin' INKspiration blog it’s Masculine Monday and you know it’s fun to work on those dude cards.  So today I decided to do something different and make a card for the “little dudes” since they’re just as important.  When the Boys will be Boys stamp set was released I had to have it since it’s so perfect for all the boys, you and young at heart.  This card is also bright and cheery and with a little metallic the guys will love it.

I started with Real Red cardstock and then added a piece of the Irresistibly Yours Specialty Designer Series Paper (another SAB freebie!!)  I used sponges and a rainbow of colors to create the rainbow effect on the paper and once I rubbed the paper with a paper towel to remove the excess ink the printed stars stay while and really pop against the colors.  I decided to mat this layer with Whisper White cardstock to help it really pop against the cardbase.

For the main stamped image I stamped the robot on Whisper White cardstock with Memento Black ink and then colored it in with my Stampin’ Write Markers (I could have used blendabilities but I was worried with all the small spaces I wouldn’t be able to really color like I wanted).  I punched the robot out with the 2” Circle Punch and then matted it with a piece of Pacific Point that was cut out with the Big Shot and Starburst Framelits.  For some accents to kind of look like cogs I cut out a coup of different size starburst using Silver Foil cardstock.  For the larger piece I layered it with a piece of Old Olive cardstock that was punched with the 1” circle Punch.  For the other I cut the inside of the silver starburst out with the ½” Circle Punch (hint:  punch the center out first and then you can center the starburst framelit so the hole is in the middle).  I used dimensionals to attach the smaller cog for dimension.

The greeting is from the same stamp set and was stamped on Pumpkin Pie cardstock.  To cut it out I used the Big Shot and Apothecary Accent Framelits (I just centered my strip so I just cut the decorative pieces on the edges of the greeting) and then attached it with dimensionals.

This card is so fun, it can’t help but brighten your little one’s day.  Make sure to check out the other design team creations for further inspiration.
Below are easy ordering links for the products used on today's card:
Built for Free Using: My Stampin Blog


Enjoy!

Diana
Pin It!

Sunday, February 22, 2015

Can You Case it? Design Team - Sketch Challenge CYCI #58

Good morning and Happy Sunday.  As you wake up and are reading this I’m just finishing up running the Princess Half Marathon and this weekend has been so wonderful (I definitely see how people get hooked on running Disney races, they really are amazing!!)   For this weeks Can You Case It? Sketch challenge we were given complete freedom to make anything we wanted, with any products we want.  In honor of this special day of course I had to use the Best Day Ever product suite (all of which you can earn for FREE during Sale-a-bration) since it really fits the day!  I started with Coastal Cabana for the cardbase (can’t believe this color will be retiring in a few months, I need to remember to stock up!  Next I added a piece of Soft Suede that was embossed with the Big Shot and Lovely Lace Embossing Folder.  I added a strip of the Best Day Ever Designer Series Paper along the side (this pack has some great patterns and colors). 

For the greeting I sued the Best Day Ever Stamp set and stamped with Soft Suede ink on Crumb Cake cardstock.  Then I used the Scallop Tag Topper Punch to punch the top and added a piece of Calypso Coral ribbon from the Best Day Ever Accessory Pack.  I also added another strip of the DSP to the bottom of the tag and used dimensionals to attach the tag to the cardfront.  The final touch was to add a Crushed Curry button (from the same accessory pack, see I managed to used every single item from that product suite on this one card) and threaded Calypso Coral Baker’s Twine through but button for a cute bow. 

I have to say, this card makes me smile and think happy thoughts every time I look at it.  And most of the products I earned for FREE, which also makes me happy.  The other design team members shared wonderful cards as well so please go check them out and then play along with the sketch, I would love to see what you come up with, and I hope your Sunday is the Best.Day.Ever.
Below are easy ordering links for the products used on today's card:

Built for Free Using: My Stampin Blog


Have an enjoyable Sunday!

Diana
Pin It!

Friday, February 20, 2015

Sketch Frenzy Friday Sketch Challenge: Simply Wonderful

Good morning and it’s a magical Friday!  We’ve arrived safely in FL and looking forward to a fun-filled, magical weekend.  I’ve been looking forward to this weekend for almost a year and can’t believe it’s finally here.  This morning I’m heading over to the race expo and then it’s off to Hollywood Studios for some park fun.  Of course I can’t leave you hanging for inspiration so since it’s Friday it’s time for our weekly Sketch Frenzy Friday Sketch challenge.  This week Patrice gave us a fun layout and I decided to use it to showcase some of the great Sale-a-bration items you can earn for FREE right now!!!  The card started with the This Day Project Life Mini Kit (these kits are good for so much more than just memory keeping!!).

I started with Crushed Curry for the cardbase and then added a piece Island Indigo cardstock that I embossed with the Big Shot and Fancy Fans Embossing Folder.  I added two pieces of ribbon from the Best Day Ever Accessory Kit (also a SAB freebie).  I used the Hexagon Punch to punch three pieces from the This Day Project Life kit for the patterned paper.  For the greeting I used the Simply Wonderful stamp set and used my Stampin’ Write Marker to just ink the part of the stamp I wanted and then punched it out with the Modern Label Punch and used dimensionals to attach the greeting to the cardfront.
 

For a fun accent I created a flower piece. First I stamped the flower using the Petite Petals stamp set and stamped on Rich Razzleberry cardstock and then used the Petite Flower Punch to punch it out.  I used my bone folder to help curl up the edges to create dimension to the flower.  For the center of the flower I used a Crushed Curry button from the Best Day Ever Accessory Pack and used some Calypso Coral Baker’s Twine to tie a bow in the center of the button.

I used a lot of different items on this card, but thanks to Sale-a-bration most of the items were free, plus this was a really quick card to pull together.  The other design team members shared some fun cards as well so please go check them out and then play along with the sketch, I would love to see what you come up with, it’ll be great for any project on your To Do list this weekend.

Below are easy ordering links for the products used on today’s card:

Built for Free Using: My Stampin Blog


Have an enjoyable Friday and hope you get some crafting time!

Diana
Pin It!

Wednesday, February 18, 2015

Fab Friday Color Challenge: Lotus Blossom

Good morning!  Well we got our first real snow of the year (I know, about time) so the kids got to enjoy all the fun yesterday, it's funny how snow play never gets old.  Today I decided to play along with the Fab Friday Color challenge and decided to lighten things up with a spring type card.  When I first saw the Lotus Blossom stamp set that's a part of the FREE Sale-a-bration items this year I had to get it but then it's sat in the studio and this was my first chance to play with it.  The set is so great since you can make beautiful card really easy!

I started with Crisp Cantaloupe for the cardbase and then added a piece of DSP from the Stacked with Love Designer Series Paper Stack (you can use this paper pack for so much more than Valentine's).  Next I used the Big Shot and Apothecary Accents Framelits to cut out the main stamped piece using Whisper White cardstock.  The Lotus Blossom stamp set is a two set stamp so I used all three layers, stamping darker to lighter, using Real Red, Calypso Coral, and Crisp Cantaloupe ink.  I did add Old Olive and Pear Pizzaz for the flower stem (it wasn't part of the color challenge but come on, every flower has to have a stem).  I also sponged around the edge of the stamped image with Calypso Coral ink.  I wrapped a piece of Crisp Cantaloupe Thick Baker's Twine around the stamped image before attaching it to the cardfront with dimensionals.

For the greeting I turned to one of my Paper Pumpkin stamp sets (from the December kit) and stamped in Real Red, sponged around the edge with Old Olive and punched it out with the Decorative Label Punch.  Of course I used dimensionals to attach the greeting as well. 

This card turned out so beautiful and I'll definitely be making up more of them for future occasions and changing up the colors for extra fun.  I have to say, I love the exclusive stamp sets in the Paper Pumpkin kits and how I can use them long after I've completed the kit projects.  Sale-a-bration is a perfect time to try out this great program since you can purchase one of the prepaid subscriptions and still earn Sale-a-bration rewards, let me know if you have questions.

Below are the easy ordering links for the products used on today's card:

Built for Free Using: My Stampin Blog


Enjoy!

Diana

Pin It!

Monday, February 16, 2015

Stylin' Stampin' INKspiration: Scrapbook Sketch Challenge #SSINKLS18

Happy Monday and Happy Presidents Day!  What a wonderful weekend but I think I need to head back to work to try to get some rest from the fun (if that's possible).  I have to say,  adore my family and spending time together and during Aidan's sleepover we got to know some of his school friends better and boy are they some great kids, so fun.  The boys are off today and enjoying the day together while I'm working.  Well since it's the third Monday of the month you know it's time for our monthly scrapbook sketch over on the  Stylin' Stampin' INKspiration blog.  I love these challenges as they are a great way to work on my scrapbook layouts, even if I don't get caught up, every little bit helps.


Today's page is from last years Cub Scout Pinewood Derby.  This is such a fun activity for the scouts, they take such pride in their creations, and no matter how their car performs in the race everyone has a fun time.  This is a pretty easy page that I created in My Digital Studio but I added lots of layers to help create texture and dimension to the page.


It's always great to see what other people come up with using the same layout and it really inspires me so make sure to go check out the other design team projects and then create away, remember you can use these sketches for cards, home décor, scrapbooking, the skies the limit.


Below is the supply list for the elements used on this page:


Background
     Color = CRUMB CAKE 179,161,131

Embellishments
    Staple & Stitching/Staple
    Staple & Stitching/Staple
    _Designer Kits/Keep This Memory - tags/Keep This Memory - tag 2
    Grosgrain Ribbon - knot/Baja Breeze Grosgrain Ribbon - knot
    Staple & Stitching\Chocolate - Simple Stitches line 5 (re-colored) Color = EARLY ESPRESSO 80,57,49

Stamps
    Splatters\A Split Second\A Split Second - splatter 1, Color = NIGHT OF NAVY 33,64,95
    Medallion\Medallion - background, Color = EARLY ESPRESSO 80,57,49
    Splatters\A Split Second\A Split Second - splatter 1, Color = NIGHT OF NAVY 33,64,95

Punches
    Basics\1.25 Square Punch,  Filled with: Designer Series Paper\First Edition - designer series paper\First Edition - 4
    Basics\1.25 Square Punch, Fill Color = CRUMB CAKE 179,161,131

Have a great day!

Diana
Pin It!

Sunday, February 15, 2015

Can You Case it? Design Team - Sketch Challenge CYCI #57

Happy Sunday!  What an interesting weekend.  We had a very successful birthday sleepover (oh my do boys have a lot of energy) and then the weather, it was crazy to look outside and hardly be able to see the house across the street due to the snow and wind, thankfully we got to enjoy it all from inside.  Today's Aidan's birthday so we're planning even more birthday fun but I wanted to make sure to share my card for this weeks Can You Case It? sketch challenge. We were given a challenge to make a card in under 10 minutes with only two layers, not as easy as it sounds.  Since I have birthdays on the mind I decided to go in that direction for today's card.

I started with Smoky Slate for the cardbase and then added a piece of DSP from the Flashback Designer Series Paper.  For the greeting I used the Amazing Birthday stamp and made my second layer, the greeting be the main focus.  I used Stampin' Write Markers to color on the stamp before stamping on Very Vanilla cardstock.  After stamping I used the Angled Tag Topper Punch to punch the top of the tag.  I also sponged all around the edge of the tag with Smoky Slate ink.  I did add a little extra element by stamping the "Make" from the greeting with Memento Ink on Smoky Slate cardstock, cut it out with Paper Snips and attached it to the tag with dimensionals.


To dress up the top of the tag I added a piece of Crushed Curry Chevron Ribbon and then tied a bow around the ribbon with some Basic Black Baker's Twine.  The final touch was to attach the tag to the card and I used dimensionals to pop it up.

This card turned out nice and bold and will definitely cheer up some on their special day.  The design team has made some fabulous cards so go check them out and then play along and share what you make so we can all enjoy!


Below are easy ordering links for the products used on today's card:

Built for Free Using: My Stampin Blog


Enjoy the rest of your weekend,

Diana
Pin It!

Friday, February 13, 2015

Sketch Frenzy Friday Sketch Challenge: Sassy Salutations

 Happy Friday peeps!  The weekend is almost year and we’re beyond excited.  Not only is it Valentine’s Day so I get to shower my boys with love, it’s Aidan’s birthday weekend so there are lots of fun festivities planned.  I will admit however that I’m really not looking forward to the really cold weather we’re supposed to get (if I’m going to be cold, which I don’t like, at least give me pretty snow so I can enjoy the view!)  Before the fun gets started it’s time for our weekly Sketch Frenzy Friday Sketch challenge.  Carol gave us this challenge this week and boy was it a lot of fun.  No I have to admit, this all started with my little scrap pile on my desk (come on we know we all have them, little pieces that weren’t used on a project but you didn’t want to throw away).  So pulled out my scrap pile so I could hopefully make some pretties with it this weekend and on the top was this gray circle and the gold cut out “HB” so that’s what I built my card around and it was really fun to see how it all evolved. 

I started with Island Indigo for the cardbase and then added a piece of Typeset Speciality Designer Series Paper.  Now this DSP is really fun, it’s thinner than our normal paper and kind of reminds you of old book paper so you can really have fun with it.  I started by scrunching it up in a ball and then smoothed it out, mostly, and sponged all over it with Basic Gray ink.  This really helped accent the wrinkles and add lots of texture and a more antique look.  Next I added a piece of Lost Lagoon Chevron Ribbon and Lost Lagoon DSP from the Regals Designer Series Paper Stack behind the greeting. 

The greeting piece is Sahara Sand and I stamped the greeting using the Sassy Salutations stamp set and Island Indigo ink and then sponged all over it with Basic Gray ink.  I also added a couple of pearls to the right side of the greeting piece (I made the pearls gold by coloring them with the Gold Stampin’ Dazzle Marker.  The final touch was to add the gray circle (that was originally punched out with the 2” Circle Punch) using dimensionals and glued on the “HB” (that were made using the Gold Foil Sheets, Big Shot, and the Little Letters Thinlits.

I hadn’t planned on making this such a masculine card but it definitely is heading that way which works.  I really had fun with this layout so I will definitely be using it again.  The other design team members shared some fun cards as well so please go check them out and then play along with the sketch, I would love to see what you come up with.

Below are easy ordering links for the products used on today’s card:

Built for Free Using: My Stampin Blog


Have an enjoyable Friday and a wonderful weekend!

Diana
Pin It!

Thursday, February 12, 2015

Stylin' Stampin' INKspiration February Blog Hop: Hearts, Hearts, Everywhere!

Happy Thursday, it’s time for this months Stylin’ Stampin’ INKspiration blog hop and with this time of year it’s only fitting that this months theme is all about hearts!  I know there are people out there who are still either looking for the perfect gift for their loved one or haven’t even started looking so this hop is perfect as we’re giving you lots of fabulous ideas and you have plenty of time (Valentine’s Day is this Saturday, just in case you forgot, haha!!!) 

As you hop along, please be sure to comment and show some love on every blog! We are always excited to hear from our followers! You should have just left stop number (3) on the Stylin' Stampin' INKspiration Blog Hop - (Laura at Crafty Chicks Creating). If so, you are in the right spot. If a link doesn't work or you get off track, you will find the full blog hop lineup below.


The first project I have for you is a card that uses two sets, Groovy Love, and That’s the Ticket, these sets are both in the Idea Book so you may have overlooked them with all the Occasions catalog excited.  I started with Soft Suede for the cardbase and then added a piece of Whisper White cardstock that I used the Hearts and Stars Masks and Real Red ink to sponge the hearts on the cardstock.  Next I added a couple of flags using the Stacked with Love Designer Series Paper.  For the heart I started by stamping the outline heart from the Groovy Love stamp set with Versamark Ink on Brushed Gold Cardstock and then heat embossed it with the Heat Tool and Black Embossing Powder and then punched it out with the 2” Circle Punch.  The heart is from the same stamp set and was stamped on Calypso Coral cardstock with Memento Ink (you could also heat emboss this if you wanted) and punched it out with the Sweetheart Punch and attached it to the circle with dimensionals.  A double bow tied with Basic Black Baker’s Twine is a perfect accent.

The greeting is from the That’s the Ticket stamp set and was stamped with Memento Ink on Soft Suede cardstock and then punched out with the Ticket Builder Punch.  Of course I needed an extra shot of bling so I added a small heart that was punched out of Gold Glimmer Paper using the punch from the Itty Bitty Accents Punch Pack and attached it with dimensionals

You know how much fun I have with gifts so I had to make a cute little container for Aidan’s Valentine’s Treats.  I started with the Hamburger Bigz Die and my Big Shot which made this box super easy.  I used Tombow Liquid glue on all the corners to make the box hold it’s shape.  Next I added a piece of DSP once again using the Stacked with Love Designer Series Paper Stack and then tied a bow around the box using some Silver Satin Ribbon.  The tag for the box is uses the Groovy Love set again for the heart (stamped this time in Basic Gray ink) and the greeting is from the Snuggles and Smootches Photopolyer stamp set.  I tied the whole tag around my ribbon using some more of the Basic Black Baker’s Twine.  

These projects turned out so cute and I’m still having so much fun playing with all the great love and heart themed products we have but I’m going to have move on soon (until I start thinking about anniversaries).

Below are easy ordering links for the products used on today’s projects:

Built for Free Using: My Stampin Blog


Make sure to check out the rest of the blog hop for lots of other great ideas.  If you click the “Next” button, you’ll go to Kathy’s site but you can also access any of the hopper’s site from the full blog list below.
http://katrinapscreativecorner.blogspot.com/2015/02/ssink-february-blog-hop-hearts.html

Blog Hop Participant List:
  1. Jennifer C. at Happy 2 Scrap 4 Life
  2. Jennifer G. at Jenny G Paper Crafts
  3. Laura at Crafty Chicks Creating
  4. Diana at Stampin Fun with Diana
  5. Kathy at Katrina P's Creative Corner
  6. Darcy at Dj's Stampin Place
  7. Cynthia at Ink-A-Doodle Creations
  8. Melissa at Stamp Doc
  9. Shellie at Craft Smashup
  10. Breelin at Craft-Somnia Momma
  11. Heidi at Stuck on Stampin'
  12. Kim at Stamping with Kim
  13. Tonya at Stampin' with Tonya
Enjoy and have a great day,

Diana
Pin It!

Monday, February 9, 2015

Stylin' Stampin' INKspiration Card Sketch Challenge: Boys will be Boys

Happy Monday!  What a wonderful weekend, a hint of spring to come which is so nice.  Aidan had a friends birthday sleepover this weekend so I decided to use this months Stylin' Stampin' INKspiration blog card sketch for the birthday card. All kids love Legos so the Boys will be Boys stamp set is so perfect (and it's one of the Weekly Deals this weeks so it's the perfect time to add it to your stamp collection.

I started with Daffodil Delight cardstock for the cardbase and then added a piece of Whisper White cardstock that has the Lego images from the Boys will be Boys stamp set stamped all along both edges using Black Memento Ink.

I used Real Red, Daffodil Delight, and Pacific Point Stampin' Write Markers to color in the Legos (these are classic Lego colors).  Next I added a piece of Basic Black Chevron Ribbon in the middle.  The greeting is from the same stamp set and was stamped with Memento Ink before being cut out with the Big Shot and Project Life Cards and Labels Framelits.  I sponged around the edge of the greeting with Pacific Point ink to help define the edges before attaching it to the card with dimensionals.  The final touch as to add a single Lego that I stamped, colored, and then cut out with Paper Snips before attaching it with dimensionals.

This is a great sketch that really provides lots of options and flexibility that you can use for any type of project.  Make sure to check out the other design team cards and then play along and share your card so we can all enjoy.

Below are easy ordering links for the products used on today's card:

Built for Free Using: My Stampin Blog


Enjoy!

Diana
Pin It!

Sunday, February 8, 2015

Can You Case it? Design Team - Color Challenge CYCI #56

Happy Sunday.  It’s time to take a break from weekend fun to bring you my card for this weeks Can You Case It? challenge.  This week we were given a color challenge, Real Red, Basic Black and Whisper White.  Now I’ll admit initially my mind went right to Valentine’s but I’ve been sharing so many love themed projects so far this year I decided to take a break and share a nice simple card using other products from the new Occasions Catalog I haven’t played with.  Once of the product suites is Adventure awaits and it includes an awesome stamp set with great greetings that are nice and large so they can be the focus point of the card (and would work equally well in memorykeeping) along with a coordinating paper stack that has some awesome graphic images on one side and photograph images on the other.  They’re so full of texture and work great with “dude” cards.

I started with Basic Black for the cardbase and then added a piece of Real Red cardstock that was embossed with the Big Shot and Polka Dot Embossing Folder.  I wrapped some Basic Black Baker’s Twine around the Red layer and then tied a bow.  The greeting is from the Adventure Awaits stamp set and was stamped with Memento Ink directly on the Adventure Bound DSP (this pattern looks like a sweater weave or rope). Then all I did was mat it with Whisper Whtie cardstock and attached it to the cardfront with dimensionals. 

This card came together really easily but it has lots for your eye to enjoy with all the textures (I want to just rub it, haha!!)  In fact I love this card so much this will be one of the cards we’re making in today’s Just Cards class (I know you’re excited if you’ll be attending).  The other design team members shared some fabulous cards as well using these colors so please go check them out and then play along with the sketch, are share your creation! 

Below are easy ordering links for the products used on today’s card:

Built for Free Using: My Stampin Blog


Enjoy the rest of your weekend!

Diana
Pin It!

Friday, February 6, 2015

Sketch Frenzy Friday Sketch Challenge & SSI Occasions Bundles: You Plus Me

Happy Friday peeps!  We’ve almost reached the end of the work week so let the fun begin, along with the usual family activities I have card class on Sunday that is always lots of fun and Aidan has a sleepover on Saturday, which means date night for mommy and daddy (whoo hoo!!!)  Before we get going with all that it’s time to share this weeks Sketch Frenzy Friday sketch challenge card.  This was a unique layout for me and I decided to combine it with the post we have over on the Stylin' Stampin' INKspiration blog focusing on the product bundles in the 2015 Occasions catalog.  I decided to us the Stacked with Love bundle and You Plus Me stamp set but I wanted to change things up and not make a Valentine’s card (I know!!!) so I decided to make an Anniversary card.


I started with Smoky Slate for the cardbase and then added a piece of Pistachio Pudding cardstock that was embossed with the Big Shot and the Decorative Dots Embossing Folder.  Next I added two pieces of DSP from the Stacked with Love Designer Series Paper Stack, as well as a piece of Silver Glimmer Paper. For the stamped piece I used the You Plus Me stamp set and stamped the ampersand in Crisp Cantaloupe and the little hearts in Black Memento Ink before cutting it out with the Big Shot and Oval Collection Framelits before attaching it to the cardfront with dimensionals.  For the greeting I used the Teeny Tiny Wishes stamp set and punched it out with the Word Window Punch and then matted it with Crisp Cantaloupe that was punched out with the Modern Label Punch.

I’ll admit this card turned out a bit more feminine than I had intended but love how all the different colors, patterns, and shapes play off each other.  The other design team members shared some fun cards as well so please go check them out and then play along with the sketch, I would love to see what you come up with.

Below are easy ordering links for the products used on today’s card:

Built for Free Using: My Stampin Blog


Have an enjoyable Friday and hope you get some crafting time!

Diana

Pin It!

Wednesday, February 4, 2015

Stylin' Stampin' INKspiration Blog: Valentine's Cards and Gifts Tags

Good morning!  With Valentine’s Day less than two weeks away the designers over on the Stylin' Stampin' INKspiration blog want to help you out with any last minute cards and gift packing you need to help your loved one’s feel special on the holiday so we’re sharing lots of ideas to spark your creativity.  I’m still working on a few items (thankfully I finished Aidan’s class gifts last weekend, he just needs to write the names on them).  I have two things I’m sharing with you today, a card and a coordinating gift tag that are so fun.

 I’ll start with the card, I decided to double things up and used the sketch challenge over on the Mojo Monday blog as the inspiration for this card.  I used Crumb Cake for the cardbase and then added a layer of Calypso Coral cardstock that I embossed with the Big Shot and Happy Hearts Embossing Folder.  Next I added two different pieces of DSP from the Stacked with Love Designer Series Paper stack and added some gold sequins from the Gold Sequin Trim in the top right corner of one piece for some added detail (I will admit I may have added a few to many, I just couldn’t stop, you know how it goes?)  Next I added a piece of 5/8” Natural Chevron Trim Ribbon and Calypso Coral Chevron Ribbon for some fun flags and texture.  The greeting is from the You Plus Me stamp set and I stamped it with Memento Ink on Calypso Coral cardstock before punching it out with the 1 ¾” Circle Punch.  Of course I needed a little more bling so I punched out a circle of Gold Glimmer Paper with the 2” Circle Punch to make the mat and attached it to the cardfront with dimensionals.  This card is nice and fun but since it has playful colors it doesn’t necessary scream Valentine’s so you could always use it for an Anniversary or other occasion to let someone know you’re thinking of them.
So another project I’m working on right now is gifts for Aidan’s teachers, he’s decided he just wanted to bake some cookies to give as a yummy treat.  So we can’t make those quite yet (well actually I made up some chocolate chip cookie dough, added Valentine’s M&M’s and then scooped the dough and froze it in balls so the mess is already made, we’ll just need to pop them on the cookie sheet and bake right before we give them, AWESOME!) but we can start working on the packaging for the cookies so it’s not a last minute project and super cute.  We’re going to put the cookies in cello bags and tie some ribbon so I wanted to make gift tags to attach to the cookies.  For this I used the Big Shot and On Film Framelits to cut some Crumb Cake cardstock.  Next I added another piece of DSP from the Stacked with Love Designer Series Paper stack and attached it to the tag and trimmed off the edges.  I also added a piece of Washi Tape from the coordinating Stacked with Love Designer Washi Tape.  The greeting is from the January Paper Pumpkin Kit and I just stamped with Memento Ink.  The heart is from the Groovy Love stamp set and was stamped in Real Red ink on Whisper White cardstock before punching it out with the Sweetheart Punch (it’s on sale this week as part of the Weekly Deals!!) and attached it to the tag with dimensionals.  As you know I have to have bling so I added a small heart that I had sitting on my desk from another project that was punched out of Champagne Shimmer Paper with the heart punch from the Itty Bitty Accents Punch Pack and attached it with a dimensional as well.

I love how cute the tag turned out and Aidan can write on the back of the tag so they’re all ready to attach to the cookies and deliver to his teachers (always love when we can get projects finished ahead of time!!)
Make sure to check out all the other great cards and projects the design team is sharing for ideas to help with all your Valentine’s holiday crafting needs.

Below are easy ordering links for the products used on today’s projects:

Built for Free Using: My Stampin Blog

 
Take care and enjoy!

Diana
Pin It!

Search This Blog