Showing posts with label Wink of Stella. Show all posts

Thursday, November 2, 2017

30 Day Gratitude Challenge: Day 2 (Paper Players Tic-Tac-Toe Challenge)

Good morning!  For today's gratitude card I decided to have a little fun and play along with the Paper Players Tic-Tac-Toe challenge.  I'll admit, this one stumped me a little bit and then I remembered the Christmas Staircase Thinlits I used this weekend to make a Christmas tree on a scrapbook page I made so I thought about trying to take some of the die cut pieces to make a wreath, haha so excited with that!!

I started with Garden Green cardstock for the cardbase and then added a piece of DSP from the Merry Music Speciality Designer Series Paper package for a great neutral cardfront.  The greeting is from the Wood Words stamp set and was stamped in Garden Green ink on Whisper White cardstock and punched out with the 1" Circle Punch.  I used the 1 1/4" Circle Punch for the mat using Cherry Cobbler cardstock and used a dimensional to attach the greeting to the cardfront.

Now for the centerpiece of the card....I used the Big Shot and Christmas Staircase Thinlits to cut several pieces of greenery (I believe I used 8-9 pieces but play around with it for the thickness of the wreath you prefer) out of Garden Green cardstock.  I started by laying them out in a circle before gluing to make sure I had enough and to know what size of background I would need.


Next I started gluing the pieces onto Whisper White cardstock using my Fine Tip Glue pen to only add glue to the bottom of the greenery so I could fluff up the branches.  Once I was finished with the wreath I added a bow tied with Cherry Cobbler 1/4" Double Stitched Ribbon.  To dress things up a little I went over all the greenery pieces with my Clear Wink of Stella Pen to add a little sparkle (you can see it better in this closeup).  The final touch was to mat the piece with Cherry Cobbler cardstock and attach it to the cardfront.


Here's the challenge that we were given, so many options.

I really love how this card turned out, it has a ton of texture but will still lay nice and flat for mailing which is perfect for Christmas greetings which often get mailed.  I work hard to make my Christmas thank you's before the business of the holiday season so there is no reason
not to send thank you notes for all the thoughtful gifts you receive during the holidays.


Below are easy ordering links for the products used on today's card:

Product List

Enjoy!

Diana
Pin It!

Monday, July 3, 2017

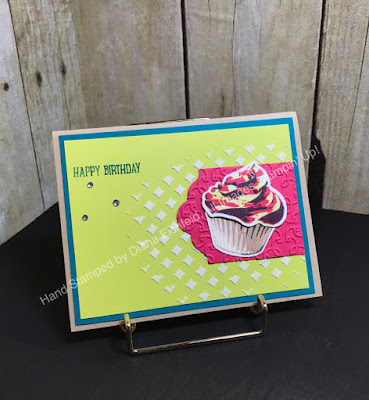
Stylin' Stampin' INKspiration Color Challenge SSINKCC47: Sweet Cupcake

Good morning and happy pre-holiday!  We enjoyed having a little early start to all the holiday festivities including the big fireworks display out at Great Meadows, always one of our favorites!  This weekend I also got to wish a special friend Happy Birthday and I made this card for her using the SSINKspiration blog color challenge.  My friend is gluten free so this was her gluten free birthday cupcake treat!

I started with Crumb Cake cardstock for the cardbase and then added a piece of Island Indigo cardstock as a matt for the Lemon Lime Twist cardfront.  On the cardfront I used some of the new Embossing Paste and the Pattern Party Decorative Mask so create this fun and easy background, and the Palette Knives you use to spread the paste are so fun, kind of like frosting a cake.  The greeting is from the Sweet Cupcake set and was stamped in Island Indigo ink and then I added a few rhinestones for a little bling.

For the main stamped image I stamped the cupcake using lots of layers of the color challenge colors and then cut the pieces out with the Big Shot and coordinating Cupcake Cutouts Framelits.  Everyone needs a little sparkle on their cupcake so I went over the blue frosting swirls with my Clear Wink of Stella Pen.  As a background for the cupcake I cut a piece of Melon Mambo cardstock out with the Lots of Labels Framelits and then embossed it with the Garden Trellis Embossing FolderDimensionals were used to pop the frosting up off the cupcake for a little extra height.

I love how fresh and fun this card turned out, perfect for happy birthday greetings.  Make sure to check out the other cards the design team made using this color combination and then we would love for you to play along with us and share what you create.

Below are easy ordering links for the product's used on today's card:

Product List

Enjoy!

Diana

Pin It!

Sunday, June 18, 2017

RemARKably Creative Blog Hop: NEW, NEW, NEW now that will Do!


Good evening and Happy Father's Day!  It was a wonderfully quiet and relaxing weekend for me with the empty house while they guys were canoeing down the Shenandoah but they made it home earlier today so I was able to check up on all the details and spoil Chris for Father's Day!  This evening we're launching this months Remarkably Created Blog Hop and sharing lots of fun ideas using new catalog items.  I'll admit, there are so many great items in the catalog I struggled a little trying to decide what to use (tough problems, I know!)  In the end I decided to use the Pocketful of Sunshine bundle since it has some cute images and I love how the matching framelits make it so the pocket will hold items.
 
 
I started with Berry Burst cardstock for the cardbase and then added a piece of Dapper Denim as a mat for the Crumb Cake cardfront.  On the cardfront I used the new Burlap background stamp and stamped in Crumb Cake ink, stamping off first so it is a more subtle effect.

Next I took the Pocketful of Sunshine stamp set and stamped the sunglasses in Berry Burst ink on Berry Burst cardstock, the money in Always Artichoke ink on Very Vanilla cardstock and the pocket using Dapper Denim ink and cardstock.  The coordinating Pocket framelits make cutting all the images out a breeze.  I added the greeting to the pocket by heat embossing it with Copper Embossing Powder and the Heat Tool.

I used my Clear Wink of Stella Pen to add some shimmer to the lenses of the sunglasses and attached them to the cardfront with dimensionals.  Also to make the money look a little more realistic I sponged it with Soft Suede ink before tucking it into the pocket.

This is such a fun stamp set and framelits, lots of potential, it would also be great for gift giving if you wanted to give money or a gift card and tuck it in the pocket.

Below are easy ordering links for the product's used on today's card:

Product List

Make sure to check out all the other great projects being shared as part of the blog hop, I'm sure your wish list will be growing, just like mine is!


Enjoy the rest of your weekend!

Diana
Pin It!

Tuesday, January 3, 2017

SSINKspiration 2017 Occasions Catalog Countdown #2: Urban Underground

All good things must come to an end, in this case it's our Christmas vacation so back to school and work we go!  Just a couple more days until the 2017 Occasions catalog is released so it's time for another additional of the SSINKspiration blog countdown, today it's about the Urban Underground Suite, one that I'm sure will be very popular for all the dudes we know and love.

I started with Delightful Dijon cardstock for the cardbase and then added a layer of Basic Gray cardstock as a mat for the cardfront which is Very Vanilla with the nuts and bolts from the Nailed It stamp set stamped all over.  Next I took a piece of paper from the awesome Serene Scenery Designer Series Paper Stack and cut out a circle using the Big Shot and Layering Circles Framelits (I used the same framelits to cut a mat out of Delightful Dijon cardstock.

The saw image was stamped in Basic Black Ink and then colored in using Smoky Slate and Basic Gray Stampin' Write Markers.  I wanted to give the saw a little metallic look so I added some Clear Wink of Stella to the blade and bolts parts before cutting it out. 

The greeting is from the same stamp set and was stamped in Delightful Dijon ink on Very Vanilla cardstock and then cut out with the Big Shot and Stitched Shapes Framelits before attaching it to the cardfront with dimensionals.  The final touch was to add a bow tied with Linen Thread.

I love all the fun images in this set and cheeky sayings that go along with them, so many fun options.  The other design team members are sharing some great cards using other products from this suite so make sure to check them out and then add them to your wish list soon!

Below are easy ordering links for the product's used on today's card:


Enjoy!

Diana
Pin It!

Wednesday, December 14, 2016

SSINKspiration Blog Hop: Winter Wonderland!


Good morning!  We’re in the middle of all the holiday happenings and while there’s a lot going on I’m really enjoying every moment.  I hate the idea of getting so caught up in everything that you miss the memories (if that makes sense).  Today over on the Stylin’ Stampin’ INKspiration blog it’s time for our monthly blog hop and this month’s theme is winter which is perfect given the cold air that we’re about to get hit by.  There are so many options with this theme but since I’m still working on some last minute Christmas cards (I always tend to need more and just carry them around with me so I can work on them during little bits of time).  I saw this great idea recently to use the jar top to make a snowglobe so I decided to take that a step further and make this super fun shaker card (and it’s got bling!!!)
As you hop along, please be sure to comment and show some love on every blog! We are always excited to hear from our followers! You should have just left stop number #5 on the Stylin' Stampin' INKspiration Blog Hop - Jennifer G. at Jenny G Paper Crafts. If so, you are in the right spot. If a link doesn't work or you get off track, you will find the full blog hop lineup below.
 
I started with Sweet Sugarplum cardstock for the cardbase and then added a Soft Sky piece of cardstock that’s the base for my shaker with a piece of Whisper White cardstock on top.  I used the Big Shot and Layering Circle Framelits to cut the circle out of the center of the Whisper White piece and then used the snow stamp from the Greetings from Santa and Soft Sky ink to stamp the snowfall in the top left and bottom right corners.  I used the Clear Wink of Stella to add some sparkle to the snowflakes (little tip:  make sure to use the Wink of Stella before stamping the greeting, I didn’t and it the greeting smudged a little).  The greeting was stamped in Early Espresso ink and I attached a piece of Window Film on the back of the cardstock for the shaker window.


 Next I took the circle that was cut out and softly drew a line around the edge so I knew where my window would be and stamped on the Soft Sky piece, the snowflakes again in Soft Sky ink, reindeer in Soft Suede (with a little early espresso added for the antlers) and the tress are from the Lovely as a Tree stamp using early espresso ink (just ink part of the stamp to use some of the trees for a smaller image.)  Next I took a foam strip and attached it around the circle to create the boundries for the glitter and added some Fancy Frost Sequins for the snow (there’s my bling!!)  Then I just attached the Whisper White cardfront to seal the shaker (I did add dimensionals to the four corners of the cardfront to the whole later was raised and the same height).  Make sure press really hard to seal you sequins in. 
Of course every snow globe needs a base so I used the Jar of Love stamp set and heat embossed the lid using the Heat Tool, Versamark ink, and some Silver Embossing Power.  After embossing I cut the lid out with the Big Shot and coordinating Everyday Jars Framelits and attached it with dimensionals to the cardfront.  The final touch was to add a couple more of the Fancy Frost Sequins on the front bottom of the cardfront to look like falling snow outside of the snow globe.  

I love the soft feel of these colors, they’re not your traditional Christmas colors but definitely give that cool winter feeling.  And a card you can play with and shake?  Super fun!!
Below are easy ordering links for the products used on today’s project:


Make sure to check out the rest of the blog hop for lots of other great ideas.  If you click the “Next” button, you’ll go to Pamela's’s site but you can also access any of the hopper’s site from the full blog list below.
http://www.stampinup.net/esuite/home/stinkytofu/blog?directBlogUrl=/blog/2075584/entry/12_14_16_stylin_stampin


Blog Hop Participant List:

1. Pamela W. ~ Stinky Tofu

2. Darcy J. ~ Dj's Stampin' Place

3. Tobe B. ~ The Craft Sea

4. Cheryl H. ~ Create with Cheryl

5. Jennifer G. ~ Jenny G Paper Crafts


Have a great day,

Diana
Pin It!

Search This Blog