Showing posts with label Merry Everything. Show all posts

Saturday, November 21, 2015

30 Day Gratitude Challenge: Day 21

Good morning!  I’m really excited about today, got up early to get my run in and then it’s “Super Saturday” in the studio and I have two different Holiday themed classes so there’s going to be lots of crafting, laughter, and fun, I can’t wait!  Before all that get’s started I wanted to share today’s gratitude card with you.  I will fully admit I was running a little low on time last night and needed to whip up something fast and thankfully I was able to go to my “extra pieces stash” and gather several items for this card to make it come together in no time.

I started with Crumb Cake cardstock for the cardbase and then added a piece of Cajun Craze and then Very Vanilla cardstock for the cardfront.  The greeting is from the Merry Everything stamp set and I used my Stampin’ Write Markers to ink the stamp.  For the flag piece, it’s Soft Suede DSP from the Neutrals Designer Series Paper Stack and I had previously cut it out but didn’t use it so all I had to do was sponge all over it to age the stripes and make them blend more with the Very Vanilla.

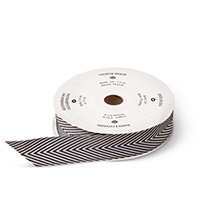
Remember the awesome Witches’ Hat Décor kit?  There were tons of extra leaves in the kit so I had already stamped (with the Vintage Leaves stamp set), crumbled, and sponged them to use for Thanksgiving cards so I just grabbed a few and added them to the card (instant texture!).  The final touch was to take a piece of Hello Honey 5/8” Striped Cotton Ribbon and tied a knot and attached it at the top of the leaves with a glue dot.

This card is nice and simple but looks like it’s a lot more involved than it was and matches the view from my window!  

Below are easy ordering links for the products used on today’s card:

Built for Free Using: My Stampin Blog


Enjoy your Saturday and hope you can get some crafting in!

Diana
Pin It!

Thursday, December 25, 2014

Stylin' Stampin' INKspiration: Design Team Family Christmas Cards

 Merry Christmas!  I hope you are enjoying a wonderful day with your family.  This is a day we like to just chill and relax and enjoying the family time.  Today on the Stylin’ Stampin’ INKspiration blog we didn’t want to leave you lacking inspiration so we thought we would share our families Holiday cards with you.  Given that I make cards it’s kind of expected and anticipated to see what I come up with and usually I design and make my cards in the summer so I just have to add the picture and write in them so the hard part is finished before the holiday craziness starts.  This year I was running behind so I didn’t make our card until Thanksgiving so it had to be a bit easier but still WOW!  The other thing I have to tell you is that like most crafters I have a large stash of product and quite a bit of it is retired that I don’t use in my business but I still love it so I use it for our family cards and projects to help use up the stash (so I can get more, right???)

This years card started with Baja Breeze for the cardbase.  I added a piece of Whisper White cardstock that was stamped with the Hardwood Stamp set and Crumb Cake ink, embossed with the Big Shot and Star Embossing Folder, and then sponged with Crumb Cake ink to help distress the look of the cardstock (there was a lot of steps but I LOVE how the background turned out).  I used the Big Shot and Star Framelits to cut out the shape of our family picture.  I added a piece of retired DSP along the bottom (of course it has glitter for my sparkle!)

The greeting is from the Merry Everything and was stamped in Real Red ink on Whisper White cardstock before punching it out with the Note Tag Punch.  I used the ¼” Circle Punch to punch a whole to add my ribbon (retired, of course, I won’t even admit how much ribbon I have) and dimensionals were used to attach the greeting to the cardfront.

Typically I leave the inside of our cards blank so I have lots of room to write each card.  This year we actually had a lot go on and I really didn’t want to write the same info 70 times so I decided to design and insert using My Digital Studio.  I opened a blank file using an 8 ½” x 11” standard cardstock size (so I could get 4 card inserts per page).  I added text with the family letter and then added 5 circle punch pieces along the left side so I could add more pictures for highlights of the year.  I did also add a holiday embellishment that coordinated with the cardstock color and DSP from the cardfront (the great thing about MDS is that digital elements never retire so you can use them forever, even after we stop selling the physical products).

In the end I really love our card and it fits our family and personalities!

Below are the easy ordering links for the current products used on today’s card:

Built for Free Using: My Stampin Blog


I want to thank all my customers, friends, readers, and followers, I love sharing my creativity and love of stamping and crafting with you and I hope I can inspire and help you create the projects you want.

I hope you enjoyed and have a Merry Christmas!

Diana
Pin It!

Monday, December 22, 2014

Quick and Easy, Last Minute Christmas Gifts

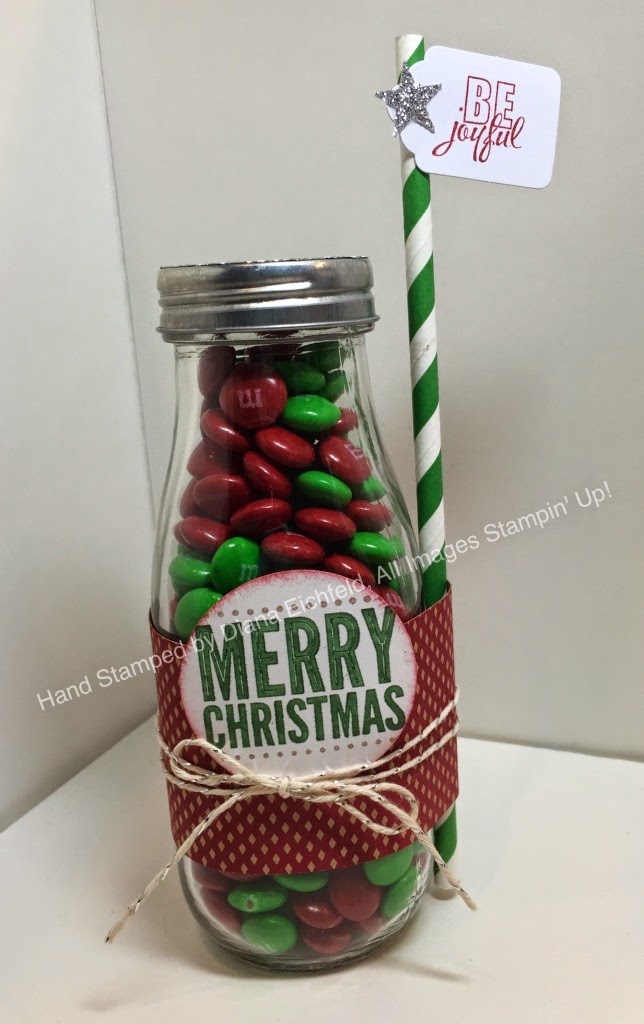
Good morning!  We've entered the last days before Christmas, are you ready?  We had a great weekend relaxing and enjoying some holiday traditions but I must admit I still have more things to get finished than I would care for.  It always seems like you have some last minute gift needs that come up so I thought I would share a super quick and easy gift that is sure to please.  There are some friends that Aidan wants to give a little something to so I found this glass milk bottles in the dollar section of a local store (they were sold in packages of two) as wells as these cute paper straws, I thought of adding the straws to go with the "milk".  I just filled each of them with candy and then decorated them for a fun threat.  I added circles of DSP from the Trim the Tree Designer Series Paper Stack that were punched out with the 1 3/4" Circle Punch on the top of the bottle top for some extra festive fun.

I wrapped a piece of Under the Tree Specialty Designer Series Paper around the bottle and made sure to include the straw inside the DSP wrap.  Next I tied a piece of Silver Baker's Twine around the bottle.  I used two different stamp sets for the greeting, Mingle all the Way and Merry Everything and after stamping the greeting used the 1 3/4" circle punch to cut them out and use dimensionals to attach them to the bottle.  I added cute little flag to the top of the straw using extra tags I had from the Many Merry Stars Simply Created Kit (the Cherry Cobbler stars are also from the kit).  I also used some Silver Glimmer Paper and the star punch from the Itty Bitty Accents Punches Pack to make some glimmery stars.  The greeting on the flag tag uses the Project Life Holiday Cheer Stamp set.

Here' a close up of one of the bottles, aren't they cute?  These are so easy and Aidan's really excited to deliver these to his friends in the next couple of days.


Below are easy ordering links for the products used on today's projects:
Built for Free Using: My Stampin Blog


Good luck wrapping everything up on your To Do list, enjoy!

Diana

Pin It!

Friday, November 14, 2014

Sketch Frenzy Friday Sketch Challenge and 30-Day Gratitude Challenge: Triple Stamping Fun

It’s Friday, whoo hoo!  Today I’m sharing my card for the Sketch Frenzy Friday card sketch, along with my 30-Day Gratitude challenge.  This was a fun challenge, instead of a sketch we were provided with the triple stamping technique as our inspiration.  When I saw this I knew the Fall Fest stamp set would be perfect for this technique.  The key to this technique is to cut the layers and then attach them together with a small amount of adhesive and then stamp your images.  When you add the mats to each of the layers it covers up any issues you have stamping around the layer boarders and shows images that look continuous across the layers.  I stamped the leaves in Cajun Craze, Mossy Meadow, Blackberry Bliss, and Crushed Curry ink.  The cardbase is Cajun Craze and I added mats in Crushed Curry and Mossy Meadow.

The greeting is from the Merry Everything stamp set and I used Stampin’ Write Markers to color in the stamp before stamping on Very Vanilla cardstock.  I punched the greeting out with the coordinating Note Tag Punch (you can buy this punch and stamp set as a bundle and save 15%) and then sponged around the edge with Blackberry Bliss ink, used the 1/8” Circle Punch to punch the hole for the ribbon and used some Blackberry Bliss 3/8” Stitched Satin Ribbon so the greeting looks like a gift tag (it’s even attached with dimensionals so it pops off the cardfront).
This is such a fun technique and one you can use with so many stamps that really make a statement.  I want to encourage you to check out the other design team cards and then come play along in the challenge, I'd love to see you creations.

 Below are easy ordering links for the products used on today's card:

Built for Free Using: My Stampin Blog


Enjoy and have a great weekend,

Diana

 
Pin It!

Sunday, November 2, 2014

30-Day Gratitude Card Challenge: Day 2

Good morning!  I have to admit, this is one of my favorite days of the year, why you ask?  Daylight savings (I love getting an extra hour, I always feel like I get so much done on this day and are still able to relax.  I'm back with the second day of this years gratitude challenge and as I mentioned yesterday I'm going to be switching things up and not just making cards for this years projects.  Today I'm sharing a beautiful gift package I whipped up using the Tag-a-Bag Gift Boxes.  The first step was to take the acetate cover for the box and embossed it with the Big Shot and Zig Zag Embossing Folder.   I wrapped a piece of Color Me Autumn Designer Series Paper around the box and then tied some Blackberry Bliss 3/8" Stitched Satin Ribbon around the box.
 
For the tag I used the Merry Everything stamp set and coordinating Note Tag Punch, along with the For All Things stamp set for a background effect and the acorn (that is punched up with a dimensional).
For some extra detail I stamped two feathers from the Four Feathers stamp set and used the coordinating feather framelit to cut them out.  I added a piece of 1 1/4" Burlap Ribbon and one of the Autumn Wooden Elements (that I colored with Mossy Meadow ink).

These boxes have so many uses, I used some packing paper from some old boxes and cut it with fringe scissors and scrunched it up before using it as filling and then added three small candles in fall scents.  This would make a perfect hostess gift, teacher gift, etc.  I'm actually making several of these up including Christmas themed one's to start crossing off names on my gift list (it's never too early to start!).


Below are easy ordering links for the products used on today's project:

Built for Free Using: My Stampin Blog


Enjoy the rest of your weekend!

Diana

Pin It!

Thursday, October 30, 2014

Halloween Treat to Impress!

Tomorrow is Halloween and one of the things I love about this holiday is of course of the tasty treats and candy (who doesn’t???)  Of course I can’t just give someone a piece of candy, I love to decorate and pretty it up so it’s a little more special.  Today I’m sharing several treats I’ve made to give to our little ghosts and goblins.

The first item is a treat bag for Aidan to give to some of his neighbor friends.  In the past the neighborhood “Booing” tradition has taken place but it’s kind of died down but Aidan really liked this idea.  We decided to make these little treat bags that Aidan can give to friends.  We used some small paper bags I had in my stash and stamped on them with the Gorgeous Grunge stamp set in Basic Black, Tangelo Twist, and Blackberry Bliss.  For the tag I used the Scalloped Tag Topper Punch (these punches are awesome!!!) and Very Vanilla Cardstock.  For the “Boo” and “to” images I used the September Paper Pumpkin stamps and the “You” is from the Merry Everything stamp set.  It’s great using Stampin’ Write Markers to only ink up part of the image for even more possibilities.  The spooky trees stamped along the bottom is also from the Paper Pumpkin kit as are the stickers and Orange Sequins.  I love how versatile the Paper Pumpkin kits are and you can use it for so much more than the initial kit projects.  The final step is to use the 1/8” Circle Punch and then attached the tag to the bag with Black Baker’s Twine (also from the Paper Pumpkin kit).  

 While there is so much candy already involved with Trick-or-Treating and other activities I still like
to give a little treat to Chris and Aidan, along with their holiday cards.  I found little bags of each of their favorite candies and have just decorated them.  For Aidan's I created my own DSP using the spooky faces from the Fall Fest stamp set and then matted it with Basic Black cardstock.  Next I wrapped a piece of Tangelo Twist Two Toned Trim around the treat and then frayed the edges for a fun effect.  The greeting is from the Frightful Wreath Photopolymer Stamp set and was stamped with Elegant Eggplant ink on Smoky Slate cardstock and then I stamped the splatter in Silver Encore ink.  The final touch is cute pumpkin using the Fall Fest stamp set and framelits.

For Chris' treat I decided to do a little recyclying and used some packing paper and used the fringe scissors and then crumpled it for a straw-like effect.  I added a belly band of Motley Monsters DSP and Basic Black cardstock in front of the packing paper.  I wrapped some Basic Black Baker's Twine around the treat to attach the tag that I made using the Note Tag Punch, and Project Life Holiday Cheer stamp set to create a tombstone and a Fall Fest Pumpkin.

I hope these have given you some cute treat ideas that you still have plenty of time to make before Halloween.

Easy ordering links for the products used in these projects are below:

Built for Free Using: My Stampin Blog


Enjoy!

Diana
Pin It!

Thursday, August 21, 2014

Disney Cruise Treats, Inspired by a Card: Merry Everything

Happy Thursday!  I'm so excited, we're officially on vacation and get to board the Disney Dream in just a few short hours.  I have to say our family loves all things Disney, and especially Disney Cruising, it really is relaxing and magical!!  One thing that really sets Disney apart is the service they provide, the Castmembers (CM), aka cruise staff, really go above and beyond to make your trip special.  In return we really like to do a little something for our dining room staff, stateroom host, and the kid's club personnel to let them know we appreciate their efforts.  For this trip I made these little treat bags filled with goodies (since we've been told the CM's don't have a lot of space and access to everyday items).  Of course I had to decorate it up and I received a wonderful card from my friend Michelle Suit, and knew it would be perfect for the cruise.  I used the Gorgeous Grunge stamp set to stamp on the bag and then used lots of different punches to make the pirate Mickey.  The tag is a sneak peak of the new Merry Everything stamp set and matching punch (which will be released next month in the Holiday catalog).  Then I just used some Basic Black Chevron Ribbon (and retired Real Red Grosgrain ribbon) to make a cute little knot.

Here's a picture of Michelle's original card, isn't it beyond cute?  I kept the colors and most elements the same since they were perfect but I did downsize the punches to make the Mickey head a little smaller for the bag.  You could easily use these bags for birthday or holiday treats, or just to let someone know you're thinking of them.

I know the CM's will love the treats and we're looking forward to a fabulous time.


Below are easy ordering links for the products used on today's project:

Pin It!

Search This Blog