Showing posts with label Snowflake Sentiments. Show all posts

Monday, December 18, 2017

SSINKspiration Fun Fold Challenge #SSINKFF2: Window Card

Good morning!  It was a crazy weekend and we were on the go non-stop, as well as my mega Christmas Cooking Baking weekend, and the last large race simulation which included 30 miles this week, let's just say I'm a little tired and didn't get much time in the studio.  I knew the SSINKspiration designers were having a fun fold challenge today using a Window Card so I had to pop down the studio to make a quick card since a glitter window card was the very first card I made when I was introduced to Stampin' Up! and made me fall in love with stamping.  This is also a really quick way to add some sparkle and dress up the card.  Because you use Dazzling Diamonds Glitter to make the window I decided to fully embrace the bling with lots of sparkly items on this card.
 
I started with Pool Party cardstock for the cardbase and then added a mat using Bermuda Bay cardstock and then a piece of the Year of Cheer Speciality Designer Series Paper.  I used the Big Shot and Layering Ovals framelits to cut the oval in all three pieces so they would all line up (don't glue the pieces together yet).  Next I took a piece of packing tape and applied it on the back of the DSP layer so the sticky side was facing out through the hole and generously sprinkled the packing tape with Dazzling Diamonds glitter which will stick perfectly.
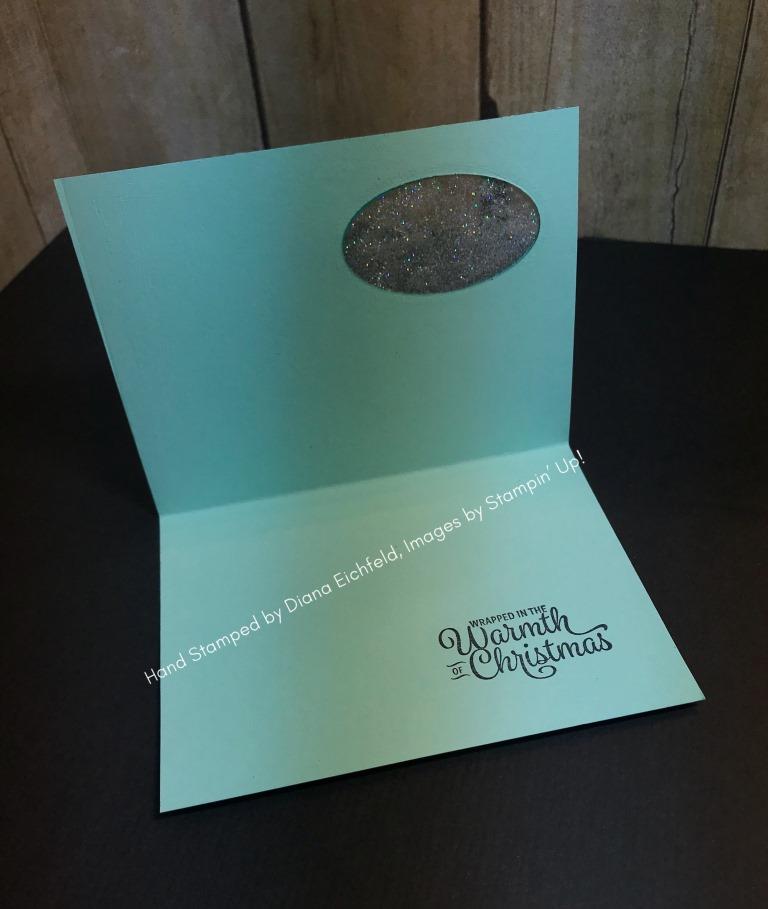
 
Next I stamped the greeting through the window hole in the cardbase basing the Snowflake Sentiments stamp set and Basic Black ink.  Here's a view from inside the card.
 
To finish of the card I attached the Bermuda Bay piece to the back of the DSP (this will hide the packing tape from view) and then wrapped a piece of Pool Party 3/8" Shimmer Ribbon around the top corner of the cardfront and then tied a double bow using Basic Black Solid Baker's Twine before attaching the cardfront to the cardbase so it lines up with the oval cut out.
Every time I make a card using this technique I still love it, and especially it's simplicity!  Make sure to check the other design teams cards using windows and then play along and share what you create.  I know we're a week away from Christmas but there is still time to get those last minute projects done for all other special people!
 
Below are easy ordering links for the products used on today's card:

Product List

Enjoy!
 
Diana
Pin It!

Friday, December 15, 2017

SSINKspiration Christmas Bags and Tags: Carols of Christmas

Good morning!  How is it possible that Christmas is only 10 days away?  In my house we haven't just been counting down to Christmas, but also the release of the new Star Wars movie and today's the day so we have a fun evening out getting our geek on that I excited about.  Today the SSINKspiration designers are sharing gift bags and tag ideas to help you with all your last minute package needs.  I always hold a holiday gift packaging class earlier in the season to help my customers to be ready and not as stressed.  Today I'm sharing a super fun and easy bag that is sure to match the great gift you'll put inside.

I started with a kraft gift bag (not Stampin' Up!) and used the Snowflake Sentiments stamp set and Whisper White Craft Ink to stamp the snowflakes all over the front of the bag.  Next I took a Striped Treat Bag and took it apart and used just the front of the bag as the base decoration (and it adds my first layer of bling!)  I layered a piece of Merry Music Speciality Designer Series Paper over the top (I love the prints in this package as the musical theme is perfect for the holidays).

The greeting is from the Carols of Christmas stamp set and was stamped with Basic Black ink on Whisper White cardstock before being cut out with the Big Shot and Stitched Shapes Framelits.  I used the Layering Circles Framelits to cut out the scalloped circle mat using Cherry Cobbler cardstock and then attached the piece to the gift bag with dimensionals.  To add a little more sparkle I added a couple of Black Rhinestones and a Gold Metallic Enamel Dot.

As the final touch for the bag I dies a bow using the 7/8" Striped Ribbon and then took one of the Green Sprigs and applied Embossing Paste lightly on the tips to flock it and then once it was dry (didn't take very long) I pushed the stem into the center of the bow and it holds it just right!

This bag looks really detailed because of the all the embellishments but is really easy to make (just make sure leave time to let the craft ink dry completely).  I'm hoping to make a few more of these for gifts I need to give so we will see how I do for time.

Below are easy ordering links for the product's used in today's project:

Product List

Have a great weekend!

Diana
Pin It!

Monday, December 4, 2017

SSINKspiration Card Sketch SSINKCS49: Serene Snowflakes

Good morning! Holiday festivities are in full swing and I could really use things to slow down a little.  This week we're they're forecasting cold weather and even the chance of snow, yay! so that was the inspiration of today's card using this months SSINKspiration sketch challenge.  The Year of Cheer Speciality Designer Series Paper is so beautiful, love all the metallics and while I'm not a big fan of mixing metallics it is on trend right now so I decided to go with it for today's card.

I started with Whisper White Thick Cardstock and then added a piece of Basic Black cardstock as a mat for the Whisper White cardfront.  On the cardfront I embossed a large snowflake using the Big Shot and Winter Wonder Embossing Folder.  I also added some metallic enamel dots (yes both silver and gold!)  I used a piece of Gold 1/8" Ribbon around the cardfront.


Next I used two different patterns of Year of Cheer Speciality Designer Series Paper.  The greeting is from the Snowflake Sentiments stamp set and after stamping in Basic Black in on Whisper White cardstock I cut it out using the Big Shot and Stitched Shapes Framelts and attached it to the cardfront with dimensionals.

I love the look of metallics against the crisp white and black and this card is full of winter time magic.  Make sure to check out the other cards the design team is sharing and then we would love for you to come play along with us and share what you create!


Below are easy ordering links for the product's used on today's card:

Product List

Enjoy!

Diana
Pin It!

Friday, September 22, 2017

SSINKspiration Fall Frenzy: Eclipse Technique

Good morning!  Today we get to officially ring in the arrival of fall, and even though the temperature isn't going to reflect the change in seasons today the SSINKspiration blog designers are feeling a little fall frenzy and sharing projects to greet the arrival of the new season.  If you've been online lately you've noticed that a new technique is floating around and getting lots of action, the eclipse technique in honor of last months solar eclipse, so I decided to use this technique on today's card.

I started with Very Vanilla Thick cardstock for the cardbase and then added a layer of Fresh Fig cardstock behind the Very Vanilla cardfront.  To create this technique I started by stamping all over the cardstock using the Vintage Leaves stamp set and Fresh Fig, Cajun Craze, Crushed Curry, and Always Artichoke ink.  Next I used the Big Shot and Large Letters Framelits Dies to cut out the letters for "fall".  (Tip:  you can use washi tape to hold down your letter dies if they're trying to move a little on you).  Next I used Mini Dimensionals to attach the letters over the cut out holes so there is just a slight halo effect. 

The final touch was to add the rest of the greeting.  I knew I wanted to use the word "greetings" and searched all my stamp sets since I knew I had one that would work, the new Snowflake Sentiments stamp set from the Holiday catalog was perfect.  I used my Fresh Fig Stampin' Write Marker to color just the one word in on the stamp and then stamped on Cajun Crazy cardstock.  I didn't want the piece to be too big and overpower the card so I just used my Paper Snips and cut around the edges of the greeting and then attached it with dimensionals to the cardfront.

This is a fun technique, easy, and so versatile (you can adjust the size of the cardstock for the number of letters your using, think name signs, etc.).  Make sure to check out the other cards the design team is sharing for fall inspiration.

Below are easy ordering links for the product's used on today's card:

Product List

Have a great weekend!

Diana
Pin It!

Search This Blog