Showing posts with label Merry Medley. Show all posts

Friday, December 23, 2016

SSINKspiration Christmas Cards: Detailed Santa Chalkboard Style!

Happy Friday (and Christmas Eve Eve)! Today’s my last day of work (yeah!) and the guys are joining me this afternoon for my Holiday party at work, Aidan will get one last chance to put in a good word with Santa before the big day!  Today the SSINKspiration designers are sharing what are probably our final Christmas cards of the season (can’t believe it’s already here).  I’ve decided I’ve waited long enough and decided to share our family Christmas card for the year with you (I’m hoping everyone I’ve mailed them to has received them at this point).  I always start designing our family Christmas card over the summer when the Holiday catalog is first released and try to have it all completed (minus the picture) by the end of the summer, some years I’m more successful than others.  This year as soon as I saw the Merry Medley stamp set and Detailed Santa Thinlits I knew they would be on this year’s Christmas card.

I started with Cherry Cobbler cardstock for the cardbase and then added a layer of Basic Black Cardstock that was stamped with the Merry Medley stamp set and Whisper White Craft Ink for the perfect chalkboard effect background.  I used the Candy Cane Lane Baker’s Twine to wrap around the bottom and tie a bow.
Next came the fun part…the Santa.  I used the Big Shot, Detailed Santa Thinlit, and Whisper White cardstock to cut out the Santa.  It’s actually really easy, you just need to poke out all the little pieces of each Santa (did I mentioned I made 70 of these cards?)  After getting the Santa’s all glued on the background I realized it needed a little bling (shocking I know!!)  So I then proceeded to cut Red Glimmer Paper for the little pieces of the ball on Santa’s hat and glue them on (again cut these 70 times, haha yes I am just that crazy!)  The final touch was our picture and after getting family pictures taken it was convenient that we coordinated with the colors of the Christmas card so I just cut them out with the 1 ¾” Circle Punch and attached the picture with dimensionals.

I absolutely love this card!  It has lots of my favorite things and just makes me smile.  I don’t normally make lots of the same card (and when I do it drives me a little batty, but it is so worth it this one time a year).

Below are easy ordering links to the products used on today's card:


Have a great weekend and a Merry Christmas!

Diana
Pin It!

Saturday, November 26, 2016

30 Day Gratitude Challenge: Day 26

Good morning!  It's been a wonderful holiday weekend but it's time to start heading home so we can get all ready for the new week (and avoid some of the traffic, haha!)  Before we hit the road I wanted to make sure to share today's gratitude card so I didn't miss it.  This card uses one of my favorite stamp sets from the Holiday Catalog, Merry Medley, it has some great fonts and greetings and makes a great background.

I started with Old Olive cardstock for the cardbase and then added Real Red cardstock as a mat for the Smoky Slate cardfront.  On the cardfront I stamped the Merry Medley stamp using Smoky Slate ink for a nice, simple background.

The greeting is from the One Big Meaning stamp set and was stamped in Old Olive ink on Whisper White cardstock.  I cut the greeting out with the Big Shot and the Layering Circles Framelits.  I used the same framelits to create the scallop circle mat out of Early Espresso cardstock.  I used dimensionals to attach the greeting piece to the cardfront.

I wanted to give the greeting the look of a wreath so I added a bow that I made using Real Red Glimmer Paper and but it out using the Big Shot and Everyday Jars Framelits.

I love the simplicity of this card and it's nice and flat for easy mailing!

Below are easy ordering links for the product's used on today's card:


Enjoy your weekend!

Diana
Pin It!

Friday, November 11, 2016

30 Day Gratitude Challenge: Day 11

Happy Friday and Happy Veteran’s Day!  I want to take a moment to thank all the brave men and women who have given so much for the freedoms we as Americans enjoy, your service is truly appreciated.  The boys are away at scout camp this weekend (extended camp at that due to the Veteran’s Day holiday) so I’ve planned a weekend fully of holiday fun including some fun classes to get us ready for the holidays and I may start pulling out the Christmas decorations (I’ll admit I love decorating for almost all holidays but Christmas is my favorite and I have A LOT of decorations so it take awhile to get them up so I like to get started a little early so we can enjoy them to the max).  It’s only fitting that today’s card for my 30 Day Gratitude challenge is Christmas themed and it fits right in with the SSINKspiration designers sharing their favorite holiday stamp sets.   When I first saw this years Holiday catalog one of the first sets to make it to my wish list was the Merry Medley background stamp.  Not only does it have some great greetings (you could easily cut this set apart to have the perfect greeting all by itself) but the chalkboard look gets me every time.

I started with Island Indigo cardstock for the cardbase.  Next I added a piece of Cherry Cobbler cardstock for the mat of my Whisper White cardfront.  On the cardfront I used the Merry Medley stamp to stamp the background using Smoky Slate ink, just like that, instant background!  The greeting is from an old Paper Pumpkin set (I love how the stamps in the Paper Pumpkin kits are exclusive and you can only getting them by being in the club!) and was stamped in Cherry Cobbler ink.
For the main focal point I used the Starlight Thinlits and the Big Shot to cut the large solid star out of Island Indigo cardstock and then the fancy detailed star using Silver Glimmer Paper.  In the center of the star I added a Cherry Cobbler enamel dot from the Regals Enamel Dots.

The accessories really help push this card over the top and it was actually really quick and easy to make.  And man oh man that glitter star, be still my heart!!  This card could easily have been a regular Holiday card without the addition of the “thank you” greeting but it’s always fun to have your thank you’s match the holiday.

Below are easy ordering links for the products used on today’s card:


Enjoy,

Diana
Pin It!

Friday, October 7, 2016

Fab Friday 97 Sketch Challenge: Detailed Santa Greetings

Happy Friday!  It's shaping up to be an eventful weekend here on the east cost and our thoughts are with everyone who's impacted by Hurricane Matthew and we're hoping for his early departure back out to see.  We've had a super busy week, full of activities which has left little time to relax so I made it a point to hop down to the studio for a little crafting therapy to relieve some stress and decided to play along with this weeks Fab Friday sketch challenge.  I've been working on a lot of Halloween projects lately, I think because it will be there soon so I decided to change things up and make a fun Christmas card using some products from the Holiday catalog I haven't shown off yet.

I started with Crumb Cake cardstock for the cardbase and then added a piece of Cherry Cobbler cardstock as a mat behind my Basic Black cardfront.  On the carfront I used the Merry Medley stamp set (this background set as so many great greetings you could use together or individually) and stamped it using Whisper White Craft Ink for a chalkboard effect.

For the main image I took a piece of Dazzling Diamonds Glimmer Paper and cut a circle out using a 2 1/2" Circle punch and then used the Big Shot and the Detailed Santa Framelit to cut just a part of the Santa image and then added another circle of Emerald Envy cardstock so the details pops.  I like how I didn't glue down Santa's glasses so they look like they're raised (completely unintentional).  For the greeting I sued the Greetings from Santa stamp set (it's part of a bundle with the framelit so you save 10% when you buy them together) an was stamped using Cherry Cobbler ink on Crumb Cake cardstock.  To cut it out I used the Big Shot and Project Life Cards and Labels Framelits to make it look like a ticket and then attached it with dimensionals.  The final touch was to add a double bow tied with Cherry Cobbler Baker's Twine.

It's hard to tell from this picture but the Santa is so sparkly I love it and it's not too overpowering (I've heard some people think you can have too much glitter, of course I think they're crazy!)  I know you don't want to admit it but Christmas will be here before you know it so now is the time to start planning your family cards and other gifts and projects.  If you need inspiration please let me know and we can come up with something perfect to suit your needs.

Below are easy ordering links for the products used on today's card:


Have a fun and safe weekend!

Diana
Pin It!

Monday, October 8, 2012

Elegant Gift Tags, full of Sparkle

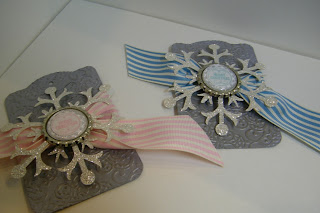
Good morning friends!  Fall has definately arrived in Northern Virigina, the leaves are starting to turn and it's definately getting cooler.  I love this time of year but it's also a reminder that the holidays are fast approaching.  Recently I saw a stunning gift tag made by Monica Weaver and knew I need to make some for my Holiday gifts.  This first version is pretty much the same as Monica's but changes the center decoration, see Monica's creation here.  I started with a piece of Brushed Gold cardstock and ran it through the Big Shot with the Two Tags Die and then embossed it with the Lacy Brocade embossing folder.  Then I sponged some Crumb Cake ink on the tag to add some dimension before wrapping a piece of Cherry Cobbler 3 1/2" Scalloped Tulle Ribbon.  Next I cut out two snowflakes with the Snow Flurry Bigz Die and Champagne Shimmer paper.  I flattened a bottle top with the Big Shot (it's pretty cool to see that) and then stamped the words from the Merry Medley stamp set in Cherry Cobbler (cut it out with the 3/4" circle punch) and stamped the decorative circle with gold ink (retired) and punched it out with the 1" circle punch.  The final touch was to add a clear epoxy disc to the top so it's all glossy and protect it, perfect!
 
Here's a close up of the gift tag with the bottlecap and Merry Medley decorative center.


I had so much fun with these tags that I decided to make some with silver and everythings the same except I used Silver Glimmer Paper for the snowflakes, Marina Mist and Pretty in Pink 1 1/4" stripped grosgrain ribbon (retired) and silver ink (retired) for the decorative detail.


Another close up of the gift tag with the bottlecap and Merry Medley decorative center, this time with the Marina Mist and Silver version.


I love how these tags turned out and they will great not only on gifts but even as a decoration on the Christmas tree after the presents have been opened.  Now's the perfect time to start making holiday tags or other projects you have in mind before things get even more crazier and hectic.  I can help you design any projects you have in mind and make sure you have all the necessary supplies, just let me know.

Happy stamping,

Diana
Pin It!

Search This Blog