Thursday, January 10, 2013

Orlando here I come, whoo hoo!

I've been looking forward to this day for several weeks.  Today I'm heading to Orlando to join Stampin' Up demonstrators from the U.S. and Canada for our annual Leadership Conference.  This is a great event to see some fabulous ladies and get recharged for the new year with lots of new creative and business ideas.  Part of any SU event is swapping so I thought I would share some of the cards I made to share.  This swap card is so simple, fun, and shows off the fabulous new valentine designer paper, More Amore.  I used this exact same layout for a Christmas card last month, just change the colors, DSP, and greeting and it fits any occasion.  I greeting is from the Wacky Wishes stamp set and also uses the Pool Party ruffled ribbon.  I'm loving the trend of using flags and banners on cards and seem to use them all the time lately, it's also great to show off different papers and how they coordinate.
 
This card is lots of fun and would be great for making multiples.  I'm planning on trying to post updates from the conference if technology permits so stay tuned.
 
Have a great day!
 
Diana
Pin It!

Stylin' Stampin' Squad Blog Hop: New Spring "Mini" Catalog

Good morning friends!  Today is the start of the Stylin' Stampin' Blog Hop and I'm so excited to join this great group of creative individuals.  If you just joined me from Bree's blog didn't she make a fabulous heart wreath, love it!  This months hop is focusing on the Spring Catalog, which is jam packed with lots of fun, fresh items.  My projects this month are for Valentine's Day and are so sweet.  This card starts with a Very Vanilla cardbase that I sponged around the edge with Crumb Cake ink.  Next I took a piece of Crumb Cake cardstock and embossed it with the Perfect Polka Dots embossing folder.  I used the negative image from a piece cut out with the Apothocary Accents framelits to create a frame and sponged inside with Real Red ink so you just get the colored shape and then used the paper piercer and templates to paper pierce around the shape.

For the heart elements I used the Hearts Collection Framelits to cut out the Basic Black Heart (that was crumpled up and then spritzed with Champagne shimmer mist) and the Real Red heart that I embossed with the new Hexagon embossing folder (this folder is AWESOME!).  I used the new Real Red Core'dinations cardstock so when I sanded the embossed piece you get a two-toned design.  I even cut some hexagons with the More Amore' Speciality DSP to highlight the hexagon design.  The Pool Party button is from one of the Sale-a-bration items that you can earn for FREE in a couple of weeks and the bow is Linen Thread.

For the greeting I used the That's the Ticket stamp set and stamped with Versamark ink on Pool Party cardstock and then heat embossed with Black embossing powder.  The Ticket Duo punch punches these images out so quickly and I just used dimensionals so the greeting stood out against all the hearts.  This card is so fun I love all the texture and different elements that catch your attention.

The second project I would like to share with you is a decorated frame.  Each year I like to make a new decor item and since I love to take pictures this was easy.  Several months ago Robin Merriman showed these great fall frames by decorating unfinished wood frames, she Robin's frame HERE.  I made several of the fall frames like Robin's that everyone loved, so when I was shopping the day after Christmas at one of my local craft stores I found this valentine frame and knew it would be perfect.  I used the same Real Red Core'dination cardstock and embossed it with the Hexagon embossing folder before sanding.  I used the More Amore Speciality DSP for the ruffled DSP along the bottom with the Pool Party Ruffled Ribbon and a Red Glimmer brad in the center of the bow.  The letters are Silver Glimmer paper and cut out with the Big Shot and the new Typeset Alphabet Bigz Die.

I used one of the lasercut hearts from the same DSP pack and then cut several hearts out of that DSP and First Edition DSP with the Large Heart Punch and the Hearts a Flutter stamp set and Framelits (all the pieces were crumpled and sponged with Pool Party ink.  I even added a Real Red glimmer heart punched with the small heart punch.  The heart in the top left corner used the same stamp set and framelits and is accented with the Real Red button and Linen Thread.  This frame is so fun and fits perfectly with the other valentine's decorations on my mantel.

I hope you enjoyed this month's projects and they've inspired you to create your own items, trust me there's something in the Spring catalog for everyone's taste.

Now continue on the hop and you can start up at the top with Annie's blog by clicking the link below.


Blog Hop Participants:
    :
    1. Annie L. of Love Me Cards
    2. Pam S. of Stampin' in the Sun!
    3. Nancy B. of Lady Stamps-A-Lot
    4. Rose C. of Stamp with Rose
    5. Tonya B. of Stampin' with Tonya
    6. Dawn S. of Dawn's Creative Chalet
    7. Patricia T. of Sunnyone Stampin'
    8. Pamela W. of Stinky Tofu
    9. Kim R. of Stamping with Kim
    10. Terry B of Goin' Over the Edge
    11. Justin K of JK Cards
    12. Heidi B of Stuck on Stampin'
    13. Jennifer B of NW Stamper
    14. Bree R. of Craft-somnia
    15. Diana E of Stampin' Fun with Diana
Pin It!

Monday, January 7, 2013

Lots of Hearts, Fab Friday Sketch Challenge

Good evening friends!  We had a very relaxing weekend, Chris had knee surgery last week so we spent most of the weekend relaxing and helping Chris recover.  I did also manage to get the rest of the Christmas decorations down and all packed up.  I also spent some time in the studio working on card swaps for this weeks Leadership Conference (I can't wait to share them with you later this week).  I was also very excited to try out this weeks Fab Friday Sketch challenge and since I seem to have Valentine's on the brain I knew this would be fun.  Sketch challenges are fun since they give you a basic design as a starting point and then you get to put your spin on it and it's so fun to see where everyone takes it.  I decided to keep this card nice and simple.  The cardbase is Pool Party and I embossed it with the Big Shot and the Perfect Polka Dot embossing folder.  Next I punched three hearts with the large heart punch and the red and silver glimmer paper (this stuff ROCKS!)  The strip of designer series paper is from the More Amore Speciality DSP and I cut a flag on one side and used the bone folder to flip the tails up.  I also added a piece of Primrose Petals stitched satin ribbon.  The greeting is from the Delightful Dozen stamp set and was inked with Stampin' Write markers and then punched out with the large oval punch and sponged around the edge with Pool Party ink.  I used dimensionals to pop up the greeting. 
 
This card is light and fun and a great mailable card.  I love when you don't have to worry about mailing cards that I make so people can enjoy them.
 
Hope you enjoy and happy stamping,
 
Diana
Pin It!

Thursday, January 3, 2013

Valentine Treat Special From Stampin’ UP!


BUY YOURS NOW – Only Through January 21st – SHOP NOW

From January 3 through January 21, Stampin’ Up!’s got two super special valentine offers sure to set your heart a flutter!

1. Get the Sealed with Love Simply Sent Kit FREE—a $7.95 US/$9.95 CAN value—when you buy the brand-new My Little Valentine Stamp Set! This four-piece stamp set, created exclusively for this promotion, contains the perfect sentiments to express your feelings for your children, spouse, girlfriends, or mail carrier!

ItemDescriptionPrice
132242My Little Valentine (English; clear-mount)$9.95 US/$11.95 CAN
132245Enamorados (Spanish; clear-mount)$9.95 US/$11.95 CAN
132248Mon petit amour (French; clear-mount)$9.95 US/$11.95 CAN

2. Purchase the Valentine Treat Bundle—complete with the brand-new Happy Valentine Heart Single Stamp and the cutest little treat bags ideal for all of your precious valentines. Even better, the brand-new Happy Valentine Heart stamp coordinates perfectly with our Full Heart Punch for fast and easy creating.*

Bundle ItemDescriptionRetail ValueSpecial Bundle Price
132771Valentine Treat Bundle Includes the Happy Valentine Heart Single Stamp (clear-mount) and 1″ x 8″ cellophane bags$7.45 US/$9.20 CAN$5.95 US/ $7.25 CAN
*Full Heart Punch not included in bundle

Both of these offers—and the exclusive stamps—are only available through January 21, perfect in time for Valentine's.


Get ready to have a little fun!

Diana
Pin It!

Wednesday, January 2, 2013

Loving Seasonal Sayings

Good morning friends!  Today I'm sharing a card I made in less than five minutes using scraps from my desk, so fun!  This card uses the Seasonal Sayings stamp set from the Holiday catalog.  I was so happy to get this stamp before the catalog ends today, did you get everything you want before time runs out?  The cardbase was run through the Big Shot with the Perfect Polka Dots embossing folder.  Next I added a piece of Real Red DSP from the Polka Dot parade designer series paper pack and matted that on Whisper White that was punched with the Scallop Trim border punch.  The ribbon is Whisper White 3/8" taffeta ribbon (this is probably my favorite ribbon we have right now, it's so soft and awesome!)  The greet was cut with the Big Shot and the Labels Collection framelits and matted on a piece of Champagne Shimmer paper cut with the same framelits (I had this left over from the New Year's card I shared a couple of days ago).  This shimmer paper is perfect and I'm sad to be saying goodbye to it, thankfully I do have some in my personal stash.
 
This card was nice and simple which is perfect, enjoy!
 
Diana

Pin It!

Tuesday, January 1, 2013

Recycled Valentine Greetings

I can't believe the holiday break has ended and we head back to work and school tomorrow, boy does time fly when you're having fun and we did have lots of fun.  For some reason once Christmas is over I get in a mood to make Valentine cards and projects and made several this week using the new single stamps that are available through tomorrow under Stampin' Up!'s pilot program.  So awhile back Sara Douglass shared this fabulous idea of making personalized stationary using the brown packing paper from Stampin' Up! orders, see Sara's creations HERE.  I loved the idea and have been saving the paper for awhile but haven't actually used it until now.  This card was a breeze to pull together.  After cutting down the paper to 5 1/2" x 8 1/2" I folded it in half and used the hearts from the Adorning Accents embossing folders and the Big Shot to emboss the strip of hearts.  Then added a red glitter heart punched with the large heart punch and the Red Shimmer paper.  The stamped heart is one of the new, exclusive single stamps, Love Heart that you can only purchase through tomorrow (I'll be sharing several other fabulous creations with this stamp so you'll want to make sure you have this in your collection).  The "Love You" greeting is from the Seasonal Sayings stamp set in the Holiday catalog and is also only available through tomorrow.  The great thing about this stamp, you can purchase it as a set or as a single image, LOVE IT!
 
This is so fun and fresh I'll definitely be making more cards with the packing paper and it's so inexpensive.
 
Have a great evening!
 
Diana 

Pin It!

Monday, December 31, 2012

New Year's Picture Frame

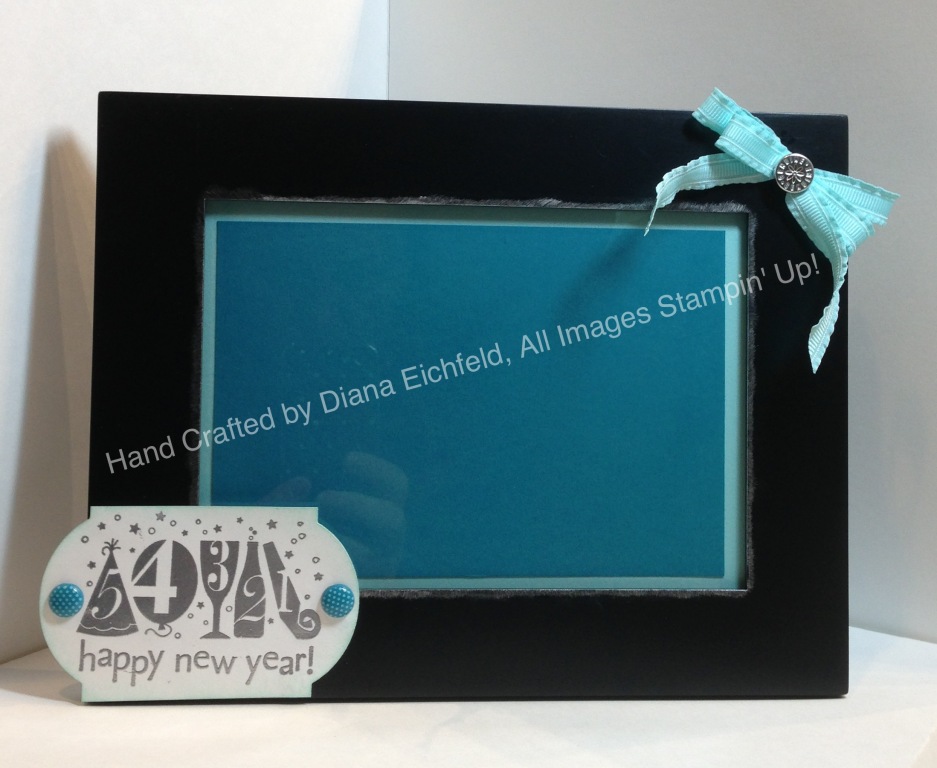
I hope you're having a blast enjoying the last few hours of 2012.  I have one last project to share with you but I had to wait since this is a gift for a friend that we're seeing tonight and I wanted it to be a surprise.  I love to commemorate holidays and events with pictures and share those pictures so I thought this picture frame would be perfect for our friend to remember our great times together.  I used the New Year single stamp set for this project as well and embossed it with Silver embossing powder.  Next I cut it out with the Window Collection framelits and then trimmed off the top and bottom curves before sponging the edges with Pool Party Ink and adding two In Color designer printed brads.  I have lots of frames in my stash just waiting to be used.  I sponged around the inside edge of the frame with Platinum Shimmer Paint and then added a bow of Pool Party Ruffled Ribbon and a designer brad (it's retired but says "Genuine" around the edges which is fitting for our friends).
 
I added Pool Party and Island Indigo cardstock inside the frame so it matches and is already for the perfect picture.  I love to decorate picture frames and give them as gifts with pictures which I think friends love since it's personalized and unique.  We've had so many changes and events in our family this year and can't wait to see what 2013 brings.  We love all our friends and family and appreciate all the love and support.
 
Take care and Happy New Year and have a fabulous 2013!
 
Diana
Pin It!

Bright Happy New Year's Greetings!


I told you I would be back.  My next project to share uses the single stamp set New Year.  I was so excited when Stampin' Up! announced they were having a pilot program selling single stamps and since this was a new and exclusive design of course I had to get it but this is the first time I've inked it up.  I drew the colors for this project from the candy wrapper I made for Aidan and shared earlier today.  The cardbase is Tempting Turquoise and I added a piece of Basic Black that I sprayed with Champagne Shimmer mist (it's hard to see in the picture but it really sparkles in person.  Next I inked the stamp with Stampin' Write markers in a rainbow of colors (I love the rainbow effect) and cut the image out with the Big Shot and Labels Collection Framelits.  I used the same framelits to cut the border piece out of Champagne Shimmer Paper (this is not on the carry over list so you only have until January 2 to make sure this fabulous paper is in your collection).  I used the same colors to create a rainbow of flags using the Brights DSP stack and the Polka Dot Parade designer series paper.
 
This card is so bright and cheery and is a perfect way to start the new year!  Hope you enjoy and remember you wan only purchase the single stamp sets until January 2 so you'll definately want to add this to your collection.
 
Have a great evening and be safe!
 
Diana

Pin It!

Happy New Year's - MDS Treat

Good afternoon friends and Happy New Years Eve!  I can't believe how quickly 2012 has passed and in just a few hours we'll be ringing in the New Year.  I'm a little late in sharing but I have three different projects I've made to celebrate the New Year so I've schedule several posts today so you can enjoy all the fun and get some great ideas for next year.  My first project is a candy bar wrapper I made for Aidan with My Digital Studio 2.  The great thing about this project is that the template was already designed from the Eventful Year digital download and all I did was add the 2013 and Aidan and tweaked the opacity of the greetings!  I love how simple it was and then I had it printed and wrapped around a Hershey bar.
 
I'm sure Aidan will love this and I love how these treats are so easy and can be tailored to any occasion and even personalized.  You've got to try this out and I can help you either learn to use MDS2 yourself or I'll help design treats for your special occasion.
 
Have a great afternoon!
 
Diana

Pin It!

Saturday, December 29, 2012

I Couldn't Resist Sharing this Santa!

Good morning friends!  I'm sitting at the hotel pool this morning while Aidan gets in one last swim (I love that no matter where we go if there's a pool Aidan has to visit and he always meets kids and has a blast!)  So while where here, and it's snowing outside I thought it would be OK to share another Christmas card.  This card uses the Wonderous Wishes stamp set from the Holiday catalog and while I love this set I haven't purchased it but I was able to stamp several images from it while at my upline's retreat in October and I just got around to coloring it and turning it into a card this week.  I used losts of Stampin' Write markers, classic ink pads, and a blender pen to color this in and tried to add lots of dimension and texture.  The image is so beautiful and fills up most of the page so all did was a piece of designer paper from the Festival of Prints paper stack as well as the 7/8" cotton ribbon that I frayed on both edges and a strip of 1/8" Early Espresso Taffeta Ribbon.
 
This card is perfect for the holiday season and just think, I already have one card made for next year, yeah!
 
Have a great day!
 
Diana

Pin It!

Wednesday, December 26, 2012

The Winter Fun Continues

I hope you all had a fabulous Christmas!  We had a great time relaxing and hanging out at home.  This morning I'm heading out for a little post Christmas shopping, I love to stock up on gift wrap, bags, etc. for next year while the sales are so great.  I'm also so excited since we still have a week of fun before it's time to head back to work and school.  During that time we're going to enjoy a few winter activities, including ice skating which was the inspiration for this card.  It uses the Winter Memories stamp set and I cut out the ice stake image after coloring in a few elements and mounted on a piece of vellum and Baja Breeze cardstock that was cut out with the Window Frame Framelits and embossed with the Big Shot and Snowflurry embossing folder.  Then I just added a piece of Cherry Cobbler Polka Dot Scallop Ribbon (showing the backside) designer paper from the Candlelight Christmas DSP, and the greeting is from the Christmas Lodge Stamp set.
 
This card is so soft I love the holiday memories it invokes.
 
Hope you enjoy the rest of the holiday week!
 
Diana

Pin It!

Tuesday, December 25, 2012

Merry Christmas Friends and Family!

Good morning and Merry Christmas!  I'm sitting here early Christmas morning waiting for Aidan to wake up (how crazy is that?) so I thought I would hope on the computer to share one of the Christmas cards I made this week.  This card uses the Winter Memories stamp set for the Holiday catalog and I just love how peaceful the images are.  The cardbase is Very Vanilla and I sponged around the edges with Crumb Cake ink.  Then I added a layer of Early Espresso Core-dinations cardstock that I ran through the Big Shot with the Woodgrain embossing folder and sanded it to bring out the woodgrain.  The DSP is actually from the Orchard Harvest DSP (I love when you can use paper for other holidays that what it is designed) and is matted with Lucky Limeade cardstock.  The main image was stamped with Basic Black in on Very Vanilla and colored in with a blender pen and my classic ink pads, sponged around the edges with Crumb Cake ink, and matted on Crumb Cake ink.  This layer was attached to the card with dimensionals so it pops.  The greeting is from the Teeny Tiny Wishes stamp set and was punched out with the Modern Label Punch.  For the accent I added a piece of Victorian Lace Ribbon and an antique brad, it's fun to add a little texture with just a hint of ribbon and bling.
 
I love how this card turned out it's so rich and soothing.  Well I need to go, I think I hear someone stirring.  We hope you all have a Merry Christmas and a blessed time with your family!
 
Diana
 

Pin It!

Thursday, December 20, 2012

MDS2 Makes Holiday Gifts a Snap!

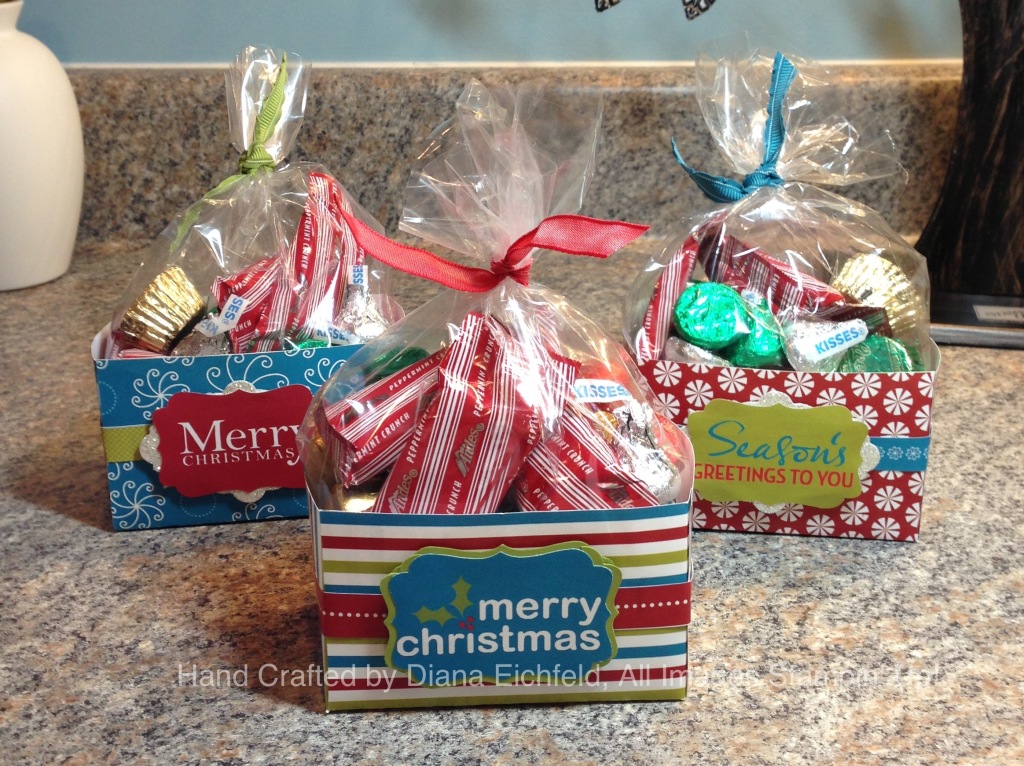
Good morning friends!  Can you believe we're less than one week away from Christmas?  Aidan keeps saying he can't wait for Christmas to get here and I keep telling him that it's only X days away and will be here soon.  So we've spent a lot of this week handing out gifts to neighbors, coworkers, and teachers to let them know how much we appreciate all they do all year long.  The last group of people we have gifts for is Aidan's Tae Kwon Do instructors.  No only does Aidan take classes everyday but he's also in their before and after school care programs so they spend a lot of time together.  So for these gifts I decided to turn to My Digital Studio 2 and made these super simple and cute boxes and tags.  I used the Savor the Season content disc which is awesome it has the box templates, that you can fill with any designer paper you want, the box bands, even the tags that fit perfectly with the decorative label punch.  I changed up the stamp greetings in the tags and did use the new color tool to color in the stamps with different colors.  I even made some of the tags to have birthday greetings so when I had them printed I would have some for different occasions.  A couple of the tags are matted on silver glimmer paper that I cut out with the apothocary labels framelits and the Big Shot.  Then all I had to do was fill some cello bags with candy and tie them with ribbon and everything coordinates perfectly, in a snap.
 
I love how MDS2 makes it so easy to make cards, decor, and gifts that anyone will love and you don't have to spend hours on them.  There's still time to take care of those last minute gifts on your list so if you don't own MDS2 remember you can download a 30 day trial version of the software to try it out and make all the projects you want, even have them printed, awesome!
 
Have a great day,
 
Diana
Pin It!

Friday, December 14, 2012

Stampin’UP! Clearance Rack Blitz – WHILE SUPPLIES LAST – some items up to 80% off!!!!


Stampin’UP! has added 300 new items for the Stampin’UP! Clearance Rack BLITZ…


WOWOW – and if you join today you can save an additional 20% on clearance rack items – YES THAT’S RIGHT.. as a demonstrator I still earn my discount and commission on clearance rack items… WOW…I’ve already shopped today.

ALL SHOPPING MUST BE ONLINE – CLICK HERE

ALL ITEMS ARE WHILE SUPPLIES LAST don’t hesitate… Just a VERY SMALL SAMPLING of the 300+ Items on clearance.. Markers for $0.99, Ribbon for $3.99, cardstock and designer series paper, even Big Shot dies and stamp sets WOOOO-HOOO Stocking stuffing time. I saw a heat tool for less than $15.. AMAZING.

I already placed my order with lots of ribbon for gift wrapping and cardstock to donate to Aidan's school (the ideas are endless but the sale is not!)

Don’t miss out – Time to SHOP!
Pin It!

Thursday, December 13, 2012

Elegant Wedding Greetings

Last month we attending a wedding for a work friend and I decided to make a card fitting the occasion.  When I think of weddings I always think of sleek and sophisticated so I decided a monochromatic card would be perfect.  The cardbase is Very Vanilla and I added Basic Black and then a panel of Very Vanilla that I ran through the Big Shot with the Elegant Lines embossing folder.  I love the swirling images and I added several pearls in different sizes in the holes for one of the swirls.  The greeting is from the Word Play stamp set and I heat embossed it with Basic Black embossing powder.  This was punched out with the large oval punch which was matted on a piece of Basic Black that was cut out with the Apothocary Accents framelits and Big Shot.  The final touch was to add a piece of 1/8” Very Vanilla Taffeta Ribbon looped with tails between the greeting layers for a little extra pizazz.
 
This card looks so stunning in person which I love.  The great thing about the Word Play stamp set is if you like this image, or another in the set but not all of them you can purchase individual stamps from this set under the current pilot program now through January 2, 2013 which is awesome!  This set has so many options for any needs you have,
Enjoy,
 
Diana
Pin It!

Tuesday, December 11, 2012

Cheerful Christmas Wrapping

Good morning friends!  So I've been spending a lot of time this week completing and wrapping gifts for Christmas.  One of the things I vowed to do this year is to try to use as many of the bags, boxes, etc. that I already have in my stash before buying anything new.  While going through my stores I found these cute little white bags that would be perfect for wrapping little gifts for our family (can't say what it is since some of them read my blog).  All I did was add a piece of Be of Good Cheer designer series paper matted on a piece of coordinating cardstock.  I used a hole punch to punch two holes in the top and threaded either Gumball Green Stiched Satin or Cherry Cobbler Scalloped Polka Dot Ribbon to tie the bags shut.  The tag was made from the Tags till Christmas stamp set and I used Stampin' Write Markers to color in the stamp so it would perfectly coordinate.  The tag fits perfectly with the Decorative Label punch so it's easy to cut out and I used dimensionals so it pops up.
 
These bags are so cute and festive, and the best part was I used supplies I already had so I didn't have to spend any money.  The bags were also super simple to make so you still have time to make your own.
 
Enjoy,
 
Diana

Pin It!

Thursday, December 6, 2012

Christmas Lodge Christmas Greetings

I’m definitely in full swing holiday preparations and while I’ve finished my families Christmas cards (I actually make them in the summer so there is one less thing to worry about) I know that many of you are still working on your cards so I want to provide you inspiration.  Today’s card is actually I card I made to swap for convention this summer and never shared it (can you believe that?)  This card has a Crumb Cake card base (I love how versatile this color is and use it ALL the time.  Next I took a piece of Whisper White cardstock and embossed it with the Big Shot and the Petals-a-Plenty embossing folder.  The striped paper is Island Indigo DSP from the In Color 2011-2013 Designer Series Paper stack and I added a piece of Cherry Cobbler Polka Dot Scalloped Grosgrain Ribbon.  The greeting is from the Christmas Lodge stamp set and is one of my favorite Holiday images we have.  All I did was ink the stamp with Stampin’ Write markers to add all the colors, huffed on the stamp and stamped, easy peasy.  This piece was matted on a piece of Crumb Cake cardstock. 
I love this card layout and have used it with several different color combinations.  This card is also great because it’s easy to make so you can make a lot, is mailable, and still has a WOW factor.  If you haven’t decided on your Holiday card design this is a great option and let me know and we can adapt it to any colors you wish and make sure you have all the necessary supplies.
Enjoy,
Diana
Pin It!

Tuesday, December 4, 2012

LIMITED OFFER – Stampin’UP! ORNAMENTAL ELEGANCE KIT – while supplies Last


Code #132832

Price $14.95


The ornament on the cover of our holiday catalog is such a hit that we are making it available to you and your customers–just in time to deck the halls with terrific trimmings you’ve made yourself! We’ve simplified this fun project so that you can quickly and easily achieve the same results. In addition to the kit, all you need is a glue gun, scissors, and adhesive. (Our Anywhere Glue Sticks [104045] are perfect for assembly.) Want greeting or place cards to go with those ornaments? The Ornament Keepsakes Stamp Set (W 128048 C 128051) gives you perfect coordination. Fancy a little sparkle and shine? Sprinkle on our Dazzling Diamonds Stampin’ Glitter (102023)!

The Ornamental Elegance Kit includes:
* Die-Cut Cardstock Elements
* Cherry Cobbler 3-1/2″ Scalloped Tulle Ribbon
* Natural Linen Thread
* Vintage Faceted Designer Buttons
* Large Pearl Basic Jewels

CONSIDER ADDING THESE to your order to really dress up your ornaments

#102023 – Dazzling Diamonds Glitter for the extra sparkle

The Ornament Keepsakes Stamp Set (W 128048 C 128051) for coordinated or additioanl projects

Anywhere Glue Sticks [104045] are perfect for assembly.

Order these now so you will have plenty of time to make them for Christmas gifting–or for your family tree! Available while supplies last.

I'll be placing an order tonight so contact me if you would like to order this kits (any any extras) so you can save on shipping. 

If you don't want to wait, you can ORDER NOW – while supplies last I know they won’t last long.

# Code #132832
Price $14.95


Pin It!

Christmas Stamp-a-Stack

Welcome back friends!  Today I just wanted to drop in to share with you the projects we'll be making at the Christmas Stamp-a-Stack class, this Sunday, at 2:00 PM.  You'll be making one of each of these 5 awesome designs for $15.  For this months add on option we'll be making all occasions card and you'll be making 3 additional cards for $5. 


 This is going to be a fun class and the last class of the year so make sure you don't miss out on the fun.  You still have time to sign up, so contact me soon to reserve your spot.

Hope to see you Sunday!

Diana
Pin It!

Sunday, December 2, 2012

Delightful Dozen Christmas Greetings: Sketch Challenge

Good evening!  I'm back after a fun-filled weekend and I'm in full on Christmas preparations.  We continued putting up decorations (one village up, one to go), I started gift wrapping, and I had an awesome Christmas Gift Class where we made several gifts that are going under the tree for the special people on my list.  This afternoon I wanted to take time to make a card for this weeks Fab Friday Sketch challenge, it's so easy and versatile I wanted to make sure to play along.  It also came together quickly due to the use of our awesome designer paper.  I started with Island Indigo as the cardbase and added a piece of Candlelight Christmas Speciality DSP.  Next I added a piece of Very Vanilla Cardstock and stamped the greeting from the Delightful Dozen stamp set (there's a greeting for every holiday which is AWESOME!)  I also added a little piece of the flocked window sheet from the same DSP pack and then added a piece of 1/8" Early Espresso Taffeta Ribbon and the Vintage Brads.
 
I love how easy this card comes together, I could easily make muliples of this for any occasion.
 
Enjoy and have a great week!

Pin It!

Search This Blog