Monday, November 30, 2015

30 Day Gratitude Challenge: Day 30, SSI Masculine Monday

Good morning and Happy Monday!  What an enjoyable end to the weekend, I didn't necessarily get a lot done but I was able to relax and even see a movie with Aidan so it was a lot of fun and definitely a great way to get ready for the start of the new work week.  It's the last day of the month, which means it's the last day of this years gratitude challenge and I've really had a great time.  I decided to use the  Stylin' Stampin' INKspiration blog Masculine Monday as great inspiration and a great change of pace to wrap this month up.

I started with Sahara Sand cardstock for the cardbase and then added a piece of the Winter Wonderland Speciality Designer Series Paper matted with Basic Black cardstock.  I also added a different pattern of paper from the DSP package for the gold stripes.

For the main stamped image I stamped the tree from Lovely as a Tree (a truly classic stamp set) using Versamark Ink on Basic Black cardstock and heat embossed it using the Heat Tool and Gold Embossing Powder.  Then I punched it out using the 2 1/2" Circle Punch.  I punched another circle out using the same punch and some Brushed Gold Cardstock (retired).  The greeting is from the Teeny Tiny Wishes stamp set and was stamped in Basic Black ink on Sahara Sand cardstock and then punched it out with the Word Window Punch.  Both the tree circle and the greeting were attached to the cardfront with dimensionals.

This designer paper is absolutely beautiful and it works great for other types of cards than just the holidays!  I'll admit, this was the first time I used this paper and it's so stunning I'll definitely be reaching for it again soon!  There are some other wonderful masculine cards being shared over on the design team blog so go check them out.

Below are easy ordering links for the products used on today's card:

Built for Free Using: My Stampin Blog


I wanted to give you one last reminder that today is the last day of Online Extravaganza and your chance to save up to 50% off some great products and gift ideas.  Today also has a new set of flash sale products that are only available while supplies last so if these are of interest to you, don't way, purchase them ASAP!!

Enjoy!

Diana
Pin It!

Sunday, November 29, 2015

30 Day Gratitude Challenge: Day 29

Happy Sunday!  It's so nice to be home after traveling most of yesterday so we're spending the day getting all settled and ready for the week (and avoiding all the crazy traffic!)  Just two more days for this years gratitude challenge and I've really had a lot of fun and have been able to send several cards out and also stocked up the card stash so I'm all ready.

This is another holiday themed card (mainly do to the colors and embossing) but could easily be modified for other occasions.

I started with Cherry Cobbler cardstock and embossed it with the Big Shot and a retired embossing folder.  Next I added a piece of the Merry Moments Designer Series Paper stack.  This card is all about flags and uses little pieces to really make the elements. 

Starting at the back I have a flag using Mossy Meadow Cardstock and it was embossed it with the Decorative Dots Embossing Folder.  The next flag uses Crumb Cake cardstock and I stamped it with the Gorgeous Grunge stamp set using the same color ink.  The top flag is for the greeting and is Whisper White cardstock and I used the Ornate Tag Topper Punch.  The greeting is from the Sassy Salutations stamp set and was stamped in Cherry Cobbler ink.  For the swirled accent I used a stamp from the Oh, What Fun stamp set and Early Espresso stamp set.  The final touch was to add some Early Espresso Baker's Twine to the top of the tag and attached the whole tag with dimensionals.

This card is nice and simple an is a great way to use up scraps you have and to make multiples (and we all need these types of cards this time of year!)

Below are easy ordering links for the product's used on today's card:

Built for Free Using: My Stampin Blog


Just remember, the Online Extravaganza is going on right now so you can save up to 50% off select Stampin' Up! products, perfect for the crafter in your life, to help you finish you holiday projects, or just a little fun.  And don't a forget a new set of  one day, flash sale items, including Project Life products will be released tomorrow so don't miss out, supplies won't last!

Enjoy the last of your holiday weekend and if you're traveling, be safe!

Diana
Pin It!

Saturday, November 28, 2015

30 Day Gratitude Challenge: Day 28

Good morning and Happy Saturday!  It’s been a wonderful holiday vacation and I’ve enjoyed every minute, today we’re heading home (we always like to get home on Saturday to get ready for the week and to avoid all the crazy traffic on Sunday returning home).  We’re full on getting ready for Christmas so I decided to use that theme for several of my remaining gratitude cards so they are ready to go.    

For this card I started with Cherry Cobbler cardstock for the cardbase and then added a piece of Sahara Sand cardstock that was embossed with the Big Shot and the Stylish Stripes Embossing Folder.  Next I took a piece of Merry Moments Designer Series Paper and wrapped some Mossy Meadow 3/8” Stitched Satin Ribbon (awesome deal on the clearance rack right now!).  For the greeting I used the Sassy Salutations stamp set and stamped it in Cherry Cobbler Ink on Whisper White cardstock and punched it out with the 2” Circle Punch.  The cute little tree outline is from the Project Life Season Snapshot 2015 stamp set and was stamped in Old Olive ink (I made sure to punch the greeting first to make sure I could line up the tree where I wanted it).  The final touch was to mat the greeting with a Gold Foil Doily from the Metallic Doillies Package (these are on sale right now as part of the Online Extravaganza and they come in silver and gold, you’ll love them!!).

This is a fun, easy card that is great if you need to make multiples and is nice and flat to make the post office happy.  You could easily change the greeting to make this a Christmas card as well (there’s plenty of time to still make your holiday cards this year if you haven’t started yet).

Below are easy ordering links for the products used on today’s card:

Built for Free Using: My Stampin Blog


Enjoy the rest of your holiday weekend!

Diana
Pin It!

Friday, November 27, 2015

30 Day Gratitude Challenge: Day 27

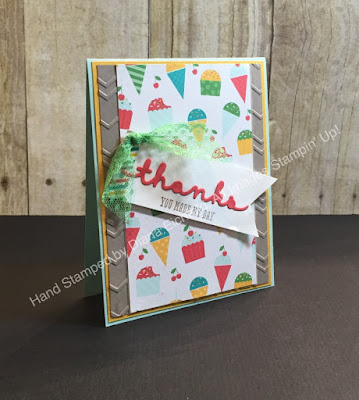
Good afternoon!  I'm getting a little late start to the day after being out last night Black Friday shopping and then trying to get some sleep.  We had such a wonderful Thanksgiving and are just enjoying time with friends and family.  For today's gratitude challenge I decided to combine it today's SSINKspiration Friday Favorites which was the Cherry on Top Designer Series Paper Stack (and the matching washi tape is equally awesome!!).  Everyone who know me knows I love ice cream and cupcake so this designer paper is perfect!

I started with Pool Party cardstock and then added a layer of Crush Curry cardstock behind the Tip Top Taupe cardstock that was embossed with the Big Shot and Arrows Embossing Folder and then added a piece of the Cherry on Top Designer Series Paper.

For the greeting I decided to make a tag using Whisper White and added a stripe of Cherry on Top Washi tape along the left side.  I use the Big Shot and the Greeting Thinlits and some Watermelon Wonder cardstock and then stamped the rest of the words using Tip Top Taupe ink and the A Dozen Thoughts stamp set.  I used dimensionals to attach the greeting to the cardfront and then added a little knot using the Cucumber Crush Lace Trim

This is such a fun, everyday card and all the bright colors would be perfect to brighten someone's day!

Below are easy ordering links for the products used on today's card:

Built for Free Using: My Stampin Blog


Have a great Friday!

Diana
Pin It!

Thursday, November 26, 2015

30 Day Gratitude Challenge: Day 26 Happy Thanksgiving!

Happy Thanksgiving!  I hope you are enjoying time with friends and family today, we get together with friends from college every year it’s always a great time.  Today, as well as other days is truly a day to remember and appreciate all that we’re thankful for and we’re so blessed.  Of course I’m sharing a card today for the gratitude challenge and today’s card is the card we sent to our families.   On the SSINKspiration blog we're sharing thanks cards so make sure to check out the blog for lots of other great ideas.

For this card I started with Hello Honey cardstock for the cardbase and then added a piece of Very Vanilla cardstock that was embossed with the Big Shot and the Woodland Embossing Folder (I used the same technique as last week to add the color behind the embossing).  Now I will admit, I used a lot of “extra” pieces I had sitting on my desk to make these cards.  The leaves are from the Witching Décor Kit (I was able to use every last leaf through various projects this month and was so happy I had stamped, crumbled, and sponged all the leaves when I was initially making the hat kit so I didn’t have to make a bigger mess.  I used Tombo liquid glue to attach the leaves so I could just attach parts of the leaves so they have lots of dimension.  I added a bow using Mossy Meadow Stitched Satin Ribbon (also retired and was sitting on my desk). 

The greeting is from last years Thanksgiving Paper Pumpkin kit (it is still available and the piece I stamped on was also in that kit so I just trimmed off the striped part (which didn’t match my card) and then sponged around the edges with Tangelo Twist ink.

These cards are so beautiful and have so many textures and elements that you really just want to  touch it (I may be biased but I was really happy with how it turned out!)

Below are easy ordering links for the products used on today’s card:

Built for Free Using: My Stampin Blog


Have a happy and safe Thanksgiving holiday!

Diana
Pin It!

Wednesday, November 25, 2015

30 Day Gratitude Challenge: Day 25

Good morning and Happy Thanksgiving Eve!  I love this time of year and are looking forward to lots of time with family and friends (and relaxing!!!)  I’m running out of time to enjoy all the fun products in our fall collection so I decided to take this opportunity with today’s gratitude card to focus on the products in the Into the Woods Product suite (I love all the elements in this suite and how everything perfectly coordinates). 

For this card I started with Soft Suede cardstock for the cardbase and then added a piece of Crumb Cake cardstock that was embossed with the Big Shot and the Decorative Dots Embossing Folder (I sponged all over the cardstock with Soft Suede ink to add depth the embossing).  I also used the Big Shot and Circle Collection Framelits to cut a circle frame out of the cardfront.  I used several different patterns from the Into the Woods Designer Series Paper and matted the woodgrain print along the left side with Tangelo Twist cardstock.  The smaller circle was punched with the 2” Circle Punch. 

For the greeting I used the Thankful Forest Friends stamp set and inked it using Stampin’ Write Markers before punching it out with the 2 ½” Circle Punch and attached it with dimensionals.  For some extra texture I added a piece of Rich Razzleberry Into the Woods Cotton Ribbon that I ruffled up using Fast Fuse as adhesive and then added one of the cute Into the Woods Wooden Elements and attached it with a dimensional.

This was my first time using this stamp set (borrowed it from a friend) and it really has some great images that provide lots of possibilities!

Below are easy ordering links for the products used on today’s card:

Built for Free Using: My Stampin Blog


Have a safe and happy holiday weather you’re traveling or staying home!
Diana
Pin It!

Tuesday, November 24, 2015

30 Day Gratitude Challenge: Day 24

Good morning!  Last day of work before the holiday break (for me at least) and  I can’t wait, but there’s so much to do!!  For today’s gratitude project I decided to change things up and show you the project we made for Aidan’s teachers (and I also made some for the kiddos on Thanksgiving).  I used the September Paper Pumpkin to make these cute little pumpkins (or haystacks if you don’t add the straws).  We baked cookies for Aidan’s teachers (we have to 13 teachers) and just put the cookies in a cello bag and then all the supplies for the bag, tag, stamps, etc. were all in the Paper Pumpkin kit (the kit makes 8 projects so I did buy a refill kit (one of the perks of being a subscriber) and we were able to whip these up in now time (and I know his teachers will love them, they’re filled with Double Chocolate (white and milk) chip cookies with cranberries, perfect fall type treat!) 

There’s no supply list since everything came with the kit.  If you like this kit all you need to do is sign up for Paper Pumpkin, then in addition to getting a new kit delivered to your mailbox each month you can shop any of the available kits from the past for your own crafting needs (FYI…during the Online Extravaganza going on right now you don’t need to be a Paper Pumpkin subscriber to purchase past kits, some are currently on sale for everyone, including the super cute valentine kit from last year!!!) some of these kits will be finding their way under the tree for some friends on my gift list!!
Have a great day!

Diana
Pin It!

Monday, November 23, 2015

SSINKspiration Mystery Challenge #SSINKMC27: And Many More

Good morning!  What a hectic and fun filled weekend, I need go back to work to get a little rest (thankfully it's a short week with the holiday!)  It's time to continue the gratitude challenge (one week to go) and I decided to combine today's card with the Mystery Challenge over on the Stylin' Stampin' INKspiration blog.  This was a lot of fun, we were given a list of items and had to incorporate as many things as we could into our card.

I started with Pool Party cardstock for the cardbase and then added a piece of Whisper White cardstock that I stamped different splatter images from the Gorgeous Grunge stamp set using Real Red, Pool Party, and Pear Pizzaz ink.  I layered a piece of Winter Wonderland Designer Vellum on top of the splatter to add some gold splatter to the mix and on the bottom I added a piece of retired designer series paper (I was working on another project in the studio and this was the perfect color).  I wrapped a piece of Gold 5/8" Satin Ribbon in the center and then tied a nice pretty knot.

To make this "Christmasy" I stamped the tree from the Lots of Joy stamp set in Pool Party ink on Whisper White cardstock and then cut it out and attached it to the cardfront with dimensionals.  The greeting is from the And Many More stamp set and was stamped in Real Red ink and then punched out with the Washi Label Punch.  I decided I needed a little more bling so I added a couple rhinestones to the greeting piece for the final touch.

There's a lot going on with this card but I had fun trying to add all the mystery items into the card so it's all good.  We would love for you to come check out the mystery challenge and play along with us!

Below are easy ordering links for the products used on today's card:

Built for Free Using: My Stampin Blog


Enjoy,

Diana

Pin It!

Sunday, November 22, 2015

30 Day Gratitude Challenge: Day 22

Good morning!  What a fun day, I always enjoy creative time and when I can do it with friends, it’s even better!  Today is all about getting the Christmas decorations out and getting the house ready (I like to have all our decorations up and ready before Thanksgiving so we can enjoy them longer).  It’s only fitting that I have a Christmas themed card for today’s gratitude challenge.  This is another nice and simple one that can really be used for any occasion (if it wasn’t for the designer paper that has ornaments printed on it.

I started with Early Espresso cardstock for the cardbase and then added a piece of Whisper White cardstock for the cardfront.  On that I added a piece of designer paper from the Merry Moments Designer Series Paper stack along the right side.  I used the Gorgeous Grunge stamp to stamp the splotches in Crumb Cake ink.  The greeting is from One Big Moment and was stamped in Early Espresso Ink.

For a fun embellishment I took another piece of DSP and cut the edges randomly to mimic washi tape and attached it to the cardfront with dimensionals so it pops up.  I took a piece of Gold Glimmer Paper and used the Big Shot and framelit from the Treat Bag Thinlits to cut the holes in the glimmer paper and then attached it to the designer paper so that part is hanging off and looks suspended.

If you haven’t had a chance to check out some of the thinlit sets, there are some great “accessory” pieces that are so useful for all types of projects, even on their own.

Below are easy ordering links for the products used on today’s card:

Built for Free Using: My Stampin Blog


Enjoy the rest of your weekend,

Diana
Pin It!

Saturday, November 21, 2015

30 Day Gratitude Challenge: Day 21

Good morning!  I’m really excited about today, got up early to get my run in and then it’s “Super Saturday” in the studio and I have two different Holiday themed classes so there’s going to be lots of crafting, laughter, and fun, I can’t wait!  Before all that get’s started I wanted to share today’s gratitude card with you.  I will fully admit I was running a little low on time last night and needed to whip up something fast and thankfully I was able to go to my “extra pieces stash” and gather several items for this card to make it come together in no time.

I started with Crumb Cake cardstock for the cardbase and then added a piece of Cajun Craze and then Very Vanilla cardstock for the cardfront.  The greeting is from the Merry Everything stamp set and I used my Stampin’ Write Markers to ink the stamp.  For the flag piece, it’s Soft Suede DSP from the Neutrals Designer Series Paper Stack and I had previously cut it out but didn’t use it so all I had to do was sponge all over it to age the stripes and make them blend more with the Very Vanilla.

Remember the awesome Witches’ Hat Décor kit?  There were tons of extra leaves in the kit so I had already stamped (with the Vintage Leaves stamp set), crumbled, and sponged them to use for Thanksgiving cards so I just grabbed a few and added them to the card (instant texture!).  The final touch was to take a piece of Hello Honey 5/8” Striped Cotton Ribbon and tied a knot and attached it at the top of the leaves with a glue dot.

This card is nice and simple but looks like it’s a lot more involved than it was and matches the view from my window!  

Below are easy ordering links for the products used on today’s card:

Built for Free Using: My Stampin Blog


Enjoy your Saturday and hope you can get some crafting in!

Diana
Pin It!

Friday, November 20, 2015

30 Day Gratitude Challenge: Day 20

Good morning and Happy Friday (really, all Fridays are happy days)!  With this being the last weekend before Thanksgiving and the “official” kickoff of the holiday season we’re going to be busy with holiday preparations, Super Saturday is tomorrow with 2 Christmas themed classes and then we’re going to  get to work decorating the house (I try to get all the decorations up before Thanksgiving so we can maximize the time to enjoy them.  There will also be some baking and cooking prep to get ready for Thanksgiving so really it’s going to be an awesome weekend all around!  This morning I wanted to share my card for the gratitude challenge and I decided to use another “new to the catalog” set, A World of Thanks.  This is a great background stamp and makes quick cards but don’t overlook the potential to use the individual sayings in the stamp as well.

I started with Blackberry Bliss cardstock for the cardbase and then used Very Vanilla cardstock for the cardfront and stamp the A World of Thanks stamp using Hello Honey ink.  Then I sponged around the edges with Soft Suede (did this sponging on all the layers of this card) and wrapped a piece of Blackberry Bliss 5/8” Stitched Cotton Ribbon around the cardfront before attaching it to the cardbase.  The greeting uses the same stamp and I used my Stampin’ Write Marker to ink just the part of the stamp I wanted and stamped it on a scrap of Very Vanilla cardstock and then cut it out with the Big Shot and the Ovals Collection Framelits.  I added a string of pearls along the bottom of the greeting (both to accent it, but also to hide a little bit of that had transferred while stamping) and then attached the greeting with dimensionals.

A great thing about doing this to highlight a specific part of the image is that I was able to flip the oval since the text on the actual stamp is upside down so I could change the orientation and the font on this stamp is nice and fun!

Below are easy ordering links for the products used on today’s project:

Built for Free Using: My Stampin Blog


Have a great day!

Diana
Pin It!

Thursday, November 19, 2015

30 Day Gratitude Challenge: Day 19

Good morning!  I’m glad you’ve made it back for today’s edition of the 30 Day Gratitude Challenge since I decided to change things up and not make anything seasonal and went with a great all occasion card I shared with stampers at my card class this month (the card for class was a get well card but you could pick your sentiment and since I was making cards with the ladies I decided to make another one as a thank you.  The bokeh technique has been making the rounds I was a little intimidated by it until I saw it explained really easily by Becky Roberts so I decided to give it a try and it’s super easy and fun.  I also like that you can really combine any colors you want to suit your needs

I started with Pear Pizzaz cardstock for the cardbase and then added layers of Marina Mist and Basic Black behind my stamped piece that started as Whisper White cardstock.  To create the background I took sponge daubers and swirled Pear Pizzaz and Marina Mist ink randomly on the cardstock until it was completely covered.  Next I took a piece of window film and cut several circles out of it using punches (I’ll admit it was a little difficult to cut through the film with the punches so if you have the Circle Collections Framelits they will work just as well and maybe a little easier).  Next I layed the window film on the cardstock and lightly swirled Whisper White Craft Ink inside each of the circles and repeated this all over the card.  As a final touch I inked up my sponge dauber with the craft ink and sponged directly on the cardstock so I had some small circles of pure craft ink and really bright, then I just let it dry.

After the background was complete all I had to do was stamp the greeting from the Fabulous Four stamp set using Momento Tuxedo Black Ink and attached a piece of Whisper White 3/8” Stitched Satin Ribbon along the left side.

This is such a soft and pretty card and will certainly brighten someone’s day, whether it be to say thanks or any occasion.  You should give this technique a try and let me know what you think and what your favorite color combination is!


Below are easy ordering links for the products used on today's card:


Built for Free Using: My Stampin Blog


Have a wonderful day!

Diana
Pin It!

Wednesday, November 18, 2015

30 Day Gratitude Challenge: Day 18

Good morning!  It’s Wednesday and it’s been a very productive week but with Thanksgiving only a week away I have a lot to do and not a lot of time.  I’m back with today’s gratitude card and with the beautiful and unusually warm weather we’ve been having here this week and I’m trying to enjoy it while it lasts so I decided to use the fall views as inspiration for today’s gratitude card, I'm also sharing this card over on the SSINKspiration blog for our gratitude post (so you can go there for other ideas).  Also, Wendy Weixler showed this great technique (new to me) for stamping on an embossing folder before adding the cardstock and it is such a beautiful effect I created this card (and it was a big hit in card class last weekend!)  I will say, I loved it so much I decided to use it for our families Thanksgiving card and I embossed several pieces and noticed that no two pieces looked exactly the same and it was really fun to see how they all turned out when I did the same thing each time.

I started with Cajun Craze cardstock for the cardbase and then added a piece of Very Vanilla cardstock.  To create the background I used the Gorgeous Grunge stamp set (the largest splotched stamp) and stamped it using Hello Honey, Cajun Craze, and Always Artichoke ink (I started with the lightest color ink and worked my way to the darkest) on the inside of the Woodland Embossing Folder (this folder is amazing and it was just announced that it will retire at the end of the Holiday Catalog and only available while supplies last so if you don’t have it order it ASAP so you don’t miss out!) .  Then I added the Very Vanilla cardstock and ran it through the Big Shot (we found that running it through twice at the same time provides a better coverage of the ink on the cardstock).

The greeting is from the For All Things stamp set and I used Soft Suede and Cajun Craze Stampin’ Write Markers to ink the stamp and then cut it out with the Big Shot and Deco Labels Framilits (and finished by sponging around the edge with Hello Honey ink).  I created a background for the greeting using the Decorative Label Punch and Always Artichoke cardstock.  A piece of Hello Honey 5/8” Striped Cotton Ribbon provides some flag tails out the one side.  The final element was to add one of the little wooden acorn pieces from the Into the Woods Wooden Embellishments (I colored it using Crumb Cake and Soft Suede Stampin’ Write Markers before attaching it to the cardfront with glue dots.

I love absolutely everything about this card and this background really is a showstopper!  I can image doing the same thing with trees, and other stamped images and see what the result is (oh, I may have to play with this!!)

Below are easy ordering links for the products used on today’s project:                  

Built for Free Using: My Stampin Blog


Have a great day!

Diana
Pin It!

Tuesday, November 17, 2015

30 Day Gratitude Challenge: Day 17

Good morning!  What an amazingly beautiful day we had yesterday, really made me want to  skip work to enjoy the nice weather.  We’re heading back to Christmas for today’s gratitude card and I love the cardinal image in the Joyful Season stamp set and with two-step stamping I knew I could make him easy and not stress out with coloring.

I started with Cherry Cobbler cardstock for the cardbase and stamped all over the background using the stem with berry image and Cherry Cobbler ink.  Next I added a piece of Merry Moments Designer Series Paper.  For the stamped image I used Whisper White cardstock and started by stamping the branch in Crumb Cake and added the berries using Cherry Cobbler.  I did stamp the bird partially on the background piece so his legs were on the branch and I didn’t have to fussy cut him (plus it adds dimension just to his body which is a little more realistic).  I stamped the bird a second time on a scrap piece of cardstock and stamp the body color and beak before cutting it out with Paper Snips and attached him with dimensionals.

The greeting is from the One Big Meaning stamp set using Mossy Meadow ink.  For embellishments I tucked a small Silver Foil Doily behind the stamped pieace before attaching it and added a piece of Mossy Meadow retired ribbon (you could use out current Mossy Meadow Stitched Ribbon but I was having issues with how the Whisper White cardstock looked against the Very Vanilla ribbon).

This card is so pretty and the font of the greeting works great in the space and with the image, I was really pleasantly surprised with how it turned out. 

Below are easy ordering links for the products used on today’s card:

Built for Free Using: My Stampin Blog


Have a great day,
Diana
Pin It!

Monday, November 16, 2015

30 Day Gratitude Challenge: Day 16

Good morning and Happy Monday!  What a wonderful weekend full of family fun and beautiful weather to enjoy.  Unfortunately it's back to another work week and I can't believe it's less than two weeks before Thanksgiving.  We've reached the half way point of my November Gratitude challenge and I hope you're enjoying all the ideas I'm sharing to help let other's know how much we appreciate them.  For today's card I decided to take a different twist and used the Kinda Eclectic stamp set and it was one of the cards we made in card class yesterday and was a hit!

I started with Soft Suede cardstock for the cardbase and then used Whisper White cardstock for the cardfront.  I used Mossy Meadow and Old Olive ink to stamp the leaves in the background.  Next I added a piece of DSP from the Into the Woods Designer Series Paper and punched it out using the 2" Circle Punch.  For the greeting I used Soft Suede and Rich Razzleberry Stampin' Write Markers to ink the stamp and then stamped on Crumb Cake cardstock before punching it out with the 2 1/2" Circle Punch before attaching it to the cardfront.

For some fun embellishments I started by using Fast Fuse to attach a piece of Into the Woods 3/8" Cotton Ribbon along the bottom.  For the butterfly I stamped it in Tangelo Twist and punched it out with the Elegant Butterfly Punch.  Three small rhinestones make the perfect accent for the butterfly body and I used glue just in the center of the body so the butterfly wings could be raised off of the cardfront.

This stamp set has so many great images that work so well together as well as separately for whatever your needs and it make a really easy, elegant card and it was fun using more "fall" colors for a new twist.

Below are easy ordering links for the products used on today's card:

Built for Free Using: My Stampin Blog


Enjoy!

Diana
Pin It!

Sunday, November 15, 2015

30 Day Gratitude Challenge: Day 15

Happy Sunday!  What a great day we had yesterday and today’s going to be another great one, football for the guys, and card class and stamping me for and the ladies (I always feel so much more relaxed after I’ve had a chance to spend some quality time creating and boy do I have a lot of projects on my To Do list that need some attention!!)  Today I have another fun and whimsical Christmas thank you card.  Have you had a chance to check out the beautiful Home For Christmas Designer Series Paper?  It was all hand painted in the design process (we learned all about the process of creating the designer paper in this years Holiday catalog and boy is it amazing!!)  These sheets have these fabulous designs and we saw this great way to cut out the individual images (Santas, reindeer, trees, etc. and use them as elements on your card.  Of course this is great but creates a lot of waisted paper, which I hate so Idecided to use one of the partial santa’s on this card and make it look like he’s peeking out. 

I started with Real Red cardstock for the cardbase and then added a piece of Whisper White cardstock for a nice clean front.  I stamped the greeting in Mossy Meadow ink using the Another Thank You stamp set (same as yesterday, yes you really do need this set!!)  I also used a stamp from Gorgeous Grunge and some Pool Party ink to stamp these lines that remind me of the lines made on ice when you’re skating.  I used some Mossy Meadow cardstock to matt a piece of Home For Christmas Designer Series Paper and attached it so my santa had something to peak out from behind.  I cut my little santa out with paper Snips and glued him onto the cardfron and then added a string of rhinestones in a waving pattern to mimic the cuts in the ice (over the top???  What do you think?)   

This card just makes me smile.  I’ll admit there is no way I could color in an image that well and cutting him out really isn’t that hard and the images in this paper package really remind me of those classic images of the holidays from when I was a kid.  It’s also nice and flat and mailable that the mailman would appreciate!

Below are easy ordering links for the products used on today’s project:

Built for Free Using: My Stampin Blog


Enjoy the rest of your weekend!

Diana
Pin It!

Saturday, November 14, 2015

30 Day Gratitude Challenge: Day 14

Good morning!  It’s going to be a fun day, we have lots to get done today and then we’re run/walking the Snowflake Stampede again this year which is a 2.5 mile loop through the Christmas lights in Bull Run park that you normally drive through.  We have so much fun dressing up and doing this loop on foot since we get to enjoy the lights, stop and take pictures as much as we want and have fun (just hoping it’s not too cold!)  Since it’s starting to get in the holiday spirit it’s only fitting that today’s gratitude card is another Christmas one.  I had several strips of this particular DSP pattern after last month’s class and a punched out tree sitting on my desk so I decided to use those two items and see what I could come up with (it’s always a great idea to go through your pile of little pieces on your desk (admit it we all those items that didn’t work on the initial project we intended but we couldn’t throw them away, so let’s repurpose and them on something new!!)

I started with Real Red cardstock for the cardbase and then added a piece of Whisper White cardstock for a nice clean front.  I took that piece of DSP (from the Merry Moments Designer Series Paper Stack and matted it with Smoky Slate cardstock.  The little tree (that I already had cut out is from the Lots of Joy stamp set and was stamped in Mossy Meadow ink on Whisper White cardstock and then punched out with the Tree Punch).  The tree was attached to the cardfront with dimensionals.  The greeting is from the Another Thank You stamp set and was stamped in Real Red.  For a final touch, I added one of the star buttons from the Home for Christmas Designer Buttons to the top of the tree and tied a knot in the button using linen thread (hate to have a naked button!!)

This card came together really quickly since I already had a couple of elements (the “hardest” part was decided which greeting to use so it didn’t overpower the tree.  This DSP is also great because it’s really neutral and isn’t holiday specific (so I can continue to use it long after Christmas is over, and trust me, I’m on a mission to work on using up my supply stash!)
Below are easy ordering links for the products used on today's card:

Built for Free Using: My Stampin Blog


Have an enjoyable Saturday!

Diana
Pin It!

Friday, November 13, 2015

30 Day Gratitude Challenge: Day 13

Happy Friday!  With a gratitude challenge it really does make you think about all you have to be thankful for, health, family, friends, etc.  We have been so blesses and I’m looking forward to enjoying time this weekend with all those things I’m thankful for.  Tonight Aidan has Ninja Night that he’s really excited about which means “date night” for mommy and daddy and we’re also really excited, we’re going to go see the new James Bond movie, whoo hoo!  Before all the fun begins I wanted to share today’s gratitude card, it’s another holiday themed one based on a card from class last month.

I started with Early Espresso cardstock for the cardbase and then added a piece of Merry Moments Designer Series Paper.  I used another pattern from the same DSP package for the tall panel.  The greeting is from the Tin of Cards stamp set (even if you don’t have the Card Tin kit, which really is awesome, the coordinating stamp set is a must have for all types of occasions!) and stamped it on Whisper White cardstock using Early Espresso ink and matted it with Early Espresso cardstock.  I added the cute little tree element and used the Lots of Joy stamp set and stamped it in Cherry Cobbler ink on Whisper White cardstock and used my Paper Snips to cut it out before attaching it with dimensionals.  I added a knot using the Gold Satin Ribbon that is so bright and shiny and really helps dress up the card.

I love the addition of glimmer to the card that dresses up the card and helps make it special (especially for the holidays!!)  You can also make a ton of these cards using the Merry Momments Designer Series Paper Stack (the one that’s in the Holiday Catalog) so you could easily make this your holiday card as well (when you cut the DSP you can get both panels out of one piece of DSP). 

Below are easy ordering links for the products used on today’s project:

Built for Free Using: My Stampin Blog


Have a great weekend!

Diana
Pin It!

Thursday, November 12, 2015

SSINKspiration November Blog Hop: Mystery Supply Challenge


Good morning!  We’re continuing our month of gratitude projects but since it’s the second Thursday of the month it’s time this months SSINKspiration blog hop and we have a fun one this time.  We decided to play another addition of Mystery Supply Challenge where we all sent each other 3 supply items (stamped image, DSP, ribbon, etc.) and the recipient needs to create a project using all three times.  I really have fun with these, not only seeing what others create with my package but challenging me with the basket I receive.  This month Darcy provided my mystery supplies and I’ll admit she didn’t include a greeting so I was happy I could use my card for the gratitude challenge (killing two birds, one stone). 


As you hop along, please be sure to comment and show some love on every blog! We are always excited to hear from our followers! You should have just left stop number #9 on the Stylin' Stampin' INKspiration Blog Hop - Leanne at Literally My Joy. If so, you are in the right spot. If a link doesn't work or you get off track, you will find the full blog hop lineup below.


I’ll start with a picture of the three items I received.  It was fun to receive this butterfly image from the Watercolor Wings stamp set, I don’t have this set and it really does make a pretty image and quite large.  It also included a piece of DSP from the Go Wild Designer Series Paper Stack and some Cherry Cobbler Thick Baker’s Twine.


I started with Wild Wasabi cardstock for the cardbase (I guessed that was one of the green’s) and then added the and then added the Go Wild Designer Series Paper for a great background and lots of contrast.  Since the butterfly is so large I knew I didn’t have enough room for the greeting to be a separate piece so I decided to heat emboss it directly onto the DSP using the Heat Tool and Cherry Cobbler Embossing Powder (this also helped tie in the baker’s twine that was part of the mystery basket.  The greeting itself is from a past Paper Pumpkin kit (love how you get exclusive stamps in these kits that you can use long after the kit supplies are exhausted).

Next I took a piece of Crumb Cake cardstock and embossed it with the Big Shot and the Arrows Embossing Folder (I did also sponge it with Crumb Cake ink).  I also tucked half of a Paper Doily behind the Crumb Cake piece for a background to the butterfly and wrapped the Cherry Cobbler Extra Thick Baker’s Twine around the Crumb Cake piece.  I wanted the butterfly to have some dimension so I folded the wings up and added a string of rhinestones to the center for the body before attaching it to the card front with liquid glue (I added glue just along the center of the body so the wings could move).

I had fun playing with the basket items and wouldn’t normally have thought of combining the butterfly with the bold DSP but it really works, thanks Darcy for helping me think outside my usual comfort zone!

Below are easy ordering links for the products used on today’s project:

Built for Free Using: My Stampin Blog


Make sure to check out the rest of the blog hop for lots of other great ideas.  If you click the “Next” button, you’ll go to Darla’s site but you can also access any of the hopper’s site from the full blog list below.

http://stampinwithdarlaandsisters.blogspot.com/2015/11/ssinkspiration-november-blog-hop.html

Enjoy,
Diana
Pin It!

Search This Blog