Tuesday, December 31, 2013

Happy New Years Greeting: Best New Year

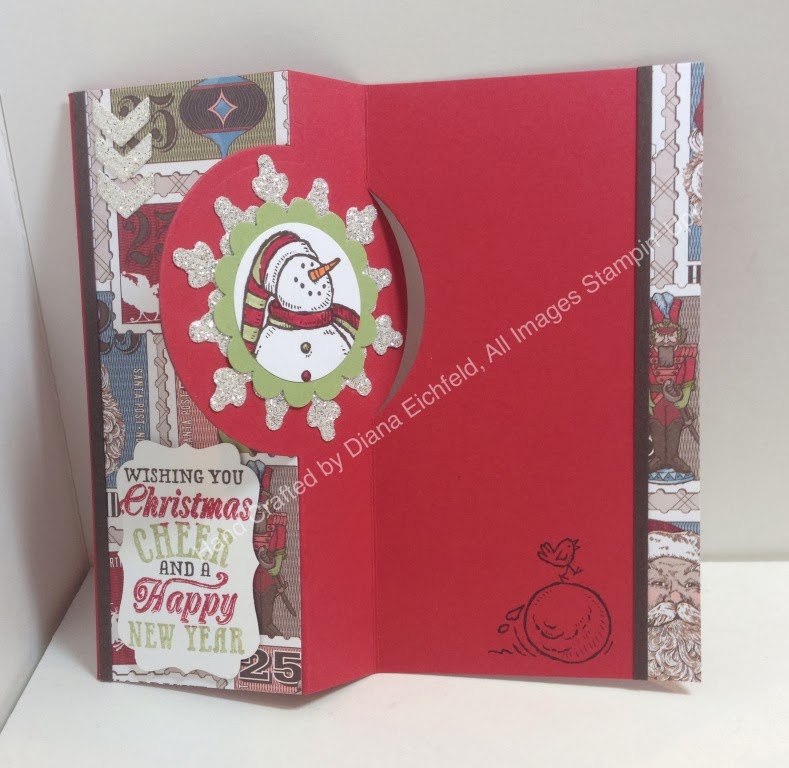
Good evening and Happy New Years!  It's been a whirlwind since we got back from our Christmas cruise and I feel like we've been on the go nonstop (it doesn't help that I had scheduled several doctor's appoints for this week to get them in before the end of the year).  Anyway, I've been itching to get back to the studio but was lacking some mojo.  I found these images from the Best New Year stamp set that were already stamped and perfect for today so I decided to whip up some cards. 
 
These all use the color pallet from the Winter Frost Speciality DSP package as well as bling in the form of Buttons, Ribbon, and Silver Glimmer Paper.  I love how you can use the same colors and change up the elements and get such different looks.
We're hosting a big New Year's Eve shindig so I've got to get going and wrap all the finishing details.  I hope you and your family have a Happy and Safe New Years and and Wonderful 2014!  Thanks for all your support and love, it means the world to me and the family.


Pin It!

Monday, December 30, 2013

Stylin' Stampin' INKspiration Blog: Love You More, Valentine's Ideas!

 Good morning!  I hope you're still enjoying all your holiday festivities and are able to relax some more this week.  We're back safe and sound from our cruise and we had an amazing time but I'm so glad we still have a few more days until we have to get back into the school and work routine.  So today I'm sharing several projects over on the Stylin' Stampin' INKspiration blog and since Christmas is over I decided to share some fun projects using the new projects in the Valentine's Special, A Whole Lotta Love!  These products are so fun and will really make it easy to create cute and fun cards, treats, etc. in a breeze.
 
The first project I have is a card and it uses the Love You More stamp set.  The cardbase is Pool Party and then I added a layer of Crumb Cake that was embossed with the new Decorative Dots Embossing Folder (this is one of the awesome new Sale-a-bration items you can earn for FREE in just a few weeks)l.  After embossing the cardstock I used a sponge dauber to lightly spread some Whisper White craft ink over the impressions to make them stand out.  Next I added a piece of Real Red Polka Dot Paper from the Polka Dot Parade Designer Series Paper along with some Pool Party Seam Binding Ribbon.
 
For the main stamped image, I used the Love You More stamp set in Chocolate Chip ink and colored in the heart with a Real Red Stampin' Write Marker.  This piece was cut out with the Big Shot and the Circle Collection Framelits and matted on Pool Party cardstock punched out with the 2 1/2" Circle Punch and then Chocolate Chip cardstock cut with the Windows Collection Framelits.
 
 For my second project I made a love note card, which is perfect for Valentine's day since it's a 3x3 card. This card has a Pear Pizzaz cardbase and I used the Stylish Stripes Embossing Folder to emboss on the Early Espresso Core'dinations cardstock and then sanded it.  For the scalloped square and square pieces I used tags out of the Pop 'n Place Gift Tags set (this set is great not just for Christmas).  The bird image is also from the Love You More Stamp set and I cut him out with Paper Snips and attached him with dimensionals.


I had to make a treat as well since it is Valentine's Day and the Sweetheart Treat bags are so cute.  The kit comes with the bags, Pool Party Baker's Twine, and the printed flags.  All I did was stamp the words from the Love you More stamp set in Basic Gray ink and added a heart cut out with the Small Heart Punch and the Silver Glimmer Paper.  These bags are pretty decent in size, I have three fun sized Hershey bars inside (what's Valentine's without chocolate?) and there's still plenty of room.
 
I hope I've given you some fun ideas to use the new Valentine's products and remember these products are only available while supplies last so don't wait!
 
Enjoy!
 
Diana

Pin It!

Friday, December 27, 2013

Giggle Greetings Birthday Greetings

Good morning and Happy Friday!  It’s been a wonderful holiday season but it’s time to start looking beyond Christmas and work on other projects.  One things we need all year long is birthday cards and I really like to change up these cards because people have such different tasks, etc.  Today’ I’m sharing a fun birthday card using the Giggle Greetings stamp set (this is such a cute stamp set and perfect for people who don’t take things too seriously).

This card uses a Pool Party cardbase and then as a layer of Smoky Slate cardstock that was embossed with the Big Shot and the Stylish Stripes Embossing Folder (remember this item is in the Holiday catalog so you’re only guaranteed to be able to purchase it through January 3, 2014, we don’t know if it will carryover so if you don’t have this folder make sure to order yours soon).  Next I used some I Am Me Designer Series Paper for the flag along with some Smoky Slate Chevron Ribbon.  The greeting is stamped on Whisper White cardstock and colored in with Stampin’ Write Markers before cutting it out with the Big Shot and the Deco Label Framelits.  I cut another Deco Label in the same size out of Calypso Coral cardstock and attached it perpendicular to the white layer.  I attached the greeting layer with dimensionals so it pops up.

This stamp set has so many cute images I’ll definitely be using it a lot and I really like the clean lines and fun elements in this card, can’t wait to send it out.

I hope you enjoy and are able to get a little crafting in today, enjoy!

Diana
Pin It!

Wednesday, December 25, 2013

Merry Christmas! Family Christmas Share 2013

Good Morning and Merry Christmas to all our friends and family! I hope you're spending a wonderful day with family and just enjoying all the special moments.  We're on a family cruise right now and we'll be spending our Christmas on a beach snorkeling and driving dune buggies (definitely not our normal Christmas activities, can't wait).  Everyone knows I really enjoy making our family Christmas cards and work on them for months, each year.  Today on the Stylin' Stampin' INKspiration blog all the designers are sharing the cards and family pictures they made for this year, can't wait to check them all out!  When Stampin' Up! released the new Circle Card Framelit Dies to make these cool swing cards I immediately knew I had to use it for our Christmas card. 
 
Now I have to admit, several items on my card are retired, I have lots of products in my stash so I love to use some of the awesome products from the past and make room for new items, but you could easily swap out any of our fabulous designer series papers and stamps to create a unique card for you and your family.
 
The greeting on the cardfront is from the Christmas Messages stamp set and was punched out with the Decorative Label Punch.  I used lots of Silver Glimmer paper on these cards, both on the chevrons on the cardfront and the snowflake on the inside circle swing element.  The stamp set, Snow Much Fun, and designer series paper, Letter's to Santa, are both retired.  Other current products I used were: the Big Shot, Circle Collection Framelits, 2 1/2" Circle Punch, Scalloped Circle Punch, and Festive Flurry Framelits.
 
I really had fun with this card and hope everyone enjoyed it, there's lots of little elements that are fun.
 
In addition to being thankful for my family and friends, I'm thankful for all you and your support, it means the world to me and I'm truly blessed.  Enjoy and be safe!
 
Diana
Pin It!

Monday, December 23, 2013

Calm Christmas Wishes to You and Yours!

Happy Christmas Eve Eve! (Can you tell I'm just a little excited??)  I know we're all really busy but I wanted to share another easy and pretty card that would be perfect for those last minute cards I know we're all working for a little inspiration.  This card starts with a Pool Party cardbase and then layers a piece of Winter Frost Speciality Designer Series Paper (this is some of the prettiest paper we've had in years in my opinion).  Next I added a piece of Bermuda Bay 1/8" Taffeta Ribbon around the DSP and tied a knot.  The stamped images are from the Calm Christmas stamp set.  The dove was stamped in Island Indigo and Old Olive Ink and was cut out with the Big Shot and Deco Labels Framelits.  I added a small pearl for the eye.  The greeting is from the same stamp set and is stamped on Smoky Slate cardstock and punched with the Large Oval Punch and then matted with some Island Indigo cardstock that was punched out with the Decorative Label Punch.
 
This is  great "mailable" card and would could whip lots of these up quickly so it's perfect for last minute Christmas greetings.

Enjoy and have a wonderful day!

Diana
Pin It!

Sunday, December 22, 2013

Quick and Easy Chocolate Tin; Pop and Place Tags Make it a Breeze


Good morning!  Are you running around working on last minute holiday gifts?  I wanted to share a really fun and easy project I made to give to some of the service personnel who support us all year long, such as the mailman, house cleaners, etc.  I shared a version of these tins in November, see original post HERE, but these are different versions using different designer series paper, ribbon, and tags.  One thing I love about the Pop & Place Gift Tags is that the tags are already pre-printed and scored so you can just pop them out and you’re ready to go, plus the Christmas Tagables Photopolymer Stamp set, coordinates perfectly with the tags and our punches so it makes gift tags a breeze.  Another great things with these is that even if you don’t have the same tins that I used you can use any other type of container or box, wrap a belly band around with paper and ribbon and attach the gift tag and it instantly adds a special touch that the recipient will appreciate (even if you use a store bought gift container).

You can still make simple and heart felt gifts that friends and family will really appreciate and understand that you took time to make it unique for them.

Good luck with all your last minute tasks and have a great weekend!

Diana
Pin It!

Friday, December 20, 2013

Fab Friday Sketch Challenge: Santa List

Happy Friday!!!!  Whoo hoo!!! I'm super excited since today officially starts our vacation and I can't wait.  With it being this close to Christmas you know that's all that's on the brain to I have to get a few last minute projects done before Christmas.  For today's Fab Friday sketch challenge I decided to use the oh, so awesome Santa's List stamp set.  The classic image in this set is so fun and I decided to mix it with some bling as well as some natural texture from the Thankful Tablescape Simply Create Kit (there are lots of fun elements in this kit so make you stock up before the end of the Holiday catalog sales period so you have some in your stash).  The cardbase is Crumb Cake and next I added a piece of the Textured Woodgrain paper from the Tablescape kit for a fun element.  Next I added a piece of Season of Style Designer Series Paper that was cut out with the Big Shot and the Apothecary Accents Framelits (I love that our DSP is double sided for double the options!  I had originally planned to use the reverse print but as the card came together I liked this Old Olive Polka Dot pattern better but didn't have to recut or waste anything since I could just flip it over).

For the main stamped image, the Santa is stamped on Crumb Cake ink with Early Espresso ink before 2 1/2" Circle Punch.  I matted this piece on some of Champagne Shimmer Paper that was cut out with the Big Shot and the Circle Collection Framelits and added some Cherry Cobbler Chevron Ribbon for the tails.  The final touch is the greeting that comes from the same stamp set, was stamped in Early Espresso and then I used the Envelope Punch Board's corner rounder punch to round the corners before sponging around the edge with Cherry Cobbler ink.  Dimensionals were a perfect touch to attach both the Santa piece and the greeting (had to double stack dimensionals on one side of the greeting to match up the layers.
being cut out with the

 I really love all the fun texture and dimension in this card, it's fun and playful.  I hope you enjoyed the card and got some inspiration if you're still working on cards or other projects for the holidays (time is quickly running out).
 
Take care and have a great weekend!
 
Diana
Pin It!

Wednesday, December 18, 2013

Paper Pumpkin Christmas Greetings

 Happy Wednesday Peeps!  I don't know how many of you are having fun with the My Paper Pumpkin subscription program but November's kit was the BOMB!  I loved it.  Today over the on the Stylin' Stampin' INKspiration blog we're sharing lots of fun projects using products from the My Paper Pumpkin Kits and I had to use this Christmas kit.  Not only is the stamp so fun and a perfect font but you've got to check out these starts, they're stitched together in strands.  So this first is really simple, it has a Real Red cardbase and then Very Vanilla and Basic Gray cardstock are layered together.  I took some of the star garland and draped it across the card front and then stamped the greeting in real red ink.
 
This second card uses all the elements from the card kit as it comes.  All I did was change it so there was only one layer of star garland (I wanted to be able to use some on other projects so I'm splitting it up).  Also, I messed up when I stamped the greeting, so instead of throwing the card away, I just stamped the greeting on a piece of Smoky Slate cardstock and made a little banner to cover up my goof (love how things like that work out).
 
These cards are oh so fun and send just the right amount of glitz and texture for these Christmas greetings.  I hope you enjoy and remember, you can sign up for My Paper Pumpkin anytime, so come and join it the fun (I love that a project gets delivered to my door each month giving me a fun and easy project without any thinking or prepping on my part, perfect!!)
 
I hope you enjoy and make sure to check out the other great projects the designers created using the My Paper Pumpkin kits.

Pin It!

Monday, December 16, 2013

Blog Candy Winner Announced

Thank you to everyone who entered to win my BLOG HOP CANDY from last Thursday's Stylin' Stampin' Squad Blog Hop! You were all so sweet in taking the time to leave a comment and I REALLY appreciated it! According to random.org, lucky comment #5 is the winner!  So Linn please email me your mailing address so I can mail your package out.

 
Have great day and Happy Crafting!
Pin It!

Stylin' Stampin' INKspiration December Scrapbook Sketch: Ice Skating Adventures

Good morning and Happy Monday!   Did you have a good weekend?  Aidan and I went down to National Harbor and saw ICE, did  little shopping, and of course relaxed at the pool (every kids favorite).  Since we were doing lots of cold holiday activities I was in that frame of mind when I started working on my scrapbook page for the Stylin' Stampin' INKspiration blog scrapbook sketch challenge.  I decided to make a page from last January when I took Aidan ice skating for the first time.  We had a great time, until a little bonk on the head, but he was such a trooper and got back up and skated some more so the fall wasn't his last experience.  Once again, I went to My Digital Studio to make this page since I would work on it on the go.  I love to scrap even the little moments as they're all precious and full of memories.


Here's the sketch we were given and I had so much fun adding lots of chevron and flag punches for accents.  I've included a list of supplies used below.  We would love for you to come play along with the challenge, sketches are a great way to get started since you can take elements that you want for the basic design and then make it your own.

Supply ListBackground
     Designer Series Paper\_Designer Kits\My First Day - designer series paper\My First Day - chalkboard

Embellishments
    Top Notch Woodcuts\Top Notch - yikes
    Silver Ribbon & Embellishments Pack\Silver Ribbon & Embellishments Pack - frosted finishes

Punches
    Basics\1.25 Square Punch,  Filled with: Designer Series Paper\_Designer Kits\Season Of Style - designer series paper\Season Of Style - 1
    Extras\Chevron - punches\Chevron - 3, Fill Color = GOING GRAY 163,158,155
    Extras\Chevron - punches\Chevron - 4, Fill Color = BASIC BLACK 19,27,29
    Extras\Chevron - punches\Chevron - 4, Fill Color = PUMPKIN PIE 255,130,1
    Extras\Chevron - punches\Chevron - 3, Fill Color = PUMPKIN PIE 255,130,1
    Extras\Chevron - punches\Chevron - 4, Fill Color = BASIC BLACK 19,27,29
    Extras\Chevron - punches\Chevron - 3, Fill Color = GOING GRAY 163,158,155
    Extras\Chevron - punches\Chevron - 3, Fill Color = PUMPKIN PIE 255,130,1
    Extras\Chevron - punches\Chevron - 4, Fill Color = GOING GRAY 163,158,155
    Extras\Chevron - punches\Chevron - 4, Fill Color = BASIC BLACK 19,27,29
    Extras\Embark Graduate - punches\Embark Graduate - banner 2,  Filled with: Designer Series Paper\_Designer Kits\Sunny Day - designer series paper\Pumpkin Pie Small Polka Dot
    Extras\Embark Graduate - punches\Embark Graduate - banner 2,  Filled with: Designer Series Paper\_Designer Kits\Winter Frost - designer series paper\Winter Frost - 6

Have a great weekend and enjoy!

Diana
Pin It!

Saturday, December 14, 2013

Proverbial Stampers Color Challenge: Best of Brides and Babies


 What a beautiful start to the weekend!  I have a bonus card for you break up your weekend which I’m sure is full of holiday happenings!  Today I decided to play along with the Proverbial Stampers Color Challenge (this is a challenge in my upper level upline’s team)  I really liked this color combination and thought it would be fun for a wedding card.  This card starts with Smoky Slate Textured Cardstock for the cardbase and I added strips of Basic Black cardstock, Silver Glimmer Paper, and Strawberry Slush Designer Series Paper.  The main stamped image is from the Best of Brides and Babies stamp set (only available until January 31, 2014).  It was stamped in Basic Black ink and I colored in accents with a Wild Wasabi and Strawberry Slush Stampin’ Write Marker.  This piece is matted with Wild Wasabi cardstock and attached to the card with dimensionals.

I added a piece of Smoky Slate Chevron Ribbon, Black Button and Whisper White Baker’s Twine (dyed with Strawberry Slush ink) for fun accents.

This is a nice, simple card that all the upcoming spring and summer brides are sure to love.

I hope you have a great weekend and enjoy!

Diana
Pin It!

Friday, December 13, 2013

Hand Stamped Sentiments Color Challenge: Perfect Blend Friendship Greetings

 Happy Friday peeps!  Are ready for the weekend?  This is our last weekend before the big trip and we’re going to be running around having lots of fun (football for Chris, and ICE for Aidan and me), plus there’s lots of baking and packing.  Before all this gets started I wanted to share with you the card I made for this weeks Hand Stamped Sentiments Color Challenge.  I think I’m on Christmas overload so I decided to make a non-holiday card for this challenge. These colors are nice and warm so I immediately decided to use the Perfect Blend stamp set.  I stamped the coffee cup three times in Baked Brown Sugar Ink, on Very Vanilla, Baked Brown Sugar, and Daffodil Delight cardstock.  I cut out the cup, lid, and coffee collar in the different colors with Paper Snips and glued them all together.  I used the greeting in the set and Cherry Cobbler ink.

The cardbase for the card is Baked Brown Sugar and I added a layer of Very Vanilla cardstock.  I used my go to stamp set, Gorgeous Grunge to stamp the different splatter and lines in lines (it kind of reminds me of coffee splatter).  I added some rhinestones and a piece of Season of Style Washi Tape in the top right corner.

This card is very similar to one I made for Halloween and I just naturally went with the same layout, love it!  This is such a fun stamp set and card, it would be perfect to send a friend a card to let them know you’re thinking of them on a random day.  It’s so fun to see all the different ideas that can come out of the same color selection, you should check them out.

Have an enjoyable Friday and hope you get some crafting time!

Diana
Pin It!

Thursday, December 12, 2013

Stylin' Stampin' Squad December Blog Hop: Gift Ideas for the Holidays!


Thank you so much for joining us for the December Stylin' Stampin' Squad Blog Hop!  This month our projects focus on quick and easy gift ideas for the holidays. As we enter the month of December, we find that the Christmas holidays are fast approaching. From decorating our homes to holiday baking, we realize that shopping days are running low. That...'s why we want to share quick and easy gift ideas that anyone can create in time for that special someone! 

As you hop along, you will see that many of our design team members are giving away some great blog candy this month. Leave a comment for each project and you will automatically be entered in to win!  Winners will be announced Monday, December 16th on our individual blogs, so don't forget to leave us those comments! We love to hear from our readers!

You should have just left stop number 7 on the Stylin’ Stampin’ Squad  blog hop – Tonya B. of Stampin' with Tonya. If so, you are in the  right spot. If a link doesn’t work or you get off track, you will find  the full blog hop lineup below.

I was so excited for this month’s blog theme since I’m working on lots of gifts right now to give for the holidays.  My first project is a really simple notecard set and matching box.  Personalized items are really popular and personalized note cards are a great way for your friends to be able to send unique notes all year long and think of you every time you use them.  I started with Very Vanilla cardstock for my cardbase and added a layer of Wisteria Wonder cardstock that was embossed with the Big Shot and the Fancy Fans Embossing Folder.  To this I added pieces of Afternoon Picnic Designer Series Paper.  I also added a piece of Victoria Lace Trim Ribbon across the center.

For the monogram I used the Morning Post Alphabet Stamp set and punched it out with the 1 3/8” Circle Punch and matted that piece with the Scallop Circle Punch.  Dimensionals were used to attach this layer to the card so it stands over the trim ribbon and adds a little pop.

Below are pictures of the coordinating cardbox that was created with an 8 1/2 x 11piece of cardstock.  I used some of the same colors and designer series paper to decorate it.  A piece of Basic Gray ¼” Stitched Grosgrain Ribbon is tied around the top and holds it closed.
Cardbox Closed
 
Cardbox Open


I have a second, bonus project for you as well. This time of year is also full of fun and treats and it’s great to have some simple, fun little treats ready to go for kids, coworkers, neighbors, the mailman, etc.  For this project I used the Real Red Goodie Gear kit (love how all the elements are included and ready to go).  I filled the bag up with some Hugs and Kisses candy.  The Crumb Cake tag comes with the kit and I embossed it with the Big Shot and the Perfect Polka Dot Embossing Folder (I used a sponge and Crumb Cake ink to highlight the embossing on the tag).  For the greeting I used the Pop & Place Gift Tag Kit for the two cardstock layers (love that they coordinate with our punches and framelits, and come pre-printed with the patterns and ready to go.  The greeting is stamped in Cherry Cobbler with the Christmas Tagables Photopolymer Stamp set, so they fit perfectly in the tag.  For some extra special texture I added a small piece of 1/8” Silver Ribbon and Cherry Cobbler Chevron Ribbon.  These kits are so great since you can make the gifts as simple or as elaborate as you want in very little time and for all sorts of occasions, not just holidays (would make great party favors).

Remember, all this month’s hoppers are offering blog candy to help you get ready for the holidays.  All you have to do is leave a comment on each of the hopper’s blogs to be entered and the drawings and announcements will take place on Monday, December 16.  I’ll be giving away a package of Gusseted Cello Bags, Snow Festival Designer Printed Gift Tags, and Cherry Cobbler Sweater Trim (you’ll be all set to make great gifts with this kit).  Don’t miss out!

I hope I’ve given you some fun and easy ideas for gifts you can make now and still have time to give this holiday season.  Make sure to check out the rest of the blog hop for lots of other great gift ideas.  If you click the “Next” button, you’ll go to  Heidi’s site but you can also access any of the hopper’s site from the full blog list below.

Stuck on Stampin'
 
Blog Hop Participants:
  1. Dawn S. of Dawn's Creative Chalet
  2. Darcy J. of DJ's Stampin' Place
  3. Annie L. of Love Me Cards
  4. Cynthia R. of Ink-a-Doodle Creations
  5. Jamie H. of Unique Ink
  6. Kim R. of Stamping with Kim
  7. Tonya B. of Stampin' with Tonya
  8. Diana E. of Stampin' Fun with Diana
  9. Heidi B. of Stuck on Stampin'
  10. Bree R. of Craft-Somnia  
  11. Anastasia R. of Stampin' Blondie
  12. Pamela W. of Stinky Tofu
  13. Darla R. & Nancy K. of Stampin With Darla and Sisters
 
Pin It!

Tuesday, December 10, 2013

Paper Craft Crew Sketch Challenge: Santa List

Good morning friends!  It's a snowing day here so I'm working from home and Aidan's looking forward to a fun day of fort building once we get enough snow for construction to begin.  Today I'm sharing the card I made for this weeks Paper Craft Crew Sketch challenge and when I saw this sketch I knew it would be a lot of fun.  The card base is Crumb cake and I added a piece of Season of Style Designer Series Paper as well as a strip of Cherry Cobbler cardstock that was embossed with the Big Shot and the Pretty Print Textured Embossing Folder.  A piece of 1/8" Early Espresso Taffeta Ribbon is a perfect accent along the seam.  I also added another piece of the same DSP as a vertical strip.
 
 The main stamped image is from the Santa's List stamp set and is stamped in Old Olive ink.  I matted this on Early Espresso cardstock and added some rhinestones along the top left corner.  For the sentiment accent it's from the Christmas Messages stamp set and is punched out with the 1 3/8" circle punch and matted with the scallop circle punch and Crumb Cake cardstock.  I used some Cherry Cobbler Chevron Ribbon for the tails and attached the whole piece with  dimensionals.
 
I love how this card turned out, it just screams classic Christmas and this Santa is just too cute.  Are you finished with all your holiday projects?  I'm making progress but I keep adding things I want to get done, so we'll see how it goes.
 
 
Enjoy and if you're having snow or bad weather where you are, be safe and take care!
 
Diana


Pin It!

Friday, December 6, 2013

Fab Friday Color Challenge: Endless Wishes for Christmas Collectibles!

Happy Friday!  I'm heading out early this morning for long day, I have a customer meeting in Philadelphia so I have a lot of driving today and am crossing my fingers traffic cooperates so so we don't have any issues.   Before I leave I wanted to share my card for this weeks Fab Friday Color Challenge.   Of course when I saw this color combination I immediately thought of Christmas so I decided to go with it.  I started with a Real Red cardbase and added a layer of Whisper White Cardstock.  I used the Endless Wishes Photopolymer Stamp set to stamp the snowflakes (in Coastal Cabana) and the greeting (in Real Red).  I must admit I was really shocked how quickly this stamp set sold out and thankfully, I received mine the day before they were gone.  One thing I love about this set is how you can combine the words to make different greetings and with the clear blocks you can add multiple stamps to one block and then just stamp them all once. 

Next I took a piece of Gumball Green cardstock and embossed it with the Big Shot and the Stylish Stripes Embossing Folder.  I matted this layer on some Silver Shimmer paper (I love to add a little sparkle to my Christmas cards). The ornament is from the Christmas Collectibles stamp set and was punched out with the Christmas Ornament Punch.  I added some 1/8" Silver Ribbon for the ornament hanger and bow.  Of course I used dimensionals to attach the ornament to the card for some added dimension.
 
These colors work so well together and add a playful element to the card and a little silver sparkle adds just the right amount of bling.  This is a great card to make multiples of since they can be stamped very quickly and are "mailable."  If you weren't lucky enough to get the Endless Wishes stamp set before it retired you could easily replace it with any other snowflake and greeting stamps.
 
I hope you enjoy and feel free to play along with the challenge.  Have a great weekend!
 
Diana  
 

Pin It!

Wednesday, December 4, 2013

Stylin' Stampin' INKspiration Blog: Gift Bags and Wrapping

Happy Wednesday!  I know we're all busy getting ready for the holidays and of course that means gift giving and wrapping.  Today over on the Stylin' Stampin' INKspiration blog we're sharing some fun and easy gift wrapping ideas that are sure to WOW any recipient.  Today I'm sharing two of the projects we made at last months Gift Wrapping class.  The first box uses the Tag A Bag Boxes along with the Winter Frost Specialty DSP.  I love that these boxes come with the clear plastic sleeves so they make gift giving so easy.  For the decorative belly band I wrapped a piece of the DSP around the box and then added a lolly made with the Simply Scored Board and DSP, Silver Foil, and two snowflakes stamped with the Festive Flurry stamp set and coordinating Festive Flurry Framelits.  I added some Smoky Slate Chevron Ribbon and Bermuda Bay 1/8" Taffeta Ribbon as accents.  The tag uses the Tags 4 You stamp set and was punched out with the coordinating Label Bracket Punch.


The second item is a decorative gift bag and gift bags really are such a perfect item for wrapping all those odd shaped gifts.  I started with just a plain white gift bag and added a piece of Cherry Cobbler Cardstock, Old Olive Cardstock (that was embossed with the Big Shot and Snow Flurry Embossing folder, and the Season of Style Designer Series Paper.  A piece of Baked Brown Sugar Ruffled Ribbon is a perfect way to cover up the paper edges and adds a perfect accent.  The little reindeer is stamped with the Color Me Christmas stamp set and colored in with Stampin' Write Markers (this would be a great project for your kids to help out with and would make the bags extra special).  I used the Big Shot and Deco Labels Framelits to cut out the reindeer piece and the coordinating mat.  The final touch was to make the tag, which was stamped with the Joy to the World stamp set, cut out with the Chalk Talk Framelits and tied to the gift bag handle with Cherry Cobbler Chevron Ribbon.
 
I hope this gives you a few ideas to help take your gift wrapping over the top this year and reduce your stress.  Still looking for more ideas, make sure to check out the Stylin' Stampin' INKspiration Blog for other ideas.
 
Enjoy,
 
Diana
 
 
Pin It!

Monday, December 2, 2013

Create with Connie and Mary Sketch Challenge: Best New Year

Good morning!  We're back to work after the long, enjoyable holiday weekend and you know what that means?  Christmas preparations are in full gear now...I spent most of Sunday and part of Saturday after we got home putting up Christmas decorations, but thankfully it's all done and I love all the lights and decorations.  I was so excited to get a few minutes to play in the studio and loved this weeks Create with Connie and Mary sketch challenge and knew the perfect set to take center stage on this card, Best New Year.  The cardbase is Smoky Slate and I added a piece of Island Indigo cardstock that was embossed with the Big Shot and the Perfect Polka Dot Embossing Folder.

Next I added a piece of Winter Frost Speciality Designer Series Paper, and punched one of the corners with the corner rounder punch on the Envelope Punch Board.  I also added a strip of Silver Glimmer Paper for some extra sparkle.  The greeting is from the Best New Year stamp set and I inked the stamp up with Pool Party, Smoky Slate, Island Indigo, and Coastal Cabana Stampin' Write Markers (I used the Envelope Punch Board to round one of the corners on this layer as well).  I used dimensionals to attach the greeting to the card front.
 
I don't normally send out New Year's cards since it's so close to Christmas but this set is so fun and I love the fonts and design so I had to give it a try.  What holiday projects are you working on right now?  My to do list is getting longer and longer by the minute,  the next three weeks are definitely going to be fun and keep me going.
 
Enjoy and have a great day,
 
Diana

Pin It!

Saturday, November 30, 2013

30 Days of Gratitude Card Challenge: Day 30

Happy Saturday and welcome to the last day of November, can't believe it!  I'm so glad you've joined me the past month and I hope you've enjoyed and been inspired by the ideas and cards I've shared.  The great thing is that showing your gratitude isn't unique to Thanksgiving and is something we should be doing all year long.  Also you can take most of the cards I've shared this month and could easily change the greeting to anything you need.  I've really enjoyed trying out some of the new Photopolymer Stamp sets Stampin' Up' has been releasing and while these sets have always been released as a "while supplies last" item we haven't had an issue purchasing them, until the release this month of the Endless Wishes Photopolymer Stamp set.  This set is full of fun snowflakes and prefect greetings that are so fun and this set has been flying off the shelves, so quickly in fact that the day before the set I order was delivered we received official notice that the stamp set has sold out and is no longer available.  Well after debating I decided to still show this set for those of you who were lucky enough to get it and once again you could change this up with other stamps for an equally perfect card.
 
The cardbase is Very Vanilla and I stamped all over the back with the Gorgeous Grunge stamp set in Crumb Cake ink.  Next I cut the tag out with the Big Shot and the Chalk Talk Framelits.  I used Whisper White craft ink to stamp the snowflakes on the tag and added little rhinestones randomly over the tag.  The greeting is from the Express Yourself Hostess Stamp set and is stamped in Cherry Cobbler link.  The ribbon accent was created using Cherry Cobbler Chevron Ribbon and I tied a bow around it with Whisper White Baker's Twine (so fun and a great way to keep the bulk down on the card and you can really let the ribbon shine.
 
I really like this card and you can just as easily make this a Christmas card, in fact, this is one of the cards we'll be making at next weekends Holiday Just Cards Class.  The class is on Sunday, December 8 at 2 PM and you still have time to register.  I would love for you to join us so just let me know.
 
Enjoy the rest of your weekend and if you're traveling please be safe!
 
Diana
 
Pin It!

Friday, November 29, 2013

30 Days of Gratitude Card Challenge: Day 29

Good morning and Happy Black Friday!  How many of you are just getting back from shopping?  We're in the group that shops overnight and are usually done about now so I should be just about done with my Christmas shopping now.  I know that everyone is super busy with family and recovering from Thanksgiving so I wanted to share a really simply and pretty gratitude card.  I believe in sending thank you card's for gifts I receive so I always need to have a stash of Christmas thank you's ready to go.  For this card I used the note card set as the cardbase and added a layer of Island Indigo Textured Cardstock under the Whisper White stamped layer.  The tree is from the Special Season stamp set and was stamped in Smoky Slate ink.  The greeting is from the Another Thank You Photopolymer stamp set and was stamped in Island Indigo.  The final touch was just to wrap some Island Indigo Baker's Twine around the cardfront and tied a pretty bow.
 
This card is nice and simple so you could make a lot of them in a short amount of time and be all set.  They're also very mailable which the post office will appreciate.  Are you crafting this weekend?  I'm excited to make lots of snowflakes from the new Snowflake Ornament Kit that are all so sparkly and pretty.
 
Have fun!
 
Diana
Pin It!

Thursday, November 28, 2013

30 Days of Gratitude Card Challenge: Day 28 Happy Thanksgiving!

Happy Thanksgiving!  I hope you are all spending the day relaxing and enjoying friends and family.  We're spending the weekend with friends from college that we get together with every year, the kids enjoying playing together and we always go out shopping for Black Friday after the big feast.  I decided for today's gratitude card I would share the card I made for our family.  I really like to send cards to our family for most holidays (St. Patrick's Day is about the only I don't do) since our family is spread out and can't always get together.  This card starts with a cardbase of Cajun Craze and then adds a piece of Pool Party cardstock and then Sweater Weather Designer Series Paper.  The greeting is from the Truly Grateful stamp set and is stamped in Soft Suede.

For the leaves I cut one out of Soft Suede cardstock with the Autumn Accents Bigz die and the Big Shot and then embossed it with the Woodgrain Embossing Folder.  I also stamped the leaf from the Magnificent Maple stamp in Cajun Craze and cut it out with Paper Snips.  The final touch was a cut little acorn that was cut out with the Autumn Accents Bigz die, twice, once in Chocolate Chip cardstock and then with the Champagne Shimmer paper for the top (I love this treatment to add a little sparkle).  I did run the Chocolate Chip piece through the Big Shot with the Perfect Polka Dot Embossing folder for some additional texture and used a dimensional to attach the acorn so it pops up.

The great thing about this card is not only is it simple and pretty but it's pretty flat and "mailable" which is perfect.  Well I'm off to watch some football and relax, enjoy and I'm so thankful for all my friends, family, and customers for all your love and support, it really means a lot.

Happy Thanksgiving!

Diana
Pin It!

Wednesday, November 27, 2013

My Digital Studio Make Gift Giving So Easy!

Good morning and Happy Thanksgiving Eve!  I've got double the fun today and I'm back to share some fun projects I'm sharing over on the Stylin' Stampin' INKspiration blog today.  So we're going to spend our Christmas Holiday this year on a Disney cruise (whoo hoo!) and if you know anything about Disney cruises, the cruise fanatics have created all sorts of fun onboard activities, including Fish Extender exchanges.  Basically families sign up in advance and bring this fish extenders (these are kind of like shoe organizers that are personalized with your family information) and then throughout the cruise you randomly drop off gifts for the other families in your group.  It's lots of fun to come back to your room and see what kind of fun surprises await.  So we've signed up for these and I decided to make fun cruise survival kits for the families and used My Digital Studio to design the cover and end used a full wood mount block case for the holder. 

This was so easy to do and I love that I was able to get them printed through Stampin' Up's professional print services and just cut them down and it fit perfectly.  I designed the case so that after the cruise families could use the cases as a keepsake from their trip.

This is the back of the case that lists of the information on the contents and fun things that can be used with it.

This is the inside of the case.  I had to really cram everything in (and then realized that I forgot the tissues, so they'll be separate).  Lots of great fun and useful things for the cruise.

I also designed bookmarks and key chains using MDS also.  For the bookmark I used the kid's bookmark template, shrunk it down and then modified it for the cruise.  For the keychain I added a 1" circle punch in MDS and filled it in with the Disney Cruise graphic.  After printing it out all I had to do was punch out the image and attached it to a flattened bottlecap.  I did use an epoxy sticker to cover the image so it's nice and sealed.

I also decided to give gifts to each of the kids in our fish extender group (I think I'm going to need a whole suitcase just for these gifts).  I simply used the gusseted cellophane bags (currently on the clearance rack) and added lots of candy, glow bracelets, a bookmark, and key chain. 
The gift tag was designed in MDS.  All I did was pick out a tag punch, filled it in with cardstock, stamps, text, and embellishments and printed it out.  I'm also working on gift bags for the crew members and I just enlarged this tag, and changed up the words.

It's so easy to make gift elements in My Digital Studio and you can still take advantage of Stampin' Up's 30% off select digital download and professional print product specials through the end of the month (there are several other projects I'm working on to get printed to take advantage of the sale) so there's still time.
 
Enjoy and happy digital crafting!
 
Diana
Pin It!

30 Days of Gratitude Card Challenge: Day 27

Good morning and Happy Thanksgiving Eve!  I guess I have to admit the holiday is officially here, even if I'm not ready.  I'm so looking forward to heading out this afternoon to visit friends (it's our tradition) and it's so fun to catch up and the kids have so much fun playing today.  Before we head out I wanted to share today's gratitude card, which is also a combo again, this time with the Hand Stamped Sentiments Sketch Challenge.  I really liked all the geometric elements to this sketch and knew I had to play along.
 
The cardbase is Crumb Cake and I added a layer of Pool Party Core'dinations Cardstock that was embossed with the Big Shot and the Alphabet Press Embossing Folder and lightly sanded.  Next I added a piece of Etcetera Designer Series Paper for the tag and an accent with an In Color Boutique Details element, in Pistachio Pudding with a small piece of Strawberry Slush cardstock punched out with the 1" Circle Punch

For the hexagon images I used the Six Sided Sampler stamp set and stamped the different images in Strawberry Slush, Pistachio Pudding, Pool Party, and Crisp Cantaloupe (anyone hungry yet?) ink and then punched them out with the matching Hexagon Punch.  I did use a dimensional to attach just the hexagon with the greeting on it so it really stands out.
 
Nice and easy peasy, hope you enjoy!  Well I better get going still have a few things to do before we head out.  Everyone who is traveling, please be safe and I hope everyone has a Happy and Restful Thanksgiving.
 
See you back here tomorrow!
 
Diana


Pin It!

Tuesday, November 26, 2013

30 Days of Gratitude Card Challenge: Day 26

Good morning!  Are you in full on Thanksgiving prep?  We always spend the holiday with friends but I still have a lot to do.  I used Thanksgiving as inspiration for today's gratitude card that I combined with this Paper Craft Crew Sketch Challenge.  The cardbase is Sahara Sand and I added a piece of Burch Paper Ribbon, from the Thankful Tablescape Simply Created Kit, that was matted with Chocolate Chip cardstock.  I used Sahara Sand ink and a sponge to sponge all over the burch ribbon to help distress it.  For the stamped image I stamped a piece of Sahara Sand cardstock and stamped the chevron woodgrain image from the Truly Grateful stamp set in Sahara Sand ink.  I also stamped the wheat bushel in Crushed Curry ink.   

Next I added two paper flags using the Sweater Weather Designer Series paper.  The greeting is from the same Truly Grateful stamp set and I stamped the circle wood image on Very Vanilla cardstock with Sahara Sand ink and the greeting is in Chocolate Chip.  I punched this piece out with the 1 1/4" circle punch and crumpled it up to distress it.  This piece was matted on a scallop circle that was punched with the Scallop Circle Punch that was also crumbled and distressed.  The final element was to attach a cute knot made out of the Natural Trim Ribbon.
 
I love how nice and soft this card turned out, and it's not overly "Thanksgivingish" and could also be used for a more masculine card.  I hope you enjoy and good luck with all your preparations and if you're traveling, safe travels. 
 
Diana
Pin It!

Monday, November 25, 2013

30 Days of Gratitude Card Challenge: Day 25

It's another Monday, but at least this is a short work week and I'm looking forward to several days of relaxing and spending time with friends and family, that's what I truly love about this holiday.  Can you tell I'm hard at work on Christmas projects?  Today's gratitude card is awesome in how easy it is but I love all the patterns and dimension.  I used one of the notecards as the cardbase and added a layer of Smoky Slate Textured cardstock before adding a strip of Winter Frost Speciality Designer Series Paper as well as a piece of Whisper White cardstock that was stamped with the Festive Flurry stamp set in Smoky Slate, Island Indigo, and Coastal Cabana ink.  I added a piece of Coastal Cabana Ruffled Ribbon across the center.
 
The greeting is from the Lots of Thanks stamp set and was stamped in Coastal Cabana ink before punching it out with the 1" Circle Punch.  I matted the greeting with some Island Indigo cardstock that was punched out with the Label Bracket PunchDimensionals are the perfect way to attach the greeting over top the ruffled ribbon.
 
The Winter Frost product suite is so soft and elegant it's fun how the patterns are kind of retro and playful but really work together.  What's your favorite product suite from the Holiday catalog?
 
Have a fabulous day,
 
Diana

Pin It!

Search This Blog