Happy Monday friends! August is really starting off with a bang and we're looking forward to lots of fun this month. We celebrated Aidan being awarded his black belt in Tae Kwon Do on Saturday (so proud of him and all the hard work he put into preparing for this) and Chris' birthday is this week so we have lots of fun things planned for this weekend as well. So when I sat down to work on my card for this weeks Create with Connie and Mary Color challenge I saw the newly released stamp set Spread the Joy on my desk and knew it would be perfect for how I'm feeling. This is a great stamp set that was designed my Stampin' Up! employee Emily Montoya as part of the first round of In with You stamp design contest. The images in this set are so unique and really fresh and fun. This card starts with a Smoky Slate cardbase and then I added a piece of Basic Black cardstock that was embossed with the Big Shot and the newly released Stylish Stripes embossing folder.
I added a piece of Bermuda Bay Designer Series Paper along the middle that I matted with some Silver Glimmer Paper for a little bling. I also added some Smoky Slate Chevron Ribbon and Basic Black 3/8" Taffeta Ribbon. The greeting was inked with Stampin' Write markers before being stamped on Whisper White cardstock and being matted with Smoky Slate. The final touch was to add a Bermuda Bay Designer Button with a bow made from Whisper White Baker's Twine.
I have to admit, I'm so in love with the colors and end result of this card, it just makes me smile every time I look at it. I hope you enjoy and you still have time to play along with this color challenge, or check out some of the other great ideas.
Have a great day,
Diana
Monday, August 5, 2013
Friday, August 2, 2013
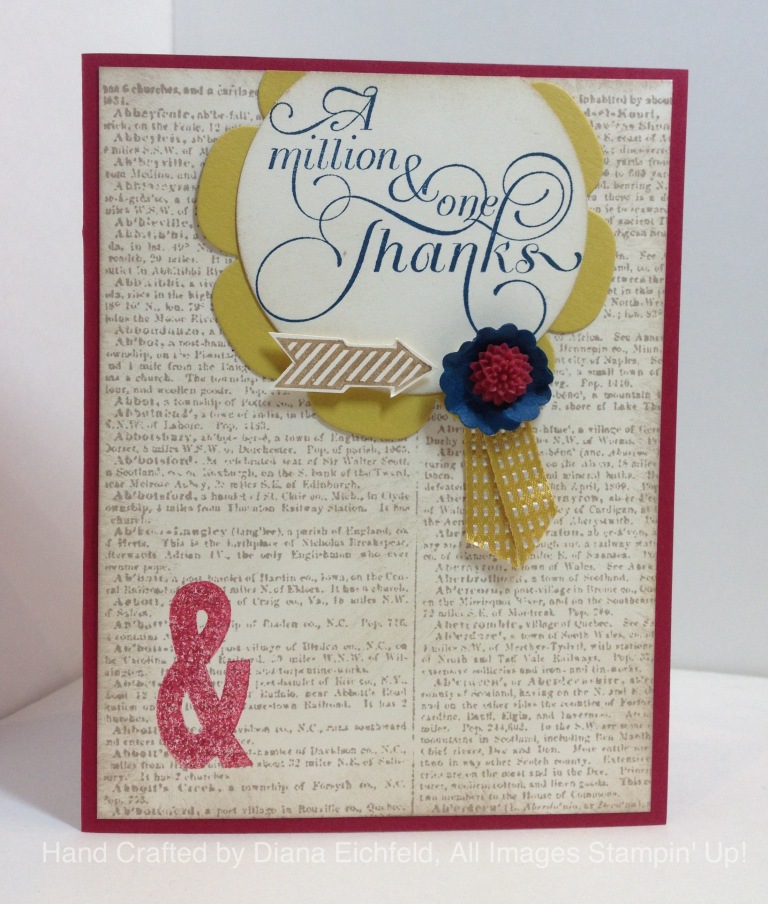
Fab Friday Sketch Challenge: Million & One
The greeting is from the new Million & One stamp set and was stamped in Midnight Muse and punched out with the 2 1/2" circle punch, and sponged around the edge with Crumb Cake. I matted this piece with a flower that was cut with the Big Shot and the Floral Frames Framelits in Summer Starfruit. I attached this piece to the top of the card and then used the paper trimmer to trim off the top. For the decorative accent I added a piece of Summer Starfruit Stitched Satin Ribbon, an arrow stamped with the same Hello, Lovely stamp set in Crumb Cake ink and cut out with my Paper Snips. The flower uses the 7/8" scallop circle punch and the cardstock is Midnight Muse and I crumpled it up to add some texture before adding a Raspberry Ripple Dalia to the center of the flower.
I think this card is soft and elegant while being fun and whimsical at the same time, I really like how this turned out. This layout is great since you could change the colors, elements, and greetings, for any occasion. You should definitely save this sketch to give you inspiration in the future.
Have a great weekend and happy stamping!
Diana
Thursday, August 1, 2013
Thinlit Card Dies have Arrived, I'm in Love!
One of the exciting announcements from our annual convention earlier this month was the upcoming release of new Thinlit Card Die Framelits. I was so excited when I saw these as they allow you to make fabulous swing type cards nice and simply using the Big Shot and the Thinlit. I'm so excited for these that I decided to change the plan for our family Christmas cards and will be using these dies for our family card. I'm placing my order early so I can get my hands on these.
Also, remember I'm offering a special, see details HERE, for orders placed by the end of this weekend using the special hostess code and you can take advantage of this special to purchase these thinlits, or any other items on your wish list.
There is a lot more information on these dies below, including several stamp sets that coordinate with these dies to make fun, beautiful projects.
Wednesday, July 31, 2013
Create with Connie and Mary Sketch Challenge: Bring on the Cake
The cardbase is Melon Mambo and I added is piece of Island Indigo that I punched with the Scalloped Trim Border Punch as well as Whisper White, and the Gingham Garden designer series paper. I like to hid seams where paper meet as much as possible so in this case I used a piece of Daffodil Delight 1/4" Stitched Grosgrain Ribbon. I used the Paper-Piercing Tool and the Festive Paper-Piercing Pack to make an outline for the Label Collections Framelit shape. Then I stamped the birthday greeting from the Bring on the Cake stamp set in Island Indigo, cut it out with the Big Shot and the Label Collection Framelits and then sponged around the edge with Melon Mambo ink before attaching it to the card with dimensionals.
For the flower accent I cut a small flower piece with the Floral Frames Framelits and scrunched it up. The leaves were cut with the Bird Builder punch and I added a small white flower I made with the Simply Pressed Clay and the Buttons & Blossoms Simply Pressed Clay Mold. I like these clay flowers and I have several made in different colors as well as white so I can use them at a moments notice for a project (can color the white pieces with markers for customer colored accents, love it!)
This card is fun and fresh and will really brighten up some one's special day. I'm also mailing this card this week so I'll be interested to see how the clay element handles the postal processing. If you haven't tried the Simply Pressed Clay you really should, it's fun and easy and you get a lot out of each bag of clay (I've made over 100 different elements of different sizes and still haven't used half of my package of clay.
Happy Stamping,
Diana
Tuesday, July 30, 2013
Virginia Tax Holiday, August 2-4, Don't Miss out on Stocking up on Stampin' Up! Essentials and Special Offer for my Customers!
Good morning friends! Just a quick reminder to let you know that the state of Virginia is having a sales tax holiday for school supplies up to $20.00 per item from August 2-4. Because school supply items are included in this sales tax holiday, the list of items below will be state tax-free during the holiday period. This is a great opportunity to stock up on these essential items for your upcoming crafting projects!
Please note that you must place your order with Stampin’ Up!® during the tax holiday period in order to receive these items tax-free. Also, keep in mind that this is a state sales tax holiday and may not apply to additional city, jurisdiction, or county taxes. You can either email me your order or you can order directly from my website at: http://www.stampinup.net/esuite/home/deichfeld/ and click on SHOP.
The following items are tax-exempt during the Virginia sales tax holiday:
Hostess Code: 2THYNWAG
For every $30 you spend (before shipping and tax) you can select either a package of Dimensionals, Tombow Multi-Adhesive, or Glue Sticks. Remember you can include anything in order order to take advantage of this offer not just the tax free items, and the Holiday catalog sales period starts on August 1 so you can get all items you need for your holiday projects now and get the extra adhesive from me. You have to order under the hostess code above, and submit your order by Sunday, August 4 at 5:00 PM EST in order to get this special.
I want to remind you of one thing to take advantage of the tax free benefit, say for example you want to order 10 packages of Snail Refil. Since the ceiling for the tax free is $20 per item if you enter the snail code and a quantity of 10, your total would be $45 so the system would charge tax. You would need to enter the quantity (in this case 4) so that your total is under $20 but you can enter as many times as you want. Does that make sense? If not please give me a call and I can explain and help you out.
Please let me know if you have any questions and happy shopping!
Diana
Please note that you must place your order with Stampin’ Up!® during the tax holiday period in order to receive these items tax-free. Also, keep in mind that this is a state sales tax holiday and may not apply to additional city, jurisdiction, or county taxes. You can either email me your order or you can order directly from my website at: http://www.stampinup.net/esuite/home/deichfeld/ and click on SHOP.
The following items are tax-exempt during the Virginia sales tax holiday:
- 2-Way Glue Pen (item 100425) $4.50
- Snail Adhesive (item 104332) $6.95
- Snail Adhesive Refill (item 104331) $4.50
- Sticky Strip (item 104294) $6.95
- Stampin’ Dimensionals (item 104430) $3.95
- Mini Glue Dots (item 103683) $4.95
- Paper Snips (item 103579) $9.95
- Uni-Ball Signo Gel Pen (item 105021) $3.95
- Blender Pens (item 102845) $9.95
- Stampin’ Write Markers (various item numbers) $3.50
- Tombow Multipurpose Adhesive (item 110755) $3.95
- Anywhere Glue Sticks (item 104045) $3.95
- 2012-2014 In Color Stampin’ Write Markers (item 126856) $14.95
- 2013-2015 In Color Stampin’ Write Markers (item 131260) $14.95
Hostess Code: 2THYNWAG
For every $30 you spend (before shipping and tax) you can select either a package of Dimensionals, Tombow Multi-Adhesive, or Glue Sticks. Remember you can include anything in order order to take advantage of this offer not just the tax free items, and the Holiday catalog sales period starts on August 1 so you can get all items you need for your holiday projects now and get the extra adhesive from me. You have to order under the hostess code above, and submit your order by Sunday, August 4 at 5:00 PM EST in order to get this special.
I want to remind you of one thing to take advantage of the tax free benefit, say for example you want to order 10 packages of Snail Refil. Since the ceiling for the tax free is $20 per item if you enter the snail code and a quantity of 10, your total would be $45 so the system would charge tax. You would need to enter the quantity (in this case 4) so that your total is under $20 but you can enter as many times as you want. Does that make sense? If not please give me a call and I can explain and help you out.
Please let me know if you have any questions and happy shopping!
Diana
Monday, July 29, 2013
Hand Stamped Sentiments Sketch Challenge: Six Sided Sampler Meets Bombs Away Birthday
I love the hexagon graphic elements that are so popular right now so I embossed the black piece with the Big Shot and the Hexagon embossing folder and then added lots of hexagon shapes using stamped pieces from the Six Sided Sampler stamp set as well as different Designer Series Paper, including (the Polka Dot Parade DSP, Brights Paper Stack, as well the retired Neutrals Paper Stack (I haven't order all the new paper, yet!). The coordinating hexagon punch made punching these guys out super simple and they all fit together. I also added some Whisper White and Pacific Point 1/4" Stitched Grosgrain ribbon. The greeting is from the Bombs Away Birthday Photopolymer stamp set (love the tongue and cheek greetings!) and cut it and the mat with the Oval Collections Framelits.
I really like how this card turned out, it's fun and fresh and totally right for a dude card.
Hope you enjoy and have a great day, it's supposed to be beautiful here in Northern VA, we even have the AC off and the windows open at home, don't normally get to do that in July.
Happy stamping,
Diana
Friday, July 26, 2013
Undefined Stamps - Make it Your Way!
|
Have you ever wanted a stamp but couldn't find the perfect image? Maybe you have a special family logo or a sketch you'd like to have as a stamp. Well now you can! Undefined is Stampin' Up!'s new stamp carving product line. You define the rubber stamp any way you want. When you carve your very own stamp, you have will have an entirely new and different creative experience. And when you're finished, you will have created a one-of-a-kind stamp! How exactly do you carve a stamp? Watch the video for a tutorial. |
Intrigued? We know you want to get your hands on the kit and start carving your own masterpieces. Here are the item numbers you'll need (we suggest adding a refill kit on your first order . . . trust us, you're gonna want it).
|
Item #
|
Description
|
Price
|
|
133402
|
Undefined Stamp Carving Kit |
$19.95
|
|
134808
|
Undefined Refill Kit |
$9.95
|
|
124236
|
Clear-Mount Cling Foam* |
$10.95
|
*Add a sheet of Clear-Mount Cling Foam to create your own clear-mount stamps. Mounting your stamps on the cling foam allows you to make stamps any size you want, not just what will fit on the blocks in the kit.
This is a picture of the kit contents:
Here are some pictures of stamps that were carved with the kit from last weeks Stampin' Up! Convention.
I'm thinking Aidan will have a fun creating a unique stamp that reflects his personality, the possibilities are endless.
Express your personality, thoughts, feelings, etc. with a stamp you've carved all on your own! I know you'll have a "look what I made!" moment.
Contact me and I can help you order your Undefined Stamp Carving kit so you can get started now.
Thursday, July 25, 2013
Covention 2013 Opening Session
I'm back to share more of the convention fun! Today I wanted to share all of the fun from the opening general session. Convention always kicks of which a theme song and this year was no exception, it was a great song performed by one of the contestants from The Voice and there even fireworks which was truly breathtaking!
Stampin' Up!'s Founder and CEO, Shelli Gardner welcomed all the attendees and really set the stage for the things to come.
There was a special visit by Ronald McDonald to discuss the efforts of the Ronald McDonald House which is a charity that Stampin' Up! has now become a Global Partner. Each year Stampin' Up! designs a special stamp set and donates $2 from the sale of each stamp set to this worthwhile organization. Make sure to check out this years stamp set, Tag It, it's so fresh and fun!
After the opening session was over there was a fun welcome party where there were lots of different things we could do, including checking out some fabulous stamped display projects, Karaoke, a service project making birthday kits for kids at a local hospital, and even working to break the Guinness Book of World Records for the most cards mailed from a single location at one time, we officially broke the record and Aidan received the card I mailed and was so excited he was party of this record breaking activity.
This year there were 6,000 attendees at convention and let me just tell you, that's an amazing about of people in one location and the inspiration and talent that was in attendance was truly amazing.
Wednesday, July 24, 2013
Convention 2013 Riverton Office Tour
Last week was Stampin' Up!'s annual convention and we celebrated the companies 25th anniversary, and boy what a party it was. I thought I would share some pictures this week of all the fun happenings. We got up bright and early on Thursday morning and boarded buses and headed out to Riverton to tour the companies corporate headquarters.
This is the lobby of the office, it's beautiful and look how it's decorated for convention.
Who wouldn't want to work here!
Michelle who's my downline, neighbor, and bestie attended convention with me this year so had lots of fun and took lots of pictures. This georgeous fountain is in the atrium of the office.
This is in the room where employees come to just think fabulous things but, there are bean bags on the floor, couches everywhere, and even game tables (how fun!!!)
There are displays of fabulous projects all over the offices which are great inspiration.
This is picture from the distribution center, it's truly amazing. Do you think my order is in one of these boxes??
Here we are in front of offices at these giant rocks at the entrance. It's a perfect place for photos and was a big hit.
After the tour we headed back to the convention center for some swapping and to get ready for the opening general session.
Saturday, July 20, 2013
Christmas in July: WOW Gift Tag
The snowflake was made with the new Simply Pressed clay. I colored it with Bermuda Bay reinker and pressed it into the Simply Pressed Holiday Cookie stamp to get the 3D snowflake (I did sprinkle Dazzling Diamonds into the mold before adding the clay so it really sparkles in person. The greeting is from the Greetings of the Season stamp set and I sponged around the edge. The final touch was to add some Whisper White bakers twine for the attachment.
This tag is so fun it'll definitely dress up holiday packages and as an added bonus it actually matches one of the new Designer Series Papers that's coming out next month in the Holiday catalog.
I hope you're enjoying the projects this week, I haven't even shared them all and remember if you want to make some of these projects join me next Sunday for the special "The Boys are Away, Let's Play Just Cards Class". We'll be making 5 of the cards I made for swaps that you're sure to love.
I hope you enjoy the rest of your day!
Diana
Convention 2013 - Day 3 Yippee-Skippee Card Swap
Today I'm sharing another swap card I made. This once is pretty simple but was a big hit. The cardbase is Crumb Cake and I added a layer of Very Vanilla and I stamped the greeting from Yippee-Skippee (I've warned you I love this set) that I colored in with Gumball Green and Baked Brown Sugar Stampin' Write Markers.
Next I ran a piece of Calypso Coral cardstock through the Big Shot with the Hexagon Embossing folder. I also added a layer of Epic Day This and That Designer Series Paper and the oh so fabulous Baked Brown Sugar Ruffled Stretch ribbon for flag layers. The final touch was to add a flower I made with the Simply Pressed Clay Button and Flowers Mold and Simply Pressed Clay. I did color the clay with reinkers (this was actually Bermuda Bay) and then let them dry before attaching it to the card with Tombo Mono Liquid Adhesive. This clay is so fun and I love that even after it drys it still have a "squishy" texture that is so fun.
I hope you're enjoying these projects and remember, I'm hosting a special class next Sunday, July 28 at 1:00PM called "The Boys are Away, Let's Play Just Cards Class." We'll be making 5 of the swap cards that I designed for convention so you'll get to get in on some of the fun. Make sure to RSVP soon to reserve your space. Hope to see you there!
Take care!
Diana
Friday, July 19, 2013
Halloween Convention Swaps, Cards and 3D Fun!
You could definitely change the colors, and stamp set to make these projects perfect for any occasion!
Enjoy,
Diana
Thursday, July 18, 2013
Convention Disney Scrapbook Swap
I really like how this layout turned out. It has lots of space for pictures and would for for a Hollywood Studios layout, or other Disney fun. I'm so excited to see all the ideas the other swappers created.
Take care,
Diana
Let the Fun Begin, Convention 2013 Begins!
This card uses the Oh, Hello, Label Love, and A Round Array stamps sets to create all the different layers. I love the matching Artisan Label punch, 7/8" Scallop Circle Punch, and Oval Collection framelits, they really make cutting elements out a breeze. I also used the Gingham Garden Designer Series Paper and 1/4" Daffodil Delight Stitched Grosgrain Ribbon for fun accents. The cardbase is Island Indigo and I added a layer of Crumb Cake paper that was embossed with the Big Shot and Fancy Fan Embossing Folder.
This is such a fun card and a great way to use paper and ribbon scraps.
Enjoy and make sure to check back frequently since I'll be sharing multiple projects each day.
Diana
Tuesday, July 16, 2013
Pick a FREE Project Kit Now, Don't Miss Out!
Stampin' Up! is making it even sweeter to join our family. Between now and August 31 when you sign up to join my team, not only will you to pick $125 of catalog items for your kit (for only $99 and free shipping) but you also get to pick out one of the following four project kits for FREE.
Kit Options: The first three project kits are from the holiday catalog and the last option is from the annual catalog. This kits will be great to help you get a head start on all your holiday projects and gift giving!
Kit Description Build a Banner Simply Created Kit AND Halloween Banner Simply Created Accessory Kit, Item Number 133507 and132698 ($29.90 Value)
Build a Banner Simply Created Kit AND Christmas Banner Simply Created Accessory Kit , Item Number 133507 and 132697 ($29.90 Value)
Thankful Tablescape Simply Created Kit, Item Number 133463 ($19.95 Value)
Tag a Bag Bundle AND Tag a Box Bundle, Item Number 131371 and 131372 ($22.45Value)
Whether you want to for the fabulous products at a discount or you want to start your own business Stampin' Up! offers the perfect solution. Just ask me for details, I would love for you to join my team!
Thursday, July 11, 2013
Stylin' Stampin' Squad July Hop: Birthday Bash
Good morning! I’m so glad you could join us for this month’s Stylin’ Stampin’ Squad Blog Hop. This month is all about birthdays and Stampin’ Up! has some great new stamp sets to make celebrating easy and special. If you’ve been following the hop you came from Bree’s page, I love her fabulous creations, if you just starting here, don’t worry you can continue all along the hop so you don’t miss any of the fabulous designers or their creations, I’m sure you’ll be inspired.
The card I’m sharing today uses the new Sketched Birthday stamp set and it is super fun, I just love the outlined images! I also used a beautiful new (at least to me) technique that I can’t wait to share with you. The cardbase is Tangerine Tango and I added a layer of Whisper White cardstock. Now for the fun washed technique. I saw this at a recent Stampin’ Up! regional event (demonstrated by Rose-Ellen Eastman) and it creates a one of a kind effect each time you do it. You take the one of our clear blocks (depending on the size you want to cover) and you color directly on the block with your Stampin’ Write Markers, in this case I created a rainbow effect with colors from the Brights Collection. Next I spritzed the block with water, and you want to really spritz it nice and good. Then you place the block on your paper and push down hard (you’ll definitely want to have an extra piece of paper you’re working on since the water will run) leave it there for a few seconds and you’ll see the water move. Then just lift your block and let the paper dry, just like that an awesome one of a kind pattern. I used Basic Black ink to stamp the balloons from the Sketched Birthday stamp set after the paper dried.
Next I took a piece of Basic Black cardstock and ran it through the Big Shot with the Chevron embossing folder, layered that on a piece of Pacific Point cardstock and added a piece of Wild Wasabi ¼” Stitched Grosgrain Ribbon. For the greeting I used the invitation image and used Stampin’ Write Markers to color in just the border and flowers and stamped on a piece of Daffodil Delight cardstock before cutting it out with the Big Shot and the Apothocary Accents Framelits. I used the Tiny Banners framelits to cut the “Happy Birthday” greeting from Real Red cardstock and added a quarter piece of the paper doily that I scrunched up to add some texture. I used my bone folder to curl up the Real Red banner so it had some dimension and attached the whole piece to the card with dimensionals.
This is such a bright and cheery card, it’ll really get someone into the celebration birthday to receive it. I hope you enjoyed this month’s project and if you click the next button below you continue on to Annie’s blog. Enjoy!
Blog Hop Participants:
Next I took a piece of Basic Black cardstock and ran it through the Big Shot with the Chevron embossing folder, layered that on a piece of Pacific Point cardstock and added a piece of Wild Wasabi ¼” Stitched Grosgrain Ribbon. For the greeting I used the invitation image and used Stampin’ Write Markers to color in just the border and flowers and stamped on a piece of Daffodil Delight cardstock before cutting it out with the Big Shot and the Apothocary Accents Framelits. I used the Tiny Banners framelits to cut the “Happy Birthday” greeting from Real Red cardstock and added a quarter piece of the paper doily that I scrunched up to add some texture. I used my bone folder to curl up the Real Red banner so it had some dimension and attached the whole piece to the card with dimensionals.
This is such a bright and cheery card, it’ll really get someone into the celebration birthday to receive it. I hope you enjoyed this month’s project and if you click the next button below you continue on to Annie’s blog. Enjoy!
Blog Hop Participants:
- Pam S. of Stampin' in the Sun!
- Rose C. of Stamp with Rose
- Tonya B. of Stampin' with Tonya
- Dawn S. of Dawn's Creative Chalet
- Darcy J. of DJ's Stampin' Place
- Pamela W. of Stinky Tofu
- Kim R. of Stamping with Kim
- Jennifer B. of NW Stamper
- Bree R. of Craft-somnia
- Diana E. of Stampin' Fun with Diana
- Annie L. of Love Me Cards
- Jamie H. of Unique Ink
- Jennifer C. of Happy 2 Scrap 4 Life
And now for the exciting announcement. I'm going a group of very talented designers (many of whom participate in this blog hop) to start a new blog, Stylin' Stampin' Inspiration. It's a DAILY inspiration blog for you by our monthly Blog Hop Demonstrators! You are going to love it! This site will go live the day of our August Blog Hop, August 8th" so I would love for you to come check it out, participate in the challenges (it's a great way to use all those stamping supplies your stashing (and you know you do!). THANKS LADIES!
**AND...if you want to join in...we still have one spot (and we can make more if needed) open!** If your interested ask me and I get you more information.
Take care,
Diana
Wednesday, July 10, 2013
Fab Friday Sketch Challenge: Simply Sketched
The greeting is also from the Simply Sketched stamp set and was stamped in Marina Mist ink and then punched out with the Large Oval Punch, sponged with Crumb Cake ink, and matted on a piece of Early Espresso cardstock that was punched with the Decorative Label Punch. I also added a piece of Very Vanilla cardstock that was punched out with the new Artisan Label Punch, stamped with the Chevron stamp from the June Paper Pumpkin stamp set in Marina Mist and then sponged with Crumb Cake. The final touch was to add a piece of 5/8" Victoria Crochet Trim and Early Espresso 1/8" Taffeta Ribbons for accents.
This card turned out even better than I thought. Love it's softness and the hint of "vintagy" qualities. In fact, I liked this card so much that I decided to use it for one of my convention swaps so if you're going to convention and you like this card come find me and maybe you can get one for yourself.
Just a reminder that tomorrow starts the monthly Stylin' Stampin' Blog Hop. It's all about birthdays this month so you'll want to check out all the great projects the designers have created and there will also be an exciting announcement tomorrow, so stay tuned!!
Thanks,
Diana
Monday, July 8, 2013
Create with Connie and Mary Sketch Challenge: Blooming with Kindness
For decorative elements I added a piece of Early Espresso 1/4" Stitched Grosgrain Ribbon and some butterflies that I cut out of Crisp Cantaloupe and Bermuda Bay cardstock with the Beautiful Wings Embosslits and Big Shot. The greeting is from the Teeny Tiny Wishes stamp set (so versatile) and was punched out with the Modern Label Punch. The final touch was to add some rhinestones to the center of the butterflies for some sparkle and I attached the butterflies by just the center so I could make the wings stand up.I really liked the simplicity of this sketch so you could really let the elements shine. This card is so sweet, and you could definitely change the greeting or colors for any occasion you have.
Enjoy and have a great week!
Diana
Tuesday, July 2, 2013
FREE Designer Series Paper, Make Sure to Stock up Now!
Stampin' Up! knows how much we love their designer series paper and there are so many fabulous new prints in this years catalog, I can't wait to get them all. So now through July 31 you can get one pack of Designer Series Paper for every three packs of select Designer Series Paper you buy (talk about perfect timing)!
The Fine Print:
- These items don't qualify for the offer:
- Designer Series Paper Stacks
- Specialty Designer Series Paper
- Designer Series Paper ordered through hostess benefits
Please let me know if you have any questions or need assistance with your order.
Thanks,
Diana
Monday, July 1, 2013
Paper Craft Crew Sketch Challenge: Really Good Greetings
This card uses the new Baked Brown Sugar for the cardbase and then I added a layer of Whisper White cardstock that I stamped with the Paper Pumpkin splotch stamp and Pistachio Pudding ink. I also added some Rhinestones for a little bling. Next I added some Pistachio Pudding designer series paper from the 2013-2015 In Color DSP stack along with a piece of Strawberry Slush cardstock that was punched with the Scallop Border Punch, and a piece of Whisper White cardstock embossed with the Big Shot and the Perfect Polka Dot Embossing Folder. I also added some Whisper White 1/4" Stitched Grosgrain Ribbon for some added texture.
The greeting is from the Really Good Greetings stamp set (love this stamp set) and was colored in with Stampin' Write Markers before stamping. The greeting was then punched out with the Large Oval Punch and matted on a piece of Strawberry Slush cardstock that was punched out with the Decorative Label Punch.
This card is so fun and fresh, I love the colors and the greeting. I'm so looking forward to the 4th of July holiday this week and having a little extra time to spend with the family (plus this weekend we actually don't have ANYTHING scheduled which hasn't happened in months so we're going to take advantage of the time and just chill).
Have a great day and happy stamping!
Diana
Subscribe to:
Posts (Atom)