Showing posts with label Yippee-Skipee. Show all posts

Wednesday, May 6, 2015

Anniversary Wishes: Yippee-Skippee

Happy Wednesday!  I always look forward to Wednesday but this Wednesday is extra special is it’s my 15th wedding anniversary (can’t believe Chris and I have been married 15 years but boy have things changed, for the better).  We don’t normally do anything crazy for our anniversary but of course I have to make him a special card, big shock I know.

I started with Blackberry Bliss for the cardbase and then added a piece of Gold Foil Vellum (backed with Whisper White cardstock).  I stamped the “Happy Anniversary” greeting from the Teeny Tiny Wishes stamp set using Versamark Ink and heat embossed it with the Heat Tool and Basic Black Embossing Powder.  When I was embossing it I noticed that the gold foil in the stripes started bubbling up for a rough effect which I really liked so I used my Heat Tool to add this effect to all the stripes.  Next I added a strip of Basic Black cardstock then then layered a piece of Gold Satin Ribbon on top.

For the greeting I decided to go to one of my favorites Yippee-Skippee (so sad it’s retiring) since it has this great say “Never Underestimate the Power of Two”.  During our relationship we’ve had lots of ups and downs but through it all we’ve worked as a team to solve problems, achieve goals, whatever it was and it has really helped us before stronger as a couple.  Anyway, back to the card, I stamped the greeting in Versamark and used Gold Embossing Powder and the Heat Tool to emboss the image before punching it out with the 2” Circle Punch.  I created a mat using some Blackberry Bliss cardstock, Big Shot, and the Window Collection Framelits (also retiring so don’t miss out on these).  I wanted to add some texture to the mat so I embossed it using the Perfect Polka Dot Embossing Folder and Big Shot.  Dimensionals help the greeting piece stand up over the flag pieces perfectly for extra dimension.

I love how elegant this card turned out with the gold, purple, and black perfect for a milestone event (and it’s definitely not girly!!) can’t wait to give it to Chris and see what he thinks.

Below are easy ordering links for the products used on today’s projects:

Built for Free Using: My Stampin Blog


Enjoy and have a great day,
 
Diana
Pin It!

Monday, May 4, 2015

Stylin' Stampin' INKspiration Color Sketch: Yippee-Skippee

 Good morning!  It’s a short week for me and I’m really looking forward to my getaway, even if I’ll be flying solo to one of the happiest places on earth!  Before I head out I have a lot on my to do list so I’m going to work as hard as I can to get as much done so I can plan and not stress.  With the start of a new month it’s always fun to see what new challenges are in store for us onver on the Stylin’ Stampin’ INKspiration blog and today we’re kicking off the month with our color sketch challenge.  These are always fun since it gets you to use colors and combinations that you may not normally think of.

I started with Crisp Cantalope (retiring) for the cardbase and then added a piece of Island Indigo cardstock as a mat for my stamped Whisper White cardstock.  On the white cardstock I started by stamping with the Background Rules stamp (so sad it’s retiring) using Crisp Cantaloupe ink and then sponged all over it using Hello Honey, Island Indigo, and even Sahara Sand ink to really distress it. 
I added a piece of Hello Honey striped DSP from the Lullaby Designer Series Paper.  Next I added a piece of Island Indigo Chevron Ribbon as the second layer.  The greeting is from the Yippee Skippee stamp set (one of my favorites and oh so sad it’s also retiring, but staying in my stash).  I stamped the greeting on Chalkboard Paper using the Rose Coral Color Box Chalk Ink (it looks similar to Crisp Cantaloupe).  The final touch was to add a bow using some Crisp Cantaloupe Thick Baker’s Twine so I punched a couple holes using the ¼” Handheld Punch to thread the baker’s twine through the paper.  Dimensionals were used to attach the greeting tag to the cardfront.

This was a unique color combination but it’s always fun to see what you come up with when you step out of your comfort zone.  The designers are sharing some other great cards so go check them out for further inspiration and come play along.

Below are easy ordering links for the products used on today’s card:

Built for Free Using: My Stampin Blog


Enjoy,
 
Diana
Pin It!

Sunday, November 16, 2014

30-Day Gratitude Card Challenge: Day 16

What a great Saturday!  Despite the cold weather we had some great family time and enjoyed seeing all the lights to get us ready for the holidays (and get a little exercise at the same time, BONUS!!!)  I’m now all warmed up and looking forward to a workout and then relaxing today before we head back to work, but not before I share with you today’s gratitude card.  Today’s card is another all occasion card that’s so fun and easy (and you could make lots of them very quickly and get different effects by changing the colors, paper, etc.  I used Sahara Sand for the cardbase (I really like to use light colors for the cardbases so they’re easy to write in, remember the point of these is to send them to friends and loved one’s).  Next I added a piece of Hello Honey cardstock that was embossed with the Big Shot and the Decorative Dots Embossing Folder.  Next I added a piece of DSP from the Moonlight Designer Series Paper Stack and matted it with Blackberry Bliss cardstock.  I wrapped a piece of Hello Honey 3/8” Stitched Satin Ribbon around the DSP and tied a knot using the Hello Honey and Blackberry Bliss 3/8” Stitched Satin Ribbon.

The greeting is from the Yippee-Skippee stamp set and I used the Stampin’ Up! Markers to color on the stamp before stamping on Whisper White cardstock.  The greeting was punched out with the Large Oval Punch and then matted with a piece of Sahara Sand cardstock punched out with Decorative Label Punch.  This piece was attached with dimensionals to the cardfront for a perfect accent!
 
There are so many times you just need to say thanks for something someone does and I love to have this type of card ready to go so I don’t miss the opportunity to share my appreciation.

Below are easy ordering links for the products used on today’s card:

Built for Free Using: My Stampin Blog


Enjoy the rest of your weekend,

Diana
Pin It!

Tuesday, June 24, 2014

Summer Fun: Giggle Greetings

Good morning!  The first few days of summer have been great and we're having a lot of fun.  In honor with the start of summer today on the Stylin' Stampin' INKspiration blog the design team is sharing lots of great ideas for summer fun.  There are so many quintessential summer things, one of which is all the great fruit so I decided to use the bowl of cherry stamp from the Giggle Greeting stamp set.  The cardbase of this card is Coastal Cabana and I added a piece of Whisper White cardstock that I stamped the greeting from the Yippee-Skippee stamp set in Real Red ink.  I decided to add a couple of banners, one of which uses Real Red DSP from the Brights Designer Series Paper Package and another is Coastal Cabana that I embossed with the Big Shot and the Arrows Embossing Folder.  I used a piece of the fabulous new 1/2" Rich Razzleberry Cotton Ribbon to tie a know that is lots of fun (you've got to feel the texture of this ribbon, awesome!)
 
For the stamped image I used my Black Stampin' Write Marker to just color in the cherry bowl so I didn't get the text that is part of the stamp.  Then I punched it out with the 2" Circle Punch and made a mat with Rich Razzleberry cardstock and the 2 3/8" Scallop Circle Punch.   I used my Stampin' Write Markers and a blender pen to color in the stamped image and the whole piece is attached to the cardfront with dimensionals.
 
I really like how bright and cheery this card is which really matches all the fun that summer entails, perfect for lots of summer celebrations.
 
Below is are easy ordering links for all the products used on today's card. 
I hope you enjoy and make sure to check out all the other great projects the designers are sharing, lots of inspiration.
 
Enjoy,
 
Diana

Pin It!

Thursday, April 24, 2014

Project Portfolio Full of Inspiration

Good morning friends!  Boy this week is flying by, we've been on the go non-stop between work, school, baseball practice, getting my runs in getting ready for this weekends race, etc. but I wouldn't have it any other way we always have lots of fun.  So today I have a special post to share.  One of my highlights every year is the opportunity to attend Stampin' Up!'s Annual Convention in Salt Lake City.  This is a fabulous time where we can connect with friends and fellow demonstrators from all over the country, see exciting new products and ideas, and more.  Convention always has some fabulous displays of projects made by fellow demonstrators which are truly amazing and inspiring.  This year we have the opportunity to apply to be a display stamper for this year's convention and we have to submit a portfolio of projects to be considered by the Stampin' Up! team.   I always love these projects and have decided to take the plunge and apply to be a display stamper this year so below is the portfolio of projects I'm submitting, which consists of 3 cards, 2 3D items, and one scrapbook page.


This first card uses lots of great products from the Occasions catalog, including the Woodgrain,  Petite Petals (with matching punch) and Hip Notes stamp sets to make a soft and springy card.


My second card is nice and yummy, perfect for any birthday greeting.  It used the Sketched Birthday stamp set and the cake was colored in with Stampin' Write Markers so you could just eat it.  Texture with the Arrows Embossing folder, flags, and lots of layers really make this card pop.


The final card I have is perfect for the little new arrival and uses the Baby, We've Grown stamp set, On Film Framelits, and lots of bling with Gold Paper and Gold Sequin trim that will make anyone sparkle when they receive it.


Next we move onto the 3D items and I have two very different projects to share with you.  The first is a treat box using the Tag a Bag Gift Boxes, the Yippee-Skippee stamp set and lots of fun accessories that really make it stand out.  The great thing about this box is that it can really be recycled and given multiple times by just changing out what is in the box. 


The second item is a fun décor item for Valentine's Day.  I used the Kaleidoscope Designer Series Paper for the color palette and used a wood cutout piece of the base, painted it White and used different papers, including DSP, Silver Glimmer Paper, and embossed Coredin'ations Cardstock to cover each of letters.  I decided to dress up the piece with punched hearts, elements that I printed out of My Digital Studio, ribbon, the "xoxo" cut out with the Big Shot and Thinlit die, and stamped images from the Love You to the Moon stamp set.


 The last item I want to share is a scrapbook page I made using My Digital Studio from our recent cruise.  This page uses lots of punched elements to showcase pictures, designer series paper, and text so we remember all the special times. I got several of the tropical embellishments from an MDS download and created with Mickey head with circle punch pieces in different sizes.


I really had a lot of fun assembly this project collection and hope you enjoy them as much as I do.  I love all the different products Stampin' Up! offers and how they all work together to make the perfect project for any occasion.

Pin It!

Friday, February 14, 2014

Extra Valentine Treats

 Good afternoon!  I'm back again with a second post today, you didn't think I'd let Valentine's Day pass without sharing some more projects did you?  These are the projects I made for Chris, I love the coffee cup images from the Perfect Blend stamp set and since I think we're the perfect pair I thought they would be perfect.  I used paper piercing to make the cup Crumb Cake, the lid Whisper White, and used Real Red Designer Series Paper for the coffee collars.  The Gorgeous Grunge is perfect with this stamp since the splatters look like coffee stains.  The greeting is from the Love You More stamp set and I stamped it in Early Espresso and then just colored in the "Love" with a Real Red Stampin' Write Marker.  The final touches were to add some Gold Sequins (I cut them apart so I could attach them individually) and then a little piece of Natural 5/8" Chevron Ribbon. 

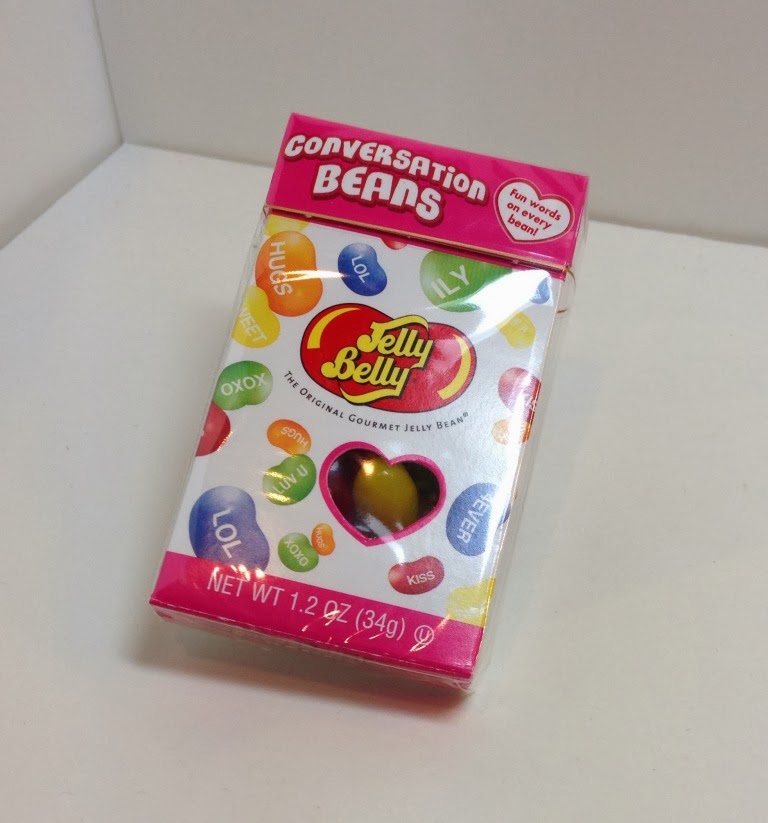
For my second project  made a cute little wrapper for a box of Jelly Belly Conversation Beans I found (Chris is addicted to Jelly Belly Jelly Beans right now).  I just wrapped a piece of Crumb Cake around the box and then added a piece of Fresh Prints Designer Series Paper Stack Paper around the box.  I used the Angled Tag Topper Punch to create the tag and then made it a little narrower by trimming down the sides after punching.  The stamp is from the Love You More stamp set and I added a coordinating piece of Fresh Prints DSP along the bottom and used some Soft Suede 3/8" Taffeta Ribbon to attach the tag.

This is what the Jelly Belly Conversation Beans looked like before I decorated them.
 
I hope you enjoyed these projects, I know Chris will like them and we're looking forward to an evening out at the movies (we're going to avoid restaurants due to the craziness).  Have a special, love filled day with the special people in your life, what a wonderful way to kick off the weekend.
Pin It!

Saturday, July 20, 2013

Convention 2013 - Day 3 Yippee-Skippee Card Swap

Happy Saturday friends!  We're having an amazing time at convention this year.  After a full day of classes and sessions we had the awards ceremony and after party last night.  It's so fun to see such amazing demonstrators get recognized for their achievements, it really gives you something to aspire to.  Plus who doesn't love a little dessert, music, and dancing to end the evening.  I also hope all my peeps back home and on the east coast are getting so relief from the heat.  I've really enjoyed escaping from the humidity this week (it's still over 100 degrees here in SLC but the lack of humidity really does make a difference).
 
  Today I'm sharing another swap card I made.  This once is pretty simple but was a big hit.  The cardbase is Crumb Cake and I added a layer of Very Vanilla and I stamped the greeting from Yippee-Skippee (I've warned you I love this set) that I colored in with Gumball Green and Baked Brown Sugar Stampin' Write Markers.
 
Next I ran a piece of Calypso Coral cardstock through the Big Shot with the Hexagon Embossing folder.  I also added a layer of Epic Day This and That Designer Series Paper and the oh so fabulous Baked Brown Sugar Ruffled Stretch ribbon for flag layers.  The final touch was to add a flower I made with the Simply Pressed Clay Button and Flowers Mold and Simply  Pressed Clay.  I did color the clay with reinkers (this was actually Bermuda Bay) and then let them dry before attaching it to the card with Tombo Mono Liquid Adhesive.  This clay is so fun and I love that even after it drys it still have a "squishy" texture that is so fun.
 
I hope you're enjoying these projects and remember, I'm hosting a special class next Sunday, July 28 at 1:00PM called "The Boys are Away, Let's Play Just Cards Class."  We'll be making 5 of the swap cards that I designed for convention so you'll get to get in on some of the fun.  Make sure to RSVP soon to reserve your space.  Hope to see you there!
 
Take care!
 
Diana

Pin It!

Friday, June 28, 2013

Retro Sketches Sketch Challenge: Yippee-Skippee!

I'm so excited that it's Friday and the weekend is just about here.  We've got a really exciting weekend ahead of us, Aidan is taking is pre-test for his Black Belt in Tae Kwon Do and he needs to pass it in order to take his Black Belt test in two weeks.  He's been working really hard at this for the past 3 years so I'm excited but also really nervous so please keep him in your thoughts.  Anyway, today I want to share the card I made for this weeks Retro Sketches Sketch Challenge.  I was using the new Soho Subway designer series paper on another project this week so it was siting out on my desk so I decided to try to come up with a more masculine card.  The cardbase is Crumb Cake and I stamped the background with the Clockworks stamp set and Crumb Cake ink (love the swirly, geometric images in this set).  Next I added a piece of Soho Subway designer series paper that is matted on a piece of Island Indigo cardstock (I used the Finishing Touches Edgelits and the Big Shot to cut the decorative border along the bottom.

The next layer uses the Early Espresso coredinations cardstock (love this stuff) that was embossed with the Big Shot and the new Alphabet Press Embossing Folder before sanding the cardstock so the images really stand out.  This piece is matted on Summer Starfruit cardstock.  I added two neutral brads to the top right corner (they're retired but I don't have any of the new candy dots to use which would have been perfect).  I also added a piece of Crumb Cake 3/8" Taffeta Ribbon and a matching bow that's accented with a Basics 3/8" Glimmer Brad.  The greeting is from the new Yippee-Skippee stamp set (one of my absolutely favorite new stamp sets!!!!) and I used Stampin' Write Markers to add the ink directly to the rubber before stamping, punched it out with the Decorative Label Punch and then sponged around the edge with Crumb Cake ink.  As usual, I used dimensionals to attach the greeting to the card so it pops up.
 
I really like how this card turned out and the colors are so fresh and different from what I normally use, I love how when you use our designer series paper it provides you some great color inspiration and a means to step out of your comfort zone while knowing that the colors will work together since Stampin' Up already planned the images and colors to work together.
 
Hope you enjoy and happy stamping this weekend!
 
Diana
 

Pin It!

Thursday, June 13, 2013

June Stylin' Stampin' Squad Blog Hop: New Catalog Showcase


Good morning friends!  Thanks for joining us this month for the Stylin' Stampin' Squad June Blog Hop.  This month we're featuring projects using all the great new items from the 2013-2014 Annual Catalog.  If you've been following along the hop you just came from Bree's blog, isn't her work amazing!!  Don't worry if you're just starting here you can continue following around the hop so you don't miss out on any of the fabulous creations from these talented stampers.
 
For my first project I'm showcasing the Mosaic Madness stamp set with the coordinating Mosaic punch and the Modern Mosaic Embossing Folder.  I love how all these products work so well together and we even have the Quatrafancy Specialty designer series paper which is yummy.  You'll also notice I used three of the new in colors, Strawberry Slush, Crisp Cantaloupe, and Coastal Cabana.  The greeting is from the Really Good Greetings stamp set, these sayings are so fun and whimsical.

For my second project I decided to make a matching gift using the new Tag a Bag Gift Boxes.  If you haven't seen these boxes you have to check them out, they come with a clear sleeve cover so they're all set and ready to decorate, and they really do hold quite a bit.  I wrapped a piece of Pistachio Pudding Cardstock, Coastal Cabana Ruffled stretch ribbon (this new ribbon is to die for), as well as the Quatrafancy Specialty DSP.

Here's a close up of the tag.  I used the Yippee-Skipee stamp set (another great greeting set you've got to get!) and I heat embossed on Basic Black cardstock with Whisper White embossing powder.  I used a sponge dauber and Whisper White craft ink to create the chalkboard technique (so hot and in right now).  For a decorative element I added one of the Crisp Cantaloupe In Color Boutique Details and the Whisper White Organza ribbon.
 
This gift is so fresh and fun, plus it has peanut butter cups inside, what could be better.  I hope you enjoyed this months projects and it's shown you some of the great new products available, LOVE THEM!  I would love for you to leave a comment and know what you think about this months projects as well as what your favorite new item from the Annual Catalog is.
 
I encourage you to continue on with the blog hop, your next stop is Annie and I know you'll love her projects.


Blog Hop Participants:
  1. Pam S. of Stampin' in the Sun!
  2. Rose C. of Stamp with Rose
  3. Tonya B. of Stampin' with Tonya
  4. Dawn S. of Dawn's Creative Chalet
  5. Darcy J. of DJ's Stampin' Place
  6. Pamela W. of Stinky Tofu
  7. Kim R. of Stamping with Kim
  8. Heidi B of Stuck on Stampin'
  9. Bree R. of Craft-somnia
  10. Diana E. of Stampin' Fun with Diana
  11. Annie L. of Love Me Cards
  12. Jamie H. of Unique Ink


Pin It!

Search This Blog