Showing posts with label Dictionary. Show all posts

Monday, June 1, 2015

Stylin' Stampin' INKspiration Color Challenge SSINKCC22: Traveler

 Good morning!  It’s hard to believe it’s already June, oh my!  Not only is there just a few short weeks left of school but in the Stampin’ Up! world tomorrow’s a very exciting day, it’s the last day to order from the Occasions and Retiring Products catalogs (including My Digital Studio), plus the new 2015-2016 Annual Catalog is released (there is actually a one day overlap so you’ll be able to order from all of these tomorrow only and take advantage one last time of the current Hostess Rewards (I’ll be placing my order tomorrow and am hoping I’ll have my 2013 and 2014 family albums finished in MDS so I can have them printed by Stampin’ Up! one last time!)  Anyway, since it’s the first Monday of the month it’s time for another color challenge over on the Stylin’ Stampin’ INKspiration blog and this month it’s a mix of old and new colors which is fun.  To go along with the theme of old and new I decided to mix old and new items for this card as well (one last hurray!!) 

I started with Mint Macaron (new In Color) for the cardbase and then added a piece of Night of Navy cardstock that was embossed with the Big Shot and Fancy Fans Embossing Folder (retiring) and matted that with Cajun Craze cardstock.  I took a piece of Cajun Craze cardstock and cut it out with the Big Shot and Chalk Talk Framelits and then stamped on it using the Dictionary Background stamp (retiring) with the same color ink.  I also added a piece of the new 1” Mint Macaron Dotted Lace Trim as a fun accent sticking out from the side of the stamped piece.

For the main stamped image I decided to use one of the Personalized Circle Photopolymer stamps (they also retiring, boo!)  It was stamped on Very Vanilla Cardstock with Mink Macaron ink and then punched out with the 1 ¼” Circle Punch.  I created a mat with the 1 3/8” Circle Punch and Cajun Craze cardstock and then the 1 ¾” Scallop Circle Punch and Mint Macaron cardstock for the final layer (I did add little dots in the scallops using my Night of Navy Stampin’ Write Marker.  Dimensionals were used to attach the greeting medallion to the cardfront.

This was a unique color combination but I like the mix and I can’t wait to use all the new In Colors more over the next couple of years.  It was also really fun to play with the personalized stamp I had made, these make great gifts either for addresses, or just personalized greetings, but remember the last day to order these is tomorrow so don’t forget!   The designers are sharing some other great cards so go check them out for further inspiration and come play along.

Below are easy ordering links for the products used on today’s card:

Built for Free Using: My Stampin Blog


Enjoy,

Diana
Pin It!

Thursday, March 19, 2015

Hand Stamped Sentiments Color Challenge and Stylin' Stampin' INKspiration Stamp Set Focus: Dictionary

Good morning!  Com on weather man, say it isn’t so.  I’m ready for spring and got a beautiful glimpse of it and now it’s been taken away and there’s even mention of the “snow” word, I’m really hoping your wrong buddy.  To help warm things up I have a bright and cheery card today that’s a double dip.  I used the Hand Stamped Sentiments Color Challenge along with the Stylin' Stampin' INKspiration blog where we’re focusing on the background stamp set:  Dictionary.  I also decided to combine this with a brand new Sale-a-Bration stamp set that was released this month, For Being You which is so fun! 
 
I started with Blushing Bride cardstock for the cardbase and then added a piece of Whisper White cardstock.  On this layer I stamped the background using the Dictionary stamp set and Blushing Bride ink and then sponged around the edges with the same ink. 

Next I stamped the “Thanks” from the For Being You stamp set in Tuxedo Black Memento Ink and then colored it in with Stampin’ Write Markers with Blushing Bride, Wilde Wasabi, and Blackberry Bliss for a rainbow effect.  I also wrapped some Wild Wasabi Cotton Twine from the Painted Blooms Cotton Twine pack (this stuff is so soft and pretty!).  I stamped the rest of the greeting in Wild Wasabi Ink, punched it out with the Word Window Punch and then sponged around the edges with Blackberry Bliss ink before attaching it with dimensionals. 
This card is so fun and I love our background stamps since I can create exactly what I want in the colors I want, quick and easy.  Make sure to check out the other design team creations for further inspiration.
 
Below are easy ordering links for the products used on today’s card:
 
Built for Free Using: My Stampin Blog


Hope this helps brighten your day!
 
Diana
Pin It!

Tuesday, August 20, 2013

Paper Craft Crew Sketch Challenge: Toil and Trouble Halloween Greetings

Happy, happy Tuesday!  I have to say, this has been one of the most unusual August's I've experienced on the East Coast.  It's been so cool and pleasant that it keeps making me think of fall, and what comes along with fall but Halloween.  For the this weeks Paper Craft Crew sketch challenge I decided to channel these fall feelings for a Halloween card.  I drew the color inspiration from directly from the Witches Brew Designer Series paper.  The cardbase is Summer Star fruit and I layered that with Basic Gray and a layer of Very Vanilla that I stamped with the Dictionary stamp set and sponged around the edges with Smoky Slate ink.
 
The striped layer is from the Witches Brew DSP and is matted with Basic Black.  Next I inked up the large image in the Toil and Trouble stamp set with Pumpkin Pie ink and stamped it and cut it out with the Oval Collection Framelits to just highlight a piece of the pattern.  The greeting is from the Halloween Hello stamp set and was punched out with the Oval Punch and matted with the Scallop Oval punch and Basic Black cardstock.  The final touch was to add a knot bow I tied with the Smoky Slate Chevron ribbon (this ribbon is AWESOME!)
 
I have to say, I absolutely love this years Halloween collection of products and am looking forward to using it for lots of other projects in the upcoming months.
 
Enjoy and happy stamping,
 
Diana


Pin It!

Friday, August 2, 2013

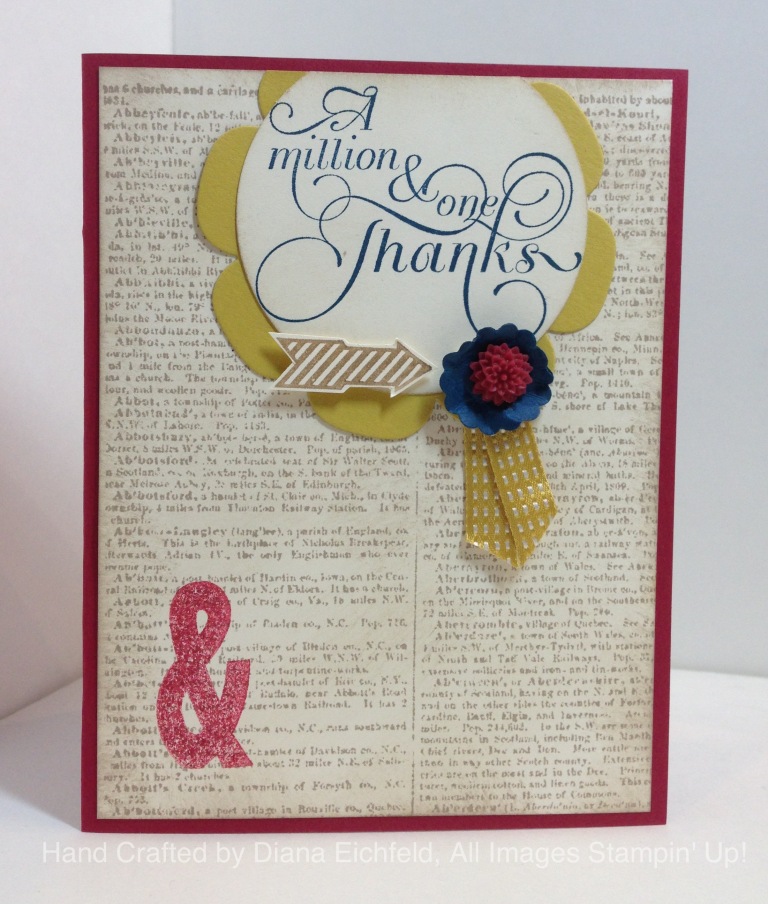
Fab Friday Sketch Challenge: Million & One

Happy Friday stamping friends!  I'm glad you could stop by this morning, I have a fun card to share with you for this weeks Fab Friday sketch challenge.  This sketch  gives a fun idea to start but really leaves open lots of possibilities.  My cardbase is Raspberry Ripple and I added a piece of Very Vanilla cardstock that was stamped with the Dictionary stamp set in Crumb Cake and sponged around the edge and all over the layer so it's nice and distressed.  To this layer I also added the ampersign from the Hello, Lovely stamp set (this is a great new set that has some great images) stamped in Raspberry Ripple, stamped off once for a lighter effect. 

The greeting is from the new Million & One stamp set and was stamped in Midnight Muse and punched out with the 2 1/2" circle punch, and sponged around the edge with Crumb Cake.  I matted this piece with a flower that was cut with the Big Shot and the Floral Frames Framelits in Summer Starfruit.  I attached this piece to the top of the card and then used the paper trimmer to trim off the top.  For the decorative accent I added a piece of Summer Starfruit Stitched Satin Ribbon, an arrow stamped with the same Hello, Lovely stamp set in Crumb Cake ink and cut out with my Paper Snips.  The flower uses the 7/8" scallop circle punch and the cardstock is Midnight Muse and I crumpled it up to add some texture before adding a Raspberry Ripple Dalia to the center of the flower.
 
I think this card is soft and elegant while being fun and whimsical at the same time, I really like how this turned out.  This layout is great since you could change the colors, elements, and greetings, for any occasion.  You should definitely save this sketch to give you inspiration in the future.
 
Have a great weekend and happy stamping!
 
Diana

Pin It!

Saturday, July 20, 2013

Christmas in July: WOW Gift Tag

Good afternoon!  We're about to start the closing general session for this years convention and we've been having so much fun we can't wait to see what Stampin' Up! has in store for us.  Since it's so hot year and back home in VA I decided to help cool things off a little by sharing the gift tag I made for a swap group I'm in.  This gift tag uses the Big Shot, Apothecary Accents Framelits, Decorative Label Framelits, and Striped Embossing Folder.  I sponged around all the edges with Smoky Slate ink and stamped on the Silver cardstock with the Dictionary Stamp set (make sure to let this sit since it will take a little longer to dry than our regular cardstock).  I wrapped a piece of Whisper White Organza Ribbon around the tag.
 
The snowflake was made with the new Simply Pressed clay.  I colored it with Bermuda Bay reinker and pressed it into the Simply Pressed Holiday Cookie stamp to get the 3D snowflake (I did sprinkle Dazzling Diamonds into the mold before adding the clay so it really sparkles in person.  The greeting is from the Greetings of the Season stamp set and I sponged around the edge.  The final touch was to add some Whisper White bakers twine for the attachment.
 
This tag is so fun it'll definitely dress up holiday packages and as an added bonus it actually matches one of the new Designer Series Papers that's coming out next month in the Holiday catalog. 
 
I hope you're enjoying the projects this week, I haven't even shared them all and remember if you want to make some of these projects join me next Sunday for the special "The Boys are Away, Let's Play Just Cards Class".  We'll be making 5 of the cards I made for swaps that you're sure to love.
 
I hope you enjoy the rest of your day!
 
Diana

Pin It!

Search This Blog