Wednesday, October 17, 2012

Halloween Printer's Tray Remix: Take Two

Good morning friends!  I'm glad you're back and I'm so happy we're halfway through the week.  Today I'm sharing the second project I made with extra pieces from the halloween printer's tray it.  Today it's another card.  I started with an Old Olive cardbase and ran it through the Big Shot with the Perfect Polka dot embossing folder.  Next I added a strip of Tangerine Tango chevron paper layered with the black striped piece.  I stamped the "Trick or Treat" words from the Toxic Treats stamp set in Old Olive ink.   
 
I wrapped a piece of Tangerine Tango Scalloped Polka Dot ribbon around the striped piece and tied a knot.  Next I added the hanging spider with dimensionals and added two rhinestones for it's eyes.  This is another clean and simple card and I loved how quickly it came together by using the pieces of the kit. 
 
I have one more project to share with you and I guarentee you'll love it so make sure to check back at the end of the week.
 
Happy Wednesday!
 
Diana


Pin It!

Monday, October 15, 2012

Halloween Printer's Tray Remix: Take One

Good morning friends!  It's the start to another crazy week but we had a great weekend which included stamping with friends which I love.  On Friday night I had a class where we made the the halloween printers tray that Stampin' Up! designed as a kit and is so fabulous.  Included in the kit were two sheets of the printed elements in case you needed extras.  After the class I still had my whole second sheet and I was trying to figure out what to do with it.  As a result I've created three different projects I'll be showing this week that use pieces from the kit as the main project elements.  This first card was a breeze to put together and I love the subway art piece that was large enough that it took up the entire card front.  All I did was wrap a piece of Basic Gray/Black striped satin ribbon around the middle and tied a knot before mounting the piece to a cardbase of Tangerine Tango.  I added a few rhinestones to the bats, spider, and frog so it really dazzles.
 
Check back soon for other projects that will provide inspiration for those extra kit pieces.
 
Enjoy,
 
Diana
Pin It!

Friday, October 12, 2012

Halloween Decor, MDS2 Style!

Happy Friday!  I have a lot of fun decorating for the holidays (all holidays) and especially enjoy making decor items for Halloween.  When I saw this new subway style Toxic Treats digital dowload for MDS2 I knew exactly what I wanted to do.  The great thing about this download was that all I needed to do was open up a new project with the file and send it to the printer, so easy.  With the new stamp coloring tool in MDS2 you could easily change the colors of any of the words in the image to match any color in your house.  Next I found a really cool frame that helped add to the antique nature of the decor.


I also decided to add a decorative accent to the corner.  I used the Toxic Treats stamp set and stamped the cauldren in Tangerine Tango and stamped over with the gate image in Basic Gray.  I punched the image out with the 2 3/8" scallop circle punch and matted with a Tangerine Tango circle punched out with the 2 1/2" circle punch.   Next I took a 2" strip of designer paper from the Houndstooth and Harringbone DSP pack and scored it every 1/4" inch and accordian folded it to create a lolly.  I decided to add several different types of ribbon in layers for lots of texture, I used Basic Black 3/8" taffeta, Basic Gray/Black Striped Satin, Tangerine Tango Scalloped Polka Dot, and Victoria 5/8" Crochet Trim ribbon at different lengths for perfect ribbon tails.  The final touch was some sparkly rhinestones.

 
This project turned out just like I pictured and works perfect with some of my other decorations.  You've got to try making hybrid projects with MDS2 which will make easy work for any project you have!
 
Enjoy!
Pin It!

Thursday, October 11, 2012

October Stamp-a-Stack Samples

Good morning peeps!  Hope you're having a great week.  I'm so excited for this month's stamp-a-stack class, there are some great cards for every occasion.  Class is this Sunday, October 14 at 2:00 PM, please RSVP by Friday to reserve your spot.  Make sure to let me know if you're interested in the Christmas card add-on option when you register.


Hope to see you Sunday!

Diana
Pin It!

Monday, October 8, 2012

Elegant Gift Tags, full of Sparkle

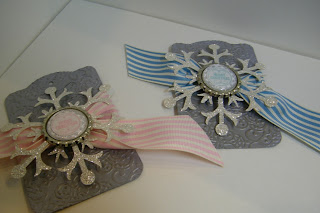
Good morning friends!  Fall has definately arrived in Northern Virigina, the leaves are starting to turn and it's definately getting cooler.  I love this time of year but it's also a reminder that the holidays are fast approaching.  Recently I saw a stunning gift tag made by Monica Weaver and knew I need to make some for my Holiday gifts.  This first version is pretty much the same as Monica's but changes the center decoration, see Monica's creation here.  I started with a piece of Brushed Gold cardstock and ran it through the Big Shot with the Two Tags Die and then embossed it with the Lacy Brocade embossing folder.  Then I sponged some Crumb Cake ink on the tag to add some dimension before wrapping a piece of Cherry Cobbler 3 1/2" Scalloped Tulle Ribbon.  Next I cut out two snowflakes with the Snow Flurry Bigz Die and Champagne Shimmer paper.  I flattened a bottle top with the Big Shot (it's pretty cool to see that) and then stamped the words from the Merry Medley stamp set in Cherry Cobbler (cut it out with the 3/4" circle punch) and stamped the decorative circle with gold ink (retired) and punched it out with the 1" circle punch.  The final touch was to add a clear epoxy disc to the top so it's all glossy and protect it, perfect!
 
Here's a close up of the gift tag with the bottlecap and Merry Medley decorative center.


I had so much fun with these tags that I decided to make some with silver and everythings the same except I used Silver Glimmer Paper for the snowflakes, Marina Mist and Pretty in Pink 1 1/4" stripped grosgrain ribbon (retired) and silver ink (retired) for the decorative detail.


Another close up of the gift tag with the bottlecap and Merry Medley decorative center, this time with the Marina Mist and Silver version.


I love how these tags turned out and they will great not only on gifts but even as a decoration on the Christmas tree after the presents have been opened.  Now's the perfect time to start making holiday tags or other projects you have in mind before things get even more crazier and hectic.  I can help you design any projects you have in mind and make sure you have all the necessary supplies, just let me know.

Happy stamping,

Diana
Pin It!

Thursday, October 4, 2012

Single Stamps Now Available for Sale!


Stampin' Up! is trying out something new! Some of you may have noticed Stampin' Up! recently had a poll on their Facebook site asking if people were interested in purchasing individual stamps from stamp sets.  They've listened to the feedback and we're excited to offer you the chance to buy single pieces from these select stamp sets: Word Play, Perfectly Penned, and Seasonal Sayings. The offer will be available now through January 2, 2013.

Details
 
  • These Single Stamps are available on any type of order (online or workshop/party)
  • You can find the stamp item numbers on the flyers listed below.
  • These won't be sent to you in our typical cases or packaging; they'll be packaged in cello bags. If you'd like a case for your stamp, you can buy our Clear-Mount Stamp Cases that come in packs of four (item 119105).
  • This offer is available for clear-mount stamps only.
  • The stamps don't come with a Clear-Mount Block, so you'll need to purchase a block separately if you don't already have one. NOTE: The recommended block sizes can be found on the flyers. 
  • There's no limit on how many pieces you can buy.
  • This is a pilot program, so take advantage of it while you can!
Click on each for the flyer details:

Word Play

Perfectly Penned

Seasonal Sayings
Pin It!

Friday, September 28, 2012

Wacky Christmas Tidings

Happy Friday!  To close out my focus on the Wacky Wishes stamp set I wanted to share a Christmas card.  One of the classes I took at Convention this summer was about pattern mixing so I decided to try some things out on this card.  For this card I decided to let the designer paper be the star.  I used the Snow Festival DSP and used the pattern that looks like a knit sweater for the main panel and matted that on Baja Breeze cardstock and layered it on a Cherry Cobbler cardbase.  The greeting is stamped on Whisper White cardstock and ink was applied to the stamp with Stampin' Write markers so it could be multi-colored.  This piece was then sponged with Baja Breeze ink and matted on a piece of Soft Suede cardstock. 
 
To add a little bit of interest on the card I added a flag from another pattern from the Snow Festival DSP and then added an Early Espresso button from the Neutrals button pack and tied a bow with Cherry Cobbler baker's twine.
 
I hope these projects have shown you some of ways to use the Wacky Wishes stamp set as well as some of our fabulous DSP.  Just think with just a few changes of papers and embellishments you could make a perfect card for any occasion.
 
Have a great weekend,

Diana

Pin It!

Wednesday, September 26, 2012

Wacky Fall Thanks!

I'm back!!!  I'm so thankful we're half way through the week, given that this is a the last week of the Government fiscal year things are even crazier than usual.  Today's card  was really simple to pull together but has lots of fun elements.  I started with a cardbase of Cajun Craze and added a piece of Very Vanilla cardstock and a piece of Orchard Harvest DSP.  Once again I rounded the corners with the corner rounder punch.  I wrapped a piece of Chocolate Chip scalloped polka dot ribbon (back side showing) around the middle.  The greeting is once again from the Wacky Wishes stamp set and was stamped in More Mustard ink. 

I had a lot of fun playing with the leaves.  I used the Autumn Accents Bigz die and cut different leaves out of More Mustard, Cajun Craze, and Gumball Green Coordinations cardstock.  I embossed the Gumball Green leaves with the Woodgrain embossing folder and then sanded it to bring out the texture on the leaves.  Then I used the houndstooth embossing folder for the large leaf.  I took both the remaining leaves and crumbled them up and then sponged them with Cajun Craze ink.  The leaves are all layered and some popped up with dimensionals for some fun.  The final touch was to add three half pearls along the ribbon.

This card is so fabulous and has lots of texture.

Enjoy!

Diana
Pin It!

Monday, September 24, 2012

Wacky Halloween Wishes

Good morning friends!  What a beautiful weekend to kickoff fall.  We had a great time with friends on Saturday and I got to putter around the studio working on little projects that I'm trying to get done.  For this weeks shares I decided to focus on one stamp set, Wacky Wishes, and show different ways how you can make simple cards for all sorts of occasions.  This first card is for Halloween and starts with a Tangerine Tango cardbase.  I added a piece of Very Vanilla cardstock (I sponged around the edge with More Mustard ink) and Houndstooth and Harringbone DSP.  The corners of the cardstock and DSP were rounded with the corner rounder punch.  I wrapped a piece of Basic Gray/Black striped satin ribbon around the middle. 
 
I also added three flags with the same DSP in different patterns.  The greeting is stamped in Tangerine Tango ink.  The final touch was to add a spider web, from the Wicked Cool stamp set, to the top corner of the card stock (I used Basic Gray ink and stamped off once before stamping so it was faded) and added a small rhinestone to the center.

I hope you enjoy and check back the rest of the week for other  ideas for this fun stamp set.

Enjoy,

Diana
Pin It!

Friday, September 21, 2012

Googly Ghoul Cuties!

I have definately developed a fondness for the cuties in the Googly Ghouls stamp set.  This fun card shows of not only the fun little cuties with their googly eyes but also the new cotton ribbon and Border Banter stamp set.  This ribbon is so soft and fabulous you're also able to stamp directly on the ribbon (love it!)  I also frayed the ribbon to distress it and attached it with several glue dots so it would ripple. 
 
The rest of the card is pretty simple and uses the Houndstooth and Scaringbone DSP (this paper is so fun and not overly halloweenish so you can use it for other things).  You'll definately want to grab these products so you can get an early start on your halloween and fall projects!


Pin It!

Wednesday, September 19, 2012

Your Amazing, Birthday Greetings

It seems like there are an insane amount of birthdays during September, which means that I've been working like crazy to keep up with all the birthday wishes.  Today's card share is something I made for a birthday party Aidan attending this past weekend.  This card uses the Your Amazing stamp set, as soon as I saw this stamp set in the new catalog I knew I would have to have this set being perfect for projects for both kids and adults.  This card started with a Daffodil Delight card base and I stamped the two ticket images randomly along the top with Daffodil Delight ink.  I added a piece of World Spectacular DSP that was matted on a piece of Cherry Cobbler cardstock that was punched with the Scallop border punch.  I stamped the elephant in Cherry Cobbler and cut it out with paper snips.  The greeting was colored on the rubber with the Stampin' Write markers and then cut out with the apothocary accents framelits and the big shot.  I used the the circle punch from the Itty Bitty punches set to punch the Cherry Cobbler circles and then added silver brads as an accent.

So perfect for the birthday boy, I hope he enjoyed it.  You'll definately want to add this stamp set to your collection, it'll be perfect for lots of different projects.

Enjoy,

Diana
Pin It!

Monday, September 17, 2012

Treats, not Tricks Halloween Class Samples

Good morning!  Today I wanted to share with you some of the projects we'll be making on this Saturday's Halloween Treats Class.  I tell you these were so fun to make and I know you'll enjoy them as well.  The class starts at 10 AM and will include lots of yummy treats to get you in the holiday mood.  Make sure to RSVP soon to ensure that you have a spot in this fun class.


Pin It!

Sunday, September 16, 2012

Carry On: Sketch Challenge

Happy Sunday friends!  What another fabulous weekend, I love this time of year.  We got a lot done this weekend, including decorating the house for Halloween/fall so now I'm ready for fall.  This week's Fab Friday challenge is a color challenge. I'll admit these are not colors I use regularly use but it was fun to play along.  I decided to use the Carry On Hostess stamp set since it was sitting out in the studio begging to see a little action and get all inky.   I started  with a cardbase of Sahara Sand and ran it through the Big Shot with the Chevron embossing folder.  Next I added a piece of So Saffron designer series paper, matted on a piece of Going Gray, which was then matted on Whisper White that had been punched with the Scallop Trim boarder punch.  I also added a piece of Whisper White 5/8" organza ribbon around the stack before adhering it to the cardbase.

The main stamped image was stamped by coloring directly on the rubber with Stampin' Write markers.  I did the same thing with the cupcake image and then cut it out with paper snips.  I added some dazzling details to the frosting by using the 2 way glue pen before attaching it to the cardstock with a dimensional.  This whole stamped image was matted on a piece of Basic Gray cardstock before attaching it to the card. 
 
This card is definately a lot of fun and yummy!  Thanks for checking out my card and join in on the fun with this great color challenge.
 
Enjoy,
 
Diana

Pin It!

Wednesday, September 12, 2012

Kidoodles Birthday Greetings

Good morning friends!  Today I'm sharing a card that was one of my swaps from convention in July (I can't believe there are still cards that I haven't shared).  This is a really cute card I make for a kid's swap I participated in and uses the Kidoodles stamp set.  Since I have a boy I'm always looking for boy type cards and this was a perfect opportunity.  The card base is Pumpkin Pie and is layered with a piece of Whisper White cardstock that was embossed with the new Argyle embossing folder.  I stamped the main image in Basic Black ink and colored it in with various Stampin' Write markers.  I attached this piece to a long piece of Pacific Point cardstock and added a piece of Real Red designer series paper to the bottom.  The final touch was a piece of Old Olive Scalloped Polka dot grosgrain ribbon.
 
I had to make forty of these cards for the swap and I remember I even brought them on our Cub Scout camping weekend and I was able to get them colored in while we enjoyed the campfire.  This card is nice and cheery, a perfect way to send birthday greetings to the little one in your life.  The great thing with this set and layout is that you could keep the card design the same and interchange the stamped image and colors and it would be fabulous.
 
Hope you enjoy,
 
Diana

Pin It!

Sunday, September 9, 2012

Gently Falling: Fab Friday Challenge

Good evening friends!  We'll we've survived our first weekend of the new school year.  After a hot start the weekend we had some strong storms on Saturday afternoon which brought some much cooler weather that we loved.  Thankfully we get to enjoy this nice cooler weather for the next few days.  This cooler weather was the inspiration for my sketch card this week.  I found a new sketch site, Fab Friday that I'm really excited to participate in.  This card is for thanksgiving and uses my much loved Gently Falling stamp set (love that this set returned to the annual catalog this year!)

The cardbase is Very Vanilla and I sponged around the edge with Cajin Craze ink.  The designer paper is Orchard Harvest DSP and then I took a piece of Very Vanilla Cardstock and stamped the leaves with Early Espresso for the outline and More Mustard, Baja Breeze, and Gumball Green for the inside.  Another fun product I used on this project is the new Coordinations Cardstock (this time in Early Espresso) and it was embossed with the Woodgrain embossing folder.  Then I took the new standing block and lightly (very lightly) sanded on the top to bring out the woodgrain.  A small piece of Cajin Craze cardstock was punched with the Scalloped Edge Border Trim punch to add along the bottom of the woodgrain piece.
 
The greeting is from the Teeny Tiny Wishes stamp set, punched out with the Modern Label punch and then matted on a flag piece of Baja Breeze cardstock.  The final touch was to add a small knot of Early Espresso 1/8" taffeta ribbon on top of a small Naturals Designer Button. 
 
I love how this card turned out and is definately getting me ready for the arrival of fall.  I think it's about time to start putting up the halloween and fall decorations, that will really help set the mood.
 
Enjoy and have a great week!
 
Diana

Pin It!

Wednesday, September 5, 2012

September Stamp-a-Stack Projects

Good morning friends!  I wanted to drop by to show you this month's stamp-a-stack projects.  I had so much fun creating these cards and know you'll love them as well (we'll also be using lots of fun new tools).  You'll make 5 different cards and have the option to add the Christmas Card option as well (you'll make 3 Christmas cards).


There's still stime to RSVP for this months class, this Sunday, at 2 PM so contact me ASAP to reserve your spot.

Hope to see you Sunday!

Diana
Pin It!

Friday, August 31, 2012

Disney Magic Projects: Day 4

So I've definately decided that I add to my own stress levels before trips by adding additional projects to finish before we leave.  This is one of those projects.  I decided that I may have the need to write thank yous or other notes while on the cruise and of course they needed to be Disney themed to I came up with these quick and easy note cards (so easy I made 10 of them in 30 minutes).

I started with a cardbase of Whisper White and added a piece of Polka Dot DSP that I cut with flag tails.  Then I punched out three circles using the 2 1/2" circle and 1 3/8" circle punches and ran them through the Big Shot with the Cheveron embossing folder (just like my earlier post on the door magnets).  The final touch was to add a little bow made with 1/4" grosgrain ribbon.  I was going to add a thank you stamp but since I thought I might use the cards for things other than thank you's I decided to leave them blank.
 
These turned out so cute I'm so happy I made time for this project.  I hope you've enjoyed all these Disney projects and hope they've added a bit of Disney magic to your day.
 
Enjoy,
 
Diana

Pin It!

Wednesday, August 29, 2012

Disney Magic Projects: Day 3

It's another beautiful morning!  As I was doing research for our cruise I discovered the DisBoards website which is a forum for all things Disney, including cruises.  They have pages set up for each of the cruises where you can start to meet up with families who are going to be on your cruise long before you board the ship.  This is also where Fish Extender exchanges are organized.  For those of you who do not know what Fish Extenders are they are unique to Disney cruises and people hang customized pockets next to their doors (under the fish ornaments) and people drop off gifts all during the cruise.  So of course I had to sign up and committed to making 40 gifts.  So given by love of scrapbook and papercrafting I decided to make mini scrapbook albums out of CD cases.

I used MS2 to create the cover (Kimberly Van Diepen has a great tutorial on how to make mickey heads on the program you have to check out).  On the inside I have a Top 10 list that each family can personalize and punched out a Mickey head with a punch.  The scrapbook is an accordian fold and is decorated with Disney scrapbook paper (found at a local craft store).

We also added Mickey rhinestones to jazz it up and I created tags for each of our port destinations which were punched out with the Modern Label punch. 

Here's another close up of the pages.  I love how these turned out even if they do take up an entire suitcase.  I can't wait to see how people like the albums and it'll be so easy for families to remember this trip by simply triming some pictures and gluing them in the album.
 
This would make great gifts for any type of get together or something you want to remember.
 
Enjoy,
 
Diana

Pin It!

Monday, August 27, 2012

Disney Magic Projects: Day 2

It's certainly another magical day!  So as most people know we're huge Disney fans and everytime we go I make Aidan a special autograph book so he can collect character autographs and then I add the matching pictures with the characters so Aidan can enjoy his Disney memories whenever he wants.  So this year Aidan decided he wanted a circle shaped book which was a breeze with the Scallop Circle No.2 Bigz die.  I cut lost of pieces out with Basic Black cardstock and added a piece of Disney designer paper for the outside cover with chipboard.  The letters are Daffodil Delight cut with the Timeless Type Junior die.  The date was cut with the same die and Black glitter paper I had in my stash.  I used the crop-a-dile to punch a hole and added a binder ring to bring it all together.  Several pieces of 1/4" grosgrain ribbon tied in knots help finish off the project.

On the inside of the book I added circles of Whisper White cardstock that I cut with the Clear Circle Bigz die as the perfect area for character signatures.  The opposite sides were left blank  so they're all ready for pictures. 


I love that Aidan still likes to see all the Disney characters and meet them all and it's even better that he really likes these little projects I can make him.  Well we're off for another fun day and I can't wait to see what new characters we meet on this adventure (there are supposed to be lots of pirate characters, can't wait!)

Have a great day,

Diana
Pin It!

Saturday, August 25, 2012

Disney Magic Projects: Day 1

Good morning!  We had a long night last night, but our vacation has officially started, yeah!  Since we're going on a Disney Cruise I've been working on several Disney themed projects for the cruise that I'm going to be sharing with you this week.  This first project is name magnets for our stateroom door.  On Disney cruises guests have a lot of fun decorating their doors with magnets so I new I could whip some up quickly with the Big Shot.  These Mickey heads are cut out with the Clear Circle Bigz die for the head and the 1 3/4" circle punch for the ears.  Then I ran all the pieces through the big shot with the Chevron embossing folder.

I used Real Red cardstock and the Timeless Type Junior Alphabet (retired) and added a bow with Daffodil Delight 1/4" grosgrain ribbon for the boys and Marina Mist 1/8" taffeta ribbon for the Minnie bow.  These turned out so cute and will look great with the photo magnet we had made.  I'll make sure to take a picture of our fully decorated door to share when we get back.
 
Enjoy!
 
Diana

Pin It!

Search This Blog