Showing posts with label Sketched Birthday. Show all posts

Monday, September 22, 2014

Hand Stamped Sentiments Color Challenge: Snowy Sketched Birthday Greetings

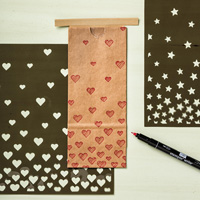
Happy Monday!  What a great weekend, I really enjoyed the last few days of beautiful summer weather and the arrival of fall, fabulous.  One of the things we did this weekend was attend a 3rd birthday party for a friends daughter and since the party theme was "frozen" I thought this weeks Hand Stamped Sentiments Color Challenge would work perfect for this birthday card.    I started with Marina Mist for the cardbase and then added a layer of Night of Navy cardstock and then Whisper White.  On the Whisper White layer I used the Hearts and Stars Decorative Masks and Marina Mist and Night of Navy ink and a sponge to sponge the hearts on the cardstock to mimic snowflakes.

For the main stamped image I used the Sketched Birthday stamp set and stamped the image twice, once in Marina Mist, and punched it out with the 1 3/4" Scallop Circle Punch, and a second time and punched it out with the 1 1/4" Circle Punch for the center.  I used Stampin' Write Markers to color in the cupcake in the center and then added some Dazzling Diamonds glitter for the frosting using my 2 Way Glue Pen.  This piece was attached with a dimensional.  I also punched out another 1 3/4" Scallop Circle using Hello Honey cardstock for the base layer.  For some pretty embellishments I used a little flag of Hello Honey 3/8" Stitched Satin Ribbon and a bow made with 1/8" Silver Ribbon.
 
This card turned out really cute and sure help make this little girls birthday fun and glittery.
 
Below are easy ordering links for all the products used on today's card: 
Diana

Pin It!

Thursday, April 24, 2014

Project Portfolio Full of Inspiration

Good morning friends!  Boy this week is flying by, we've been on the go non-stop between work, school, baseball practice, getting my runs in getting ready for this weekends race, etc. but I wouldn't have it any other way we always have lots of fun.  So today I have a special post to share.  One of my highlights every year is the opportunity to attend Stampin' Up!'s Annual Convention in Salt Lake City.  This is a fabulous time where we can connect with friends and fellow demonstrators from all over the country, see exciting new products and ideas, and more.  Convention always has some fabulous displays of projects made by fellow demonstrators which are truly amazing and inspiring.  This year we have the opportunity to apply to be a display stamper for this year's convention and we have to submit a portfolio of projects to be considered by the Stampin' Up! team.   I always love these projects and have decided to take the plunge and apply to be a display stamper this year so below is the portfolio of projects I'm submitting, which consists of 3 cards, 2 3D items, and one scrapbook page.


This first card uses lots of great products from the Occasions catalog, including the Woodgrain,  Petite Petals (with matching punch) and Hip Notes stamp sets to make a soft and springy card.


My second card is nice and yummy, perfect for any birthday greeting.  It used the Sketched Birthday stamp set and the cake was colored in with Stampin' Write Markers so you could just eat it.  Texture with the Arrows Embossing folder, flags, and lots of layers really make this card pop.


The final card I have is perfect for the little new arrival and uses the Baby, We've Grown stamp set, On Film Framelits, and lots of bling with Gold Paper and Gold Sequin trim that will make anyone sparkle when they receive it.


Next we move onto the 3D items and I have two very different projects to share with you.  The first is a treat box using the Tag a Bag Gift Boxes, the Yippee-Skippee stamp set and lots of fun accessories that really make it stand out.  The great thing about this box is that it can really be recycled and given multiple times by just changing out what is in the box. 


The second item is a fun décor item for Valentine's Day.  I used the Kaleidoscope Designer Series Paper for the color palette and used a wood cutout piece of the base, painted it White and used different papers, including DSP, Silver Glimmer Paper, and embossed Coredin'ations Cardstock to cover each of letters.  I decided to dress up the piece with punched hearts, elements that I printed out of My Digital Studio, ribbon, the "xoxo" cut out with the Big Shot and Thinlit die, and stamped images from the Love You to the Moon stamp set.


 The last item I want to share is a scrapbook page I made using My Digital Studio from our recent cruise.  This page uses lots of punched elements to showcase pictures, designer series paper, and text so we remember all the special times. I got several of the tropical embellishments from an MDS download and created with Mickey head with circle punch pieces in different sizes.


I really had a lot of fun assembly this project collection and hope you enjoy them as much as I do.  I love all the different products Stampin' Up! offers and how they all work together to make the perfect project for any occasion.

Pin It!

Tuesday, January 28, 2014

Stylin' Stampin' INKspiration Blog: Use Your Markers


Good morning!  I'm looking forward to a great week and can't believe January is almost over, crazy.  Today over on the Stylin' Stampin' INKspiration Blog we're showcasing ideas using our fabulous Stampin' Write Markers.  I love these markers, they were actually one of my first "major" paper crafting tools and I love their versatility (I got a full marker set even before I had all the ink pad colors so I could have access to all the colors as I built up my supplies). 

For my card I decided to make a birthday card for my niece and used the Sketch Birthday stamp set.  The cardbase is Marina Mist an I added a layer of Whisper White cardstock that was embossed with the Big Shot and the Arrows Textured Embossing Folder.  I used some Rich Razzleberry DSP from the Polka Dot Parade Designer Series Paper and matted it with Basic Black ink.  I used the new Banner Punch (a FREE item during Sale-a-bration that begins on Tuesday and this punch will be in next years Annual Catalog so you'll definitely want to get this while you can for FREE).  I added some Basic Black 1/8" Basic Black Taffeta Ribbon around the DSP.
 
The stamped image is from the Sketched Birthday set and after stamping it in Basic Black I used my Stampin' Write Markers to color in the cake (it looks so yummy!)  I used the 2 1/2" Circle Punch to punch out the cake and then matted it with a circle cut with the Big Shot and the Circle Collection Framelits and Smoky Slate cardstock.  For a little extra bling I used a Two Way Glue Pen to add some Dazzling Diamonds around the candle.  The final touch was to add the birthday greeting that's from the same stamp set and was cut out with the Big Shot and Itty Bitty Banners Framelits.
 
This card turned out so fun and I really could eat that cake!  My markers are some of my most used crafting tools and if you don't have them yet, Sale-a-bration is the perfect time to add them to your crafting toolbox (that's actually when I got mine initially). 
 
Enjoy and make sure to check out the other great project ideas the SSI design team have for you!
 
Diana


Pin It!

Thursday, July 11, 2013

Stylin' Stampin' Squad July Hop: Birthday Bash

Good morning! I’m so glad you could join us for this month’s Stylin’ Stampin’ Squad Blog Hop. This month is all about birthdays and Stampin’ Up! has some great new stamp sets to make celebrating easy and special. If you’ve been following the hop you came from Bree’s page, I love her fabulous creations, if you just starting here, don’t worry you can continue all along the hop so you don’t miss any of the fabulous designers or their creations, I’m sure you’ll be inspired.

The card I’m sharing today uses the new Sketched Birthday stamp set and it is super fun, I just love the outlined images! I also used a beautiful new (at least to me) technique that I can’t wait to share with you. The cardbase is Tangerine Tango and I added a layer of Whisper White cardstock. Now for the fun washed technique. I saw this at a recent Stampin’ Up! regional event (demonstrated by Rose-Ellen Eastman) and it creates a one of a kind effect each time you do it. You take the one of our clear blocks (depending on the size you want to cover) and you color directly on the block with your Stampin’ Write Markers, in this case I created a rainbow effect with colors from the Brights Collection. Next I spritzed the block with water, and you want to really spritz it nice and good. Then you place the block on your paper and push down hard (you’ll definitely want to have an extra piece of paper you’re working on since the water will run) leave it there for a few seconds and you’ll see the water move. Then just lift your block and let the paper dry, just like that an awesome one of a kind pattern. I used Basic Black ink to stamp the balloons from the Sketched Birthday stamp set after the paper dried.

Next I took a piece of Basic Black cardstock and ran it through the Big Shot with the Chevron embossing folder, layered that on a piece of Pacific Point cardstock and added a piece of Wild Wasabi ¼” Stitched Grosgrain Ribbon. For the greeting I used the invitation image and used Stampin’ Write Markers to color in just the border and flowers and stamped on a piece of Daffodil Delight cardstock before cutting it out with the Big Shot and the Apothocary Accents Framelits. I used the Tiny Banners framelits to cut the “Happy Birthday” greeting from Real Red cardstock and added a quarter piece of the paper doily that I scrunched up to add some texture. I used my bone folder to curl up the Real Red banner so it had some dimension and attached the whole piece to the card with dimensionals.

This is such a bright and cheery card, it’ll really get someone into the celebration birthday to receive it. I hope you enjoyed this month’s project and if you click the next button below you continue on to Annie’s blog. Enjoy!

 
Blog Hop Participants:
  1. Pam S. of Stampin' in the Sun!
  2. Rose C. of Stamp with Rose
  3. Tonya B. of Stampin' with Tonya
  4. Dawn S. of Dawn's Creative Chalet
  5. Darcy J. of DJ's Stampin' Place
  6. Pamela W. of Stinky Tofu
  7. Kim R. of Stamping with Kim
  8. Jennifer B. of NW Stamper
  9. Bree R. of Craft-somnia
  10. Diana E. of Stampin' Fun with Diana
  11. Annie L. of Love Me Cards
  12. Jamie H. of Unique Ink
  13. Jennifer C. of Happy 2 Scrap 4 Life

And now for the exciting announcement.  I'm going a group of very talented designers (many of whom participate in this blog hop) to start a new blog, Stylin' Stampin' Inspiration.  It's a DAILY inspiration blog for you by our monthly Blog Hop Demonstrators! You are going to love it! This site will go live the day of our August Blog Hop, August 8th" so I would love for you to come check it out, participate in the challenges (it's a great way to use all those stamping supplies your stashing (and you know you do!).  THANKS LADIES!

**AND...if you want to join in...we still have one spot (and we can make more if needed) open!**  If your interested ask me and I get you more information.
Take care,
Diana
    Pin It!

    Monday, June 17, 2013

    Paper Craft Crew Sketch Challenge: Sketched Birthday Greetings

    Good morning friends, I hope you had an enjoyable Father's Day and were able to spend time with your loved ones.  We spent Saturday at Kings Dominion and had so much fun checking out some awesome roller coasters, but we only saw about 1/3 of the park so I know we'll be making a return trip in the future to have more fun.  Today I'm sharing my card for this weeks Paper Craft Crew Sketch challenge and I decided to use this challenge to make a birthday card for my nephew.  This sketch is so fun and I love how you can use different shapes for the bottom elements.
     
    I started with a cardbase of Daffodil Delight and then added a layer of Pacific Point before adding the Pumpkin Pie DSP from the Perfect Polka Dot DSP (love this pack of paper).  I also added some Pacific Point, Whisper White, and Daffodil Delight 1/4" Stitched Grosgrain Ribbon (I decided to add multiple tied knots instead of a bow since this is for a boy.
     
    For the elements on the bottom I stamped two images from the Sketched Birthday stamp set and punched it out with the new Hexagon punch before coloring them in with Stampin' Write Markers.  The greeting is from the Banner Greetings stamp set and was stamped in Pacific Point and then I just cut it out with Paper Snips.  The banner was attached with dimensionals so it stands up.  The final touch was to add a couple of rhinestones to accent the hexagons.
     
    This card is bright and cheery and will be perfect for my nephew as he gets ready to turn another year older.  There are so many fun new stamps and accessories in the new catalog, I'm having fun mixing the new with the carryover items, it's like rediscovering forgotten treasures.
     
    Aidan gets out of school for summer on Tuesday and we're all looking forward to the fun and relaxation the summer brings (even if we already have the weekend booked up).  Hope you enjoy and have a great week.
     
    Diana
    Pin It!

    Tuesday, April 23, 2013

    Create with Connie and Mary: Sketched Birthay

    Welcome back and I'm back to share a fun card I made for this weeks Create with Connie and Mary color challenge and decided to also show you a sneak peak of a new stamp set that will be in the new catalog that's release on June 1, Sketched Birthday.  This is a fun set with lots of cute images for all your birthday needs.  The cardbase is Summer Starfruit and then I added a piece of Whisper White cardstock that was embossed with the Big Shot and the Hexagon embossing folder.  The designer series paper is from the Poetry Prints pack and these is a fun package since it's smaller and has 12 different patterns, something for everyone!  The DSP was matted on Midnight Muse cardstock and then I added some Gumball Green Stitched Satin Ribbon.
     
    The main stamped image was first stamped with Summer Starfuit ink on the same color paper and punched out with the 1 3/4" scallop circle punch.  Then I stamped with image again on Whisper White cardstock using Stampin' Write Markers to color in the stamp and punched out with the 1 1/4" circle punch.  I used dazzling details for the frosting on the cupcake and then used dimensionals to pop up both layers of the image. 
     
    This is a fun card, I like how the strong colors play against the light handed sketched images, lots of fun! 
     
    I hope you enjoy and check out this color challenge and see what you can come up.
     
    Diana


    Pin It!

    Search This Blog