Showing posts with label You're Lovely. Show all posts

Thursday, March 13, 2014

Stylin' Stampin' Squad Blog Hop: Favorite Springtime Flowers to Help Say Goodbye to Winter


Thank you so much for joining us for our March Stylin' Stampin' Squad Blog Hop!  Temperatures are on the rise and there is just one short week until the official first day of Spring!  We are all so ready to put away our snowflakes and break out the flowers in our craft rooms!  Stampin' Up! has so many options for Spring-time flowers and we are showing you just a few of those today!

As you hop along, please be sure to comment and show some love on every blog! We are always excited to hear from our followers! You should have just left stop number 2 on the Stylin’ Stampin’ Squad blog hop – Pam S. of Stampin' in the Sun. If so, you are in the right spot. If a link doesn’t work or you get off track, you will find the full blog hop lineup below.


I was really excited when this blog topic was announced since there are so many different flower sets, I can’t wait to see all the great projects the designers are sharing.  I’m not a huge flower person (of course I do have several flower sets) but my favorite set currently is Mixed Bunch.  This set came out last year and while I initially didn’t fall in love with it once I got it I use it regularly, so simple with the matching punches and fun daisy type look.  For my card I started with a cardbase of Crumb Cake and added a piece of DSP from the Fresh Prints Designer Series Paper Stack (these pieces perfectly fit a card front) and overlayed the DSP with a piece of Crumb Cake cardstock that I first stamped with the Hardwood stamp and Soft Suede Ink, and then cut it out with the Big Shot and the Hexagon Hive Thinlit Die (a little tip to ensure all your hexagons get cut out, run it through the Big Shot 3 times to guarantee it’ll cut through and make removing all the pieces a breeze.  I added a piece of Natural 5/8” Chevron Ribbon around the center of the card for some added texture.


For the flowers I used So Saffron, Strawberry Slush, and Wisteria Wonder and punched each of the flowers out with the Blossom Punch and used a Bone Folder to curl the flower edges for more dimension.  The centers were punched out with the ¾” Circle Punch.  A Mini Silver Brad was added to the center of each flower and I used a dimensional to attached the flower center so they really pop.  Mono Multi-Purpose glue was used to glue the flowers to the card front (these beauties aren’t going anywhere).  The greeting is from the Lots of Thanks stamp set and is stamped with Soft Suede Ink and Strawberry Slush cardstock and then punched out with the Modern Label Punch and attached with a dimensional and glue dot (I used the glue dot to attach the greeting to the flower piece and then the dimensional on the other side so it sits even.

Of course I decided to make a matching treat (even if there not given together it’s still fun to make coordinating projects) so I used one of the Mini Muslin Bags (I can’t believe I’ve had these for months and this is the first time using them, I love their versatility and how big they are!).  I used the You’re Lovely stamp set (a SAB exclusive) to stamp the little line of images along the bottom of the bag with Strawberry Slush ink (make sure to put a piece of cardboard or cardstock inside the bag before stamping or adding ink to the bag so you don’t get any bleed through).  Then I tied a piece of Wisteria Wonder Chevron Ribbon around the top of the bag for added color and so I had something to tie my tag to.  The tag uses all the same products as the card above but a used a piece of 2013-2015 In Color DSP and the Scallop Tag Topper Punch to make the tag base (these tag topper punches are really the bomb, They make tags and decorative elements so easy and you can make them any size you want, love it!!!)

 
I love how these projects turned out and may be making them of other occasions, the card would be a beautiful birthday or Mother’s Day card (even Easter) and the bags could be great for Teacher Appreciation, party favors, etc.  I hope you enjoyed these projects and I’ve helped you rediscovered a stamp set that may be in your stash but hasn’t been used much lately, or if you don’t have it make sure to get it!
 
http://inkadoodlecreations.blogspot.com/2014/03/peaceful-petals-with-stylin-stampin.html


Blog Hop Participants


  1. Dawn S. of Dawn's Creative Chalet
  2. Pam S. of Stampin' in the Sun
  3. Diana E. of Stampin' Fun with Diana
  4. Cynthia R. of Ink-A-Doodle Creations
  5. Erica B. of Stamping Starlette
  6. Anastasia R. of Stampin' Blondie
  7. Darcy J. of DJ's Stampin' Place
  8. Bree R. of Craft-Somnia
  9. Heidi B. of Stuck on Stampin'
  10. Shellie G. of Craft Smashup
  11. Kim R. of Stamping with Kim
  12. Jennifer C. of Happy 2 Scrap 4 Life
  13. Tonya B. of Stampin' with Tonya
  14. Donna S. of Organized Chaos
  15. Jamie H. of Unique Ink
  16. Darla R. & Nancy K. of Stampin with Darla and Sisters
  17. Kathy P. of Katrina P's Creative Corner
Pin It!

Friday, March 7, 2014

Sketch Frenzy Friday Sketch Challenge: Petite Petals Get Well Greetings


It's that time of week again, Friday has arrived and we're just a few short hours from the start of the weekend.  We have another jam packed weekend but I'm looking forward to a little girl time, family time, and of course stamping, perfect.  Today I'm sharing the card I made for this weeks Sketch Frenzy Friday sketch challenge.  I really enjoyed this weeks sketch since it was nice and simple and lends itself to so many options.  Since we're in the last month of Sale-a-Bration I decided to showcase a couple of the fabulous products that you can earn for FREE with qualifying orders.  For this card I started with a cardbase of Basic Black and I added a layer of Sahara Sand cardstock.  Some Summer Starfruit Baker's Twine (from the SAB Sweet Sorbet Accessories pack was added along the left side). 
 
I used the Petite Petals and matching Petite Petals Punch was used for the three flowers and I stamped them in Pool Party, Crisp Cantaloupe, and Pistachio Pudding ink. After punching out the flowers I curled the petals with a Bone Folder and then attached the flowers to the cardfront using a glue dot.  I used the line of flowers stamp from the You're Lovely stamp set (another SAB reward item) and stamped in Basic Black below the flowers and added a small pearl to each of the flower centers.  The final touch was to add the greeting in the bottom right corner, I used the Express Yourself stamp set and Summer Starfruit ink for the perfect ending.
 
This card is so simple but pretty it's wonderful and definitely mailable which the post office will appreciate.  You could also change this card but just swapping out the greeting or colors which I love.  We would love for you to play along with us on this sketch challenge, so get creative and share your wonderful projects, it's a great activity for the weekend.
 
Take care and happy stamping,
 
Diana
 
Pin It!

Monday, March 3, 2014

Stylin' Stampin' INKspiration Color Challenge: You're Lovely


Good morning!  Well it's another Monday, which means we have another winter storm we're dealing with, I must admit, I'm really ready for spring.   At least we can get some feelings of spring with this month's Stylin' Stampin' INKspiration Blog color challenge, I love these bright and cheery colors.  The cardbase is Rose Red and I added a layer of  Perfect Plum and then Whisper White.  The white layer is embossed with the Big Shot and the Needlepoint Border Textured Embossing Folder.  I also added a piece of Marina Mist DSP from the Perfect Polka Dot Designer Series Paper package.  I used a piece of Silver Ribbon to cover the edge of the DSP.
 
For the stamped greeting I used the You're Lovely stamp set (this is one of the FREE items you can selected through the end of the month during Sale-a-Bration).  I inked the image up twice, one in Rose Red and cut it out with the Big Shot and the Deco Label Framelits.  I stamped it again after coloring in the image with Stampin' Write Markers and punched out the circle with the 1 3/4" Circle Punch and then used markers to color in the flowers.  To create a mat for the image I cut a frame with Perfect Plum cardstock and the Deco Labels Framelits before embossing it with the Fancy Fan Embossing folder.  I used dimensionals to attach the greeting to the card for added texture.

 
I really had a lot of fun with this color challenge and we would love for you to come and join us, it'll help you get out of the winter blues and remember spring really is just around the corner.
 
Happy stamping,
 
Diana
Pin It!

Tuesday, February 11, 2014

Monster Valentine Treats, Three Ways

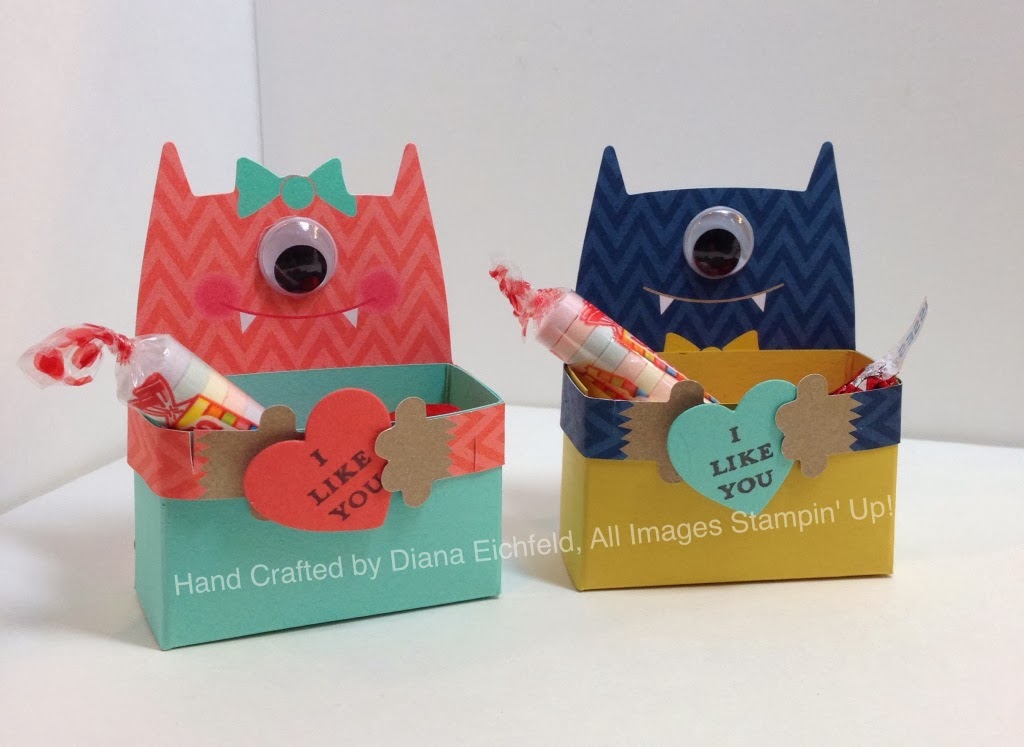
Good morning!  It's almost Valentine's Day, do you have all your cards and projects finished?  I'm still wrapping up the last couple items but I wanted to share some fun and easy ideas to give you some inspiration.  One of the great kits that Stampin' Up! offered this year were the Monster Hugs Valentine Treats in both a Boy (Item 132162) and Girl (Item 132163) Version.  These kits are great because you got all the supplies you need to make 18 of these cute little monsters for only $5.95.  Here are three different ideas all using the kits which are super easy and cute.

These are the basic treats, all you need to do is write the names for the Valentine's attach the candy and wrap the monster's arms around and add the little eyeball and heart, so cute!

For the next version I needed to make some candy treat cards for my Mom and Grandma to give to some special kids so I took the exact same monster and attached it to the front of the card.  For this card I used the  Adorning Accents Embossing Folder for the Heart Embossed strip, the Delightful Dozen Stamp set, and a Rhinestone for the center of the stamped heart.

The final treat is a little valentine box that I found the template online by a fellow demonstrator, Julie Davison, you can find her template HERE.  I gave Aidan the option of how he wanted to use the monster valentine's for his class gifts and he quickly decided on the boxes, because "then I can give more candy", too funny!  Julie's little boxes were so perfect I didn't change a thing and I was able to fit four little pieces of candy inside for a nice little treat.  The "I Like You" stamp set is from the You're Lovely stamp set that you can year FREE this year during Sale-a-bration and it was cut out with the Big Shot and the Hearts a Flutter framelits.
 
I hope I've given you a few ideas on how you can use these cute little monster treats to make valentine's that any kid, young or old will be sure to enjoy!

Pin It!

Friday, January 24, 2014

Sketch Frenzy Friday: You're Lovely

Happy Friday peeps!  It's time for the weekend and lots of family time but first I have a fun card to share with you for this weeks Sketch Frenzy Friday Sketch Challenge.  In just four short days Stampin' Up!'s largest sale of the year begins, Sale-a-bration so I thought I would share a couple of the fun SAB items you can earn for FREE during this promotion in this card.  The cardbase is Pistachio Pudding and I added a layer of Sahara Sand cardstock under the Sweet Sorbet Designer Series Paper (this year's SAB DSP).  I used the Chevron border Punch along the bottom to punch out the negative so the Sahara Sand layer shows through.

The main stamped image is from the You're Lovely stamp set (another SAB option) and was colored in with Stampin' Write Marker's before cutting it out with the Big Shot and the Deco Labels Framelits.  I matted this with a piece of Basic Black that was cut with the same framelit and was embossed with the Decorative Dots Embossing Folder (yes, another SAB option).  The final touch was to add some Summer Starfruit Stitched Satin Ribbon for the tails. 
This sketch is really fun and I decided to rotate it on it's side for a fun twist.  Have I got you excited for Sale-a-Bration?  Get ready since you aren't going to want to miss out on all the fun.
 
Have a great weekend,
 
Diana

Pin It!

Search This Blog