Monday, February 29, 2016

SSINKspiration Masculine Monday: Traveler

Good morning! We're back from an amazing vacation and truly memorable experience, Disney and Star Wars is a great combination.   Today I'm back to share a really fun masculine card for Masculine Monday over on the SSINKspiration blog.  I always have fun with these cards since I have so many guys in my life (and they're not really into flowers and such!!)

I started with Cajun Craze cardstock for the cardbase and then added a piece of  Early Espresso cardstock.  For the main patterned paper I used a card from the Memories in the Making Project Life Speciality Cards (FREE during Sale-a-bration and added stripes of color using a sponge and Crumb Cake, Cajun Craze, and Early Espresso Ink (love how the designs come through on the card when you add ink!!). 

Next I took a piece of Crumb Cake cardstock and stamped the World Map stamp in Crumb Cake ink and then sponged around the edges.  I used a pieces of designer series paper from the Going Places Designer Series Paper stack and sponged it using Early Espresso ink.  For the main stamped image I used the Traveler stamp and stamped the train image in Early Espresso ink on Very Vanilla cardstock and then cut it out with the Big Shot and Tags & Labels Framelits.  For an accent I added a piece of Natural 5/8" Chevron Ribbon (I ruffled it up and then used the Handheld Mini Stapler).

For the greeting I used the Tag Talk stamp set and stamp the image twice (on Crumb Cake and Cajun Craze cardstock) and used my Paper Snips to cut out the center greeting and attached it with dimensionals and used the Bracket Label Punch to cut out the Cajun Craze layer and attached the whole greeting with dimensionals.

There are lots of fun layers and elements on this card that I really had fun added and add texture and dimension to the cards (but it's still flat enough that the postman will be happy!!)  The other design team members are sharing some great cards for further inspiration so please go check them out and enjoy!

Here are the easy shopping links for the products used on today's card:


Have a great Monday!

Diana
Pin It!

Friday, February 26, 2016

Star Wars Fun on a Disney Cruise

Good morning!  We have been having a wonderful time on our Disney cruise and yesterday was our Star Wars Day at Sea which was a lot of fun to see Star Wars characters, activities, etc. as well as so many guests on the cruise really getting into the fun and dressing up.  As in past cruises the cast members on the ship have really gone above and beyond to make our vacation truly magical so we like to give gifts to the different staff, specifically our dining room team, stateroom host, and the kid’s club staff and candy is a little something special we can offer since they spend so much time on the ship working.  Since this was a Star Wars themed cruise I decided to make the packaging all Star Wars themed, thanks to the fabulous inspiration from Tami White (see her projects and tutorial HERE).  I am not a punch art expert by any means but using Tami’s guide I was able to adjust the size of my Death Star and Millennium Falcon’s to fit my packaging (given Aidan’s birthday party was Star Wars themed and all the gifts for the cruise I made about 45 Death Star and Millennium Falcon’s for different items, oye!


The first project was little kraft bags and I stamped the background using the Gorgeous Grunge and Timeless Texture stamp sets and the greeting is from Sassy Salutations.  I used the XL Oval Punch to punch out the greeting and attached the elements with dimensionals and used some retired ribbon to tie up the bag.


The second project is a larger bag of treats for the kid’s club staff and I used one of our gusseted bags and then made a tag, using all the same supplies (made a smaller Death Star) and cut the tag out with the Big Shot and Chalk Talk Framelits.
This is a fun, easy card that is great if you need to make multiples and is nice and flat to make the post office happy.  You could easily change the greeting to make this a Christmas card as well (there’s plenty of time to still make your holiday cards this year if you haven’t started yet).


Below are easy ordering links for the products used on today’s projects:


I hope you enjoyed a little bit of our fun and have a great weekend!

Diana
Pin It!

Wednesday, February 24, 2016

SSINKspiration Project Life: Honeycomb Wishes in Dimension

Good morning!  One of the great new additions to our product offering over the past year is the Project Life by Stampin’ Up and while I’m starting to really get into using these products for memory keeping (completed my second Daily December journal this year) there are so many other options to use these products if you’re not into memory keeping and today the SSINKspiration designers are sharing some fun ideas to get you started. 

For this card I started with Pear Pizzaz cardstock for the cardbase and then added a piece of Whisper White cardstock.  On this piece I used the Honeycomb Happiness stamp set (FREE during Sale-a-bration) to stamp the little chick twice (once on the white cardstock and a second time on a piece of So Saffron cardstock and used my Paper Snips to cut him out (and color his beak in with a Pumpkin Pie Stampin’ Write Marker)).  Next I used the Work of Art stamp set and stamped the “swoosh” in Pear Pizzaz so it looked like grass.  I used dimensionals to attach the chick to the cardstock.

On top of the cardstock I added one of the acetate cards from the Memories in the making Project Life Specialty Card Collection (FREE during Sale-a-bration).  Did you know that on these acetate sheets where there is gold on one side if you flip them they are silver??  Awesome!! On top of the acetate card I added a piece of Basic Black 3/8” Stitched Satin Ribbon to the top and added a bow made of Whisper White Baker’s Twine for added texture. 

The greeting is from the Greatest Greetings stamp set and after stamping it on So Saffron cardstock I used the Big Shot and Project Life Cards and Labels Framelits to cut it down before attaching with dimensionals.  The final touch to the greeting was to add a couple strips of pearls for added dimension.  To attach the acetate piece to the cardfron I used dimensionals and just made sure the chick was centered in the silver cutout (a perfect frame!!)

I love the flexibility of the Project Life cards on all sorts of projects including card making (and adds a little pizzaz), so if you haven’t tried them out this is the perfect time.

Below are easy ordering links for the products used on today’s card:


 Enjoy and have a great day!

Diana
Pin It!

Monday, February 22, 2016

SSINKspiration Mystery Challenge #SSINKMC30: Easter Greetings

Happy Monday!  This morning we’re waking up in Cozumel and looking forward to a day of snorkeling, catamaran’s, and beach fun so it should be perfect.  Of course I couldn’t forget about you so I’m leaving a little inspiration throughout the week for fun.  Today over on the SSINKspiration blog it’s time for this months Mystery challenge so I decided to play along.  I’ll admit this month that challenge was a little hard for me but I was able to use 4 of the items on the challenge list:  1) non-card, 2) colors, 3) Easter, and 4) dies and punches so I’m happy with the end result. Since Valentine’s is over naturally you start to think of Easter, but with our trip it hasn’t even been on my mind so this was good to do something new.

I decided to use the Fry Box BizL Die for this project (I love how easy it comes together and really holds quite a good amount of ‘stuff.”  I used So Saffron cardstock for the base of the Fry Box and then ran through pieces of Whisper White and Cucumber Crush cardstock for the front of the box so it had the same shape (and was super easy).  I used the Fringe Scissors to cut the Cumber Crush piece so it looks like grass and then added a Whisper White 3/8” Statin Ribbon bow at the bottom.  For the two “eggs” I cut the smaller one using the Large Oval Punch and Bermuda Bay DSP from the Brights Designer Series Paper Stack.  The larger one I cut using the Big Shot and Oval Collections Framelits and then used the Work of Art stamp set to stamp the lines so it looks like an Easter egg.

For the greeting I used the Greatest Greetings stamp set (love this one from the Occasions Catalog) and used my Stampin’ Write Markers to color in the greeting so I could stack the works to make it smaller and then cut it out using the Big Shot and Project Life Cards and Labels Framelits.  I sponged around the edge of the greeting and then attached it to the front of the box with dimensionals.  After looking at the box I decided to make the greeting look like a garden sign so I cut a little piece of Crumb Cake cardstock, embossed it with the Woodgrain embossing folder and sponged it before tucking it under the sign and in the grass (love how it turned out!!)

I have to say, I spent way more time than I planned on this project but really had fun and liked the end result, can’t wait to start working on more Easter projects soon (it will be here in no time!)

Below are easy ordering links for the products used on today’s project:


Enjoy!

Diana
Pin It!

Friday, February 19, 2016

SSINKspiration Anything Friday: Party Wishes

Happy Friday!  It’s been a worldwind of craziness this week, between snow, ice, school activities, and Aidan’s birthday, just to name a few and I realized I missed sharing some stamping fun with you this week (bad Diana) so today, along with the SSINKspiration designers were sharing projects using our favorite items, anything goes (which means you get a large variety of projects to spark your inspiration).  As you’ve seen I completely fell in love with the It’s My Party product suite in the Occasions catalog (yes, I love every item in the suite, haha!!) so it’s only fitting that I shared a fun birthday card today.

I started with Mint Macaron cardstock for the cardbase and then added a piece of Whisper White cardstock that was embossed with the Big Shot and Confetti Embossing Folder (this fold is lots of fun!).  Next I added a piece of It’s My Party Designer Series Paper and matted it with Melon Mambo cardstock. 

For the main stamped image I used the Party Wishes stamp set and stamp the solid cake image using Sahara Sand ink and then used Basic Black ink for the greeting (really, this saying is awesome, and so true!!) and punched it out with the 2” Circle Punch.  I created a mat for the circle using the Big Shot and Circle Collection Framelits and Crushed Curry cardstock and attached the whole thing to the cardfront with dimensionals.  I used candle from the Party Punch Pack to punch out a candle using Melon Mambo cardstock and added some Dazzling Diamonds to the flame part of the candle.  The final touch was to add a double bow I tied using the Mint Macaron Baker’s Twine from the Baker’s Twine Combo Pack.

This product suite is so fun and the colors are sure to brighten anyone’s day and I love that there are colors that I wouldn’t have thought to use together and they work really well together.  The It’s My Party Designer Series Paper Pack is huge and has so many fun designs you’ll find something for anything you need, not just birthdays.

Below are easy ordering links for the current products used on today’s card:


Have a great weekend,

Diana
Pin It!

Tuesday, February 16, 2016

SSINKspiration: Kid's Birthday

Good morning!  It seems like winter has definitely decided that it’s not ready to say goodbye for the year so we got to enjoy another round of snow yesterday, Aidan was really excited especially since it was his birthday yesterday (can’t believe he’s 11 already!!)  It’s perfect timing since today over on the SSINKspiration blog we’re sharing kid’s birthday cards so I decided to share what I made for Aidan.  Just like his mom he loves the glitter and bling so of course I had to make sure this card had plenty.

I started with Whisper White Thick cardstock for the cardbase (this is a really great new option for when you want white for the cardbase since it’s thicker than our traditional cardstock).  Next I took a piece of Pacific Point cardstock and matted it with Real Red.  I used the Gorgeous Grunge stamp set to stamp some splotches and lines (a little hard to see) on the background first.  Next I took a piece of Basic Black cardstock and punched it using the Confetti Stars Punch and then added some Red Foil Paper behind so the foil starts show through.  The greeting is from the Remembering Your Birthday stamp set and I used my Stampin’ Write Marker to color just the part of the greeting I wanted and then used the Big Shot and Project Life Labels and Cards Framelits to cut the edges of the greeting, sponged the edges with Basic Gray ink and then attached it to the cardfront with dimensionals.

Now it was time to amp things up with lots of stars and bling.  I used the Big Shot, Star Collection Framelits, and Gold Glimmer Paper to just cut the outline of the start and in the center I used the Little Numbers Framelits and Black Glimmer Paper (retired) for the numbers.  I cut out a smaller star using the smallest star from the Framelits set and some Real Red Designer Series Paper, from the Brights DSP Stack and made sure to line it up so “awesome” and “best were the words you could see in their entirety (this star was attached with dimensionals).  The final touch was to add some star shaped sequins from the Metallic Sequin Assortment (the fine tip glue pen works perfect to attach these).

I had lots of fun making this card and Aidan loved it (he really likes when you personalize things just for him, don’t we all!!)  You could certainly change up the colors to match your recipients preferences for a perfect fit!!

Below are easy ordering links for the current products used on today’s card:

Built for Free Using: My Stampin Blog


 Enjoy!

Diana
Pin It!

Thursday, February 11, 2016

SSINKspiration Blog Hop: It's all About Love!


Good morning!  Love is definitely in the air, can you feel it?  I have a lot of fun with this holiday and showing my family what they mean to me (plus, let’s admit it glitter and bling are not only acceptable but expected for Valentine’s so I’ve been in my happy place!)  Today it’s time for another addition of the Stylin’ Stampin’ INKspiration blog hop and this month is all about Love!  I decided to share two projects that you can still make and be ready to give to your sweetie come Monday.   I decided to use the Going Global stamp set (I realize that I used it last month as well) and it has some great images perfect for this time of year, especially if you’re looking for something a little less “flowery” with a lot of versatility.

 As you hop along, please be sure to comment and show some love on every blog! We are always excited to hear from our followers! You should have just left stop number #1 on the Stylin' Stampin' INKspiration Blog Hop - Jenny at Jenny G Paper Crafts. If so, you are in the right spot. If a link doesn't work or you get off track, you will find the full blog hop lineup below.

To start I’m sharing quick and cheery card that mixes some fun elements.  I started with Blushing Bridge cardstock for the base and then embossed a piece of Garden Green cardstock using the Big Shot and Happy Hearts Embossing folder and at the top I added apiece of Love Blossoms Designer Series Paper.  I used Whisper White 3/8” Stitched Satin Ribbon to wrap around the paper pieces and then tied a knot.

For the greeting I used the Going Global stamp set and stamped the greeting in Early Espresso in on Whisper White cardstock and then punched it out with the 2” Circle Punch.  I used my Rose Red Stampin’ Write Marking to outline the heart in the greeting so it pops and then matted the piece with some Rose Red cardstock that I punched using the 2 3/8” Scallop Circle Punch and attached it to the cardfront with dimensionals.  See?  Nice and simple and you could certainly whip this up (or 20 of them) in a flash!

I decided to make a second item using the same stamp set, this time gift packaging using our Muslin Bags (yes, they are awesome!).  I used Basic Gray ink to stamp the constellation image all over the front of the bag (make sure you have a piece of cardboard inside your bag so your ink doesn’t blead through) and let it dry.  Next I stamped the greeting using Melon Mambo ink on White Shimmer Paper, punched it out with the Sweetheart Punch and then colored in the little heart using the Gold Wink of Stella Pen (these are new, and if you like to add a little bling you MUST have these, so easy and just a touch of sparkle, and no mess!)  Behind the heart is a small scallop circle piece of Bermuda Bay cardstock that I embossed with the Confetti Embossing Folder and then I add a piece of Gold Sequin trim for more sparkle.  I added a piece of Bermuda Bay 1 ¼” Grosgrain Ribbon and then a piece of Melon Mambo Designer Series Paper from the Brights DSP Stack that was cut out with the Deco Label Framelits.  I attached all these pieces together using dimensionals and Tombo Liquid Glue and then used some Fast Fuse to attach the entire piece of the front of the bag (I pushed down really hard and it stays in place).  Then it’s just a matter of filling the bag with a treat (I’m thinking something with chocolate would just about be perfect!!)

I love how you can use just little piece of accessories to really help dress up a project without making it go overboard (and be crazy expensive) and this bag could certainly be reused more than once.

Below are easy ordering links for the products used on today’s projects:

Built for Free Using: My Stampin Blog


 Make sure to check out the rest of the blog hop for lots of other great ideas.  If you click the “Next” button, you’ll go to Bree’s site (I love her creativity!!) but you can also access any of the hopper’s site from the full blog list below.
http://craft-somniamomma.blogspot.com/2016/02/bee-mine.html

Blog Hop Participant List:

  1. Jenny at Jenny G Paper Crafts
  2. Diana at Stampin Fun with Diana
  3. Breelin at Craft-Somnia Momma
  4. Leanne at Literally My Joy
  5. Kim at Stamping with Kim
  6. Donna at Geek Squad Crafting

Have a great day,

Diana
Pin It!

Tuesday, February 9, 2016

SSINKspiration Valentine's: Going Global Baker's Box

Good morning!  Can you believe Valentine’s Day is less than a week away?  I know that there are people (myself included) who are still working on wrapping up those cards and gifts and maybe there are some who haven’t started yet (gasp!!)  We’ll we’re here to help, today on the SSINKspirationblog it’s another addition of Valentine’s Projects so if you’re still looking for ideas look no further.  I decided to change things up and instead of a card I’m sharing a cute baker’s box I made.  I love the new Baker’s Box Thinlit (and I was super surprised to see that this is one of this weeks Weekly Deals so you really have no reason not to get it!!) and not only does it make these boxes super easy but they hold quite a bit as well. 

I started with the Perfectly Artistic Designer Series Paper (FREE during Sale-a-bration but only through February 15!!) and cut two pieces out using the Big Shot and the Baker’s Box Thinlit Die.  Next I took the Sweetheart Punch and punched a heart out to create a window and covered it with a piece of Window Film before attaching the sides to make the box (Fast Fuse made this super easy).  I did use a Handheld punch to punch out the holes at the top of the box but there are little pieces in the thinlit set so you could cut them out with those as well, and used some Basic Black 3/8” Stitched Satin Ribbon to tie the box closed (after filling it of course!)

For the tag I started by taking a piece of the Merry Moments Designer Series Paper (I love that this print doesn’t have any green so it totally works for Valentine’s, whoo hoo!!) and ran it through the Big Shot with the Tags and Labels Thinlits.  I used the Sweetheart Punch to punch a heart out of the Red Glimmer Paper for a little sparkle.  For the greeting I used the Going Global stamp set and stamped it in Basic Black and used a Real Red Stampin’ Write Marker to color in the tiny heart before punching it out with the Sweetheart Punch, which coordinates perfectly.  A dimensional was used on the top heart for some added dimension and it finish out the tag. 

This box is for my sweetheart but I liked how it turned out so well I decided to use these for Aidan’s teachers gifts (with a different saying) and we’re going bake Red Velvet Cookies and Chocolate Chip/M&M cookies as a fun and festive treat (and since I like to bake smaller cookies I’ve figured I can fit 4 inside each box) which will be perfect.  Also since I used a package of the SAB designer series paper it really helped cut the costs down.

Below are easy ordering links for the current products used on today’s project:

Built for Free Using: My Stampin Blog


Enjoy,
Diana
Pin It!

Monday, February 8, 2016

Hand Stamped Sentiments Sketch Challenge 230: Boys will be Boys

I’m back!!  I was having so much fun working on cards for upcoming birthdays that I have a bonus card to share with you today.  February is another big birthday month so I needed a card for one of Aidan’s friends and decided to use this weeks Hand Stamped Sentimentssketch challenge as inspiration for the layout (once Aidan picked the image for the card!)  This is a nice, simple sketch that really gives you lots of options.

I started with Marina Mist cardstock for the cardbase and embossed the front of the card using the Big Shot and Honeycomb Embossing Folder.  Next I took a square piece of Whisper White cardstock and used the Project Life Corner Rounder Punch on all the corners before starting to color the background.  I started at the top with the lighter colors first and using sponge daubers started applying ink to create a skyline (used Soft Sky, Marina Mist, Wild Wasabi, and Old Olive inks).  Once I had the background the way I wanted I used the Boys will be Boys stamp set to stamp the army man using Tuxedo Black Ink.  I had a little boo-boo with my stamping so to help cover it I used some Stampin’ Write Markers to hand draw in some grass and bird type lines.  Next I added a piece of Silver Foil Paper as a flag peeking out behind the stamped image.

The greeting is from the same stamp set and was stamped on Soft Sky cardstock, punched out with the Washi Tape Punch, and attached to the cardfront with dimensionals.  As the final touch I added 3 candy dots along the bottom of the image using the colors from the stamped piece so it all ties together.

I had some fun playing with the coloring on this card and hope it’s appreciated (bet mom will more so but Aidan thought the idea was pretty cool.  This stamp set is lots of fun and it doesn’t have to be for little boys, I know lots of men who still love them so it’s all good!


Below are easy ordering links for the products used on this afternoons card:

Built for Free Using: My Stampin Blog


Enjoy the rest of your afternoon!

Diana
Pin It!

Stylin' Stampin' INKspiration Card Sketch SSINKCS30: Bravo

Good morning!  It was a good weekend and when we weren't busy with Aidan's birthday party I was able to break away for a little stamping and had a very fun stamp class this afternoon!  Since it's the second Monday of the month it's time for the monthly card sketch challenge over on the SSINKspiration blog.  I know I've said it before but I really enjoy these challenges as a great way to change things up and provide some inspiration for cards I'm making.  I had a coworker leave recently for a new opportunity and while it's sad for us I was so happy for this opportunity for him and his family and wanted to give him something special.

I started with Lost Lagoon cardstock for the cardbase and then added a piece Crumb Cake cardstock that I embossed with the Big Shot and Brickwall Embossing Folder and then sponged the cardstock with Crumb Cake ink to highlight the embossing.

Next I took a piece of designer series paper from the Going Places DSP stack and matted it with Lost Lagoon cardstock.  As you know, I like my bling so I added a gold star to the center by using some Gold Glimmer Paper, Big Shot, and Star Collection Framelits.

The greeting is from the Bravo stamp set and was stamped with Basic Black ink on Very Vanilla cardstock.  I used Paper Snips to trim the ends and my bone folder to curl the paper and then glue dots were used to attach the greeting so it holds it's curl and looks like a flag waving.

I had a lot of fun using different textures and elements to really amp up the WOW factor with this card while it was still pretty easy to make and I know my friend really appreciated it.  The other design team members are sharing some fun cards as inspiration for this card sketch so go check them out and then we would love for you to play along and share your project!

Below are easy ordering links for the products used on today's card:

Built for Free Using: My Stampin Blog


Enjoy!

Diana
Pin It!

Friday, February 5, 2016

SSINKspiration 3D Items: Party Wishes

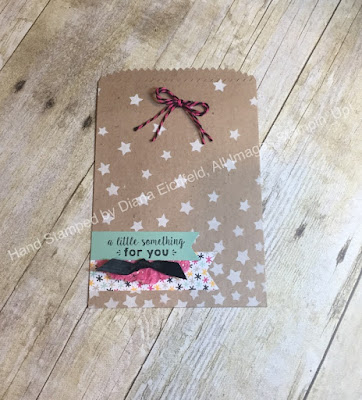
Happy Friday!  We’re finally getting back into the regular routines now that schools back in session we’re getting back on track.  It seems like we have a lot of birthdays in February (including Aidan’s big birthday party this weekend) so I’ve been working on a lot of birthday cards and projects so since we’re sharing 3D items over on the SSINKspiration blog it’s only fitting that today’s project is birthday themed.  I love our Kraft Tag a Bag Gift Bags since they’re the perfect foundation for all sorts of needs!

I started with a Kraft Tag a Bag Gift Bag and sponged stars on it using the Whisper White Craft Ink and Hearts and Stars Decorative Mask (make sure to let this dry completely, if you use our classic ink it would dry much faster).  Next I added a piece of It’s My Party Designer Series Paper that I cut for a flag.  Then I took a piece of a Paper Doily (only used a ¼ doily) and crumpled it to add some texture and then sponged it with Melon Mambo ink.  Then I used the Party Wishes stamp set for the greeting and stamped it in Basic Black Ink on Pistachio Pudding cardstock and attached it with dimensionals to the bag.  I used some Basic Black 3/8” Stitched Satin Ribbon and tied a knot and then attached it below the greeting with a glue dot.

The final touch was to punch two holes in the top of the bag using a handheld punch and then took two pieces of Melon Mambo baker’s twine from the Baker’s Twine Combo Pack and tied a bow at the top of the bag to keep it closed.

This gift bag is really cute and is super easy to make and doesn’t use a ton of products so you could make lots of them for all the gift occasions you have and the recipient will love it!

Below are easy ordering links for the current products used on today’s project:

Built for Free Using: My Stampin Blog


Enjoy,

Diana
Pin It!

Tuesday, February 2, 2016

SSINKspiration Valentines: Paper Pumpkin to the Rescue!

Good morning!  We're so excited, because after 12 days Aidan is finally returning to school (boy storm gave the kid's a second extended holiday).  While Aidan was off we decided to get  head start on one of his schools annual service projects, which is Valentine's for Veterans.  We always enjoying making cards for those who have worked to protect our freedom.  Today over on the Stylin' Stampin' INKspiration blog we're sharing Valentine's projects I thought it would be perfect to share two of the cards we made to give (great thing was as Aidan was making his cards I also made some so I'm all set on cards for the family).  These are two of the cards we made that uses extra pieces and stamps from the January 2015 Paper Pumpkin Kit (this kit is still available as well as the refill kit for Paper Pumpkin subscribers). 


The only thing we added was some cardstock (used some Brushed Gold cardstock on the second card for some bling) and the Happy Hearts Embossing Folder.

This is truly one of my all time favorite Paper Pumpkin kits perfect for treats as well as great elements for cards.  I still have more pieces(I've actually used 3 kits so far for my personal projects, as well as they were great for a kid's class I held this weekend!)

You still have plenty of time to get your valentine's finished, just let me know and I can help!

Also, just a heads up, with Valentine's Day being the second Sunday of the month (which is normally when we have card class) I'm moving this month's class to this Sunday, February 7 at 2:00 PM.  So before you great ready for all the football game that evening you can come over and make some great cards first!

Enjoy!

Diana

Pin It!

Monday, February 1, 2016

Stylin' Stampin' INKspiration Color Challenge SSINKCC30: Timeless Textures Mix Up

Good morning!  How is it actually February, crazy!!  After a busy weekend the start of a new month we have another fun color challenge over on the Stylin' Stampin' INKspiration blog.  This month we had some great colors and since I have been working on a lot of Valentine's recently it only made sense to use this color comb and and a mash of other items for a fun love themed card.

I started with Rose Red cardstock for the cardbase and then I added a piece of Whisper White cardstock and I stamped along the left side using the Timeless Textures stamp set (the flowery image was stamped using Rose Red ink, and I stamped off first, and Wild Wasabi ink was used for the circles.  Next I took a piece of Wild Wasbi cardstock and stamped a  greeting in the center using this months Paper Pumpkin stamps and layered one of the acetate pieces from the Memories in the Making Speciality Card Collection (FREE during Sale-a-bration) using the fun heart shaped piece.

To embellish the card I added three small hearts that I stamped using Rose Red cardstock, the heart punch from the Itty Bitty Punch Pack, and then embossed them using the Big Shot and the Decorative Dots Embossing Folder and used dimensionals to pop them up.  For the top right corner I used some of the pink sequin trim (also from the January Paper Pumpkin kit) and tied it off with some Old Olive Baker's Twine (it's close enough in shade of green to work for this card) and attached it to the cardfront with a glue dot.


Using lots of great embellishments really make this card fun I love the window look with the acetate sheets (not just for pictures).  The other design team members are sharing some great ideas for inspiration so go check them out and then play along with us for some fun.


Below are easy ordering links for the products used on today's card:

Built for Free Using: My Stampin Blog


Enjoy,

Diana
Pin It!

Search This Blog