Friday, February 28, 2014

Sketch Frenzy Friday Sketch Challenge: Geometrical Craziness

We're almost at the end of the work week, awesome.  I have to say, this really is the winter that won't give up, warm weather last weekend followed by snow the next day, it's crazy but I know spring is just around the corner and I can't wait.  Today I have a unique card for this weeks Sketch Frenzy Friday sketch challenge.  I have to admit I was really intimidated when I saw this sketch since it's outside by comfort zone.  The cardbase is Pool Party cardstock and I added a layer of Whisper White Cardstock that I attached all my elements to.  I wanted to change things up and instead of using the triangle shape I used the Hexagon Punch and lots of different patterns from the Quatrafancy Speciality Designer Series Paper.  For some of the hexagons I cut them in half to create the top and bottom strips. 
 
I added a piece of Daffodil Delight 1/4" Stitched Grosgrain Ribbon across the center of the cardstock with a simple bow.  For the greeting, I used another new stamp set, Geometrical, and colored in the stamp with Stampin' Write Markers.  The font on this stamp set is really fun and the solid lettering is really popular right now. I cut the greeting out with the Big Shot and Ovals Collection Framelits.  I used the same framelits to cut the mat with Island Indigo cardstock and embossed it with the Lattice Embossing FolderDimensionals are the perfect adhesive to attach the greeting to the card since it can help the greeting bridge over the ribbon.
 
It was fun to step out and try something new, it really helps you stretch your creativity.  What are you working on this weekend?  Perhaps you can use this sketch as inspiration, play along with us, we would love to see your creations.
 
Have a great weekend!
 
Diana
Pin It!

Wednesday, February 26, 2014

Fab Friday Sketch Challenge: Peachy Keen with a Metallic Twist

Good morning and congratulations on making it to the half way point in the week.  Today I'm sharing a fun card I made for this weeks Fab Friday Sketch Challenge.  I recently ordered some products from the Retro Fresh product suite so I was excited to play with them.  For this card I started with Very Vanilla for the cardbase and then I added a layer of Pool Party Cardstock that was embossed with the Big Shot and the Woodgrain embossing folder (it's fun to see this texture in colors other than brown).  Next I added a piece of DSP from the Retro Fresh Designer Series Paper package.  I added a half circle accent that uses Tangerine Tango cardstock, cut out with the Starburst Framelits and then embossed with the Decorative Dots Textured Embossing folder.  I also added a layer of Burlap Ribbon and some Gold Baker's Twine for texture.
 
The greeting uses the Peachy Keen stamp set and I used Stampin' Write Markers to color in the stamp before stamping on Very Vanilla Cardstock.  Check out this awesome frame....I used the new On Film Framelits and the Big Shot to cut out this cool film strip element out of the Gold Foil Paper.  I used dimensionals to attach the film strip greeting due to the thickness of the Burlap Ribbon so it really pops off the card.
 
This card is so fun, I absolutely love all the elements and texture.  Now check out the sketch, it really leaves open lots of possibilities and it's fun to see what everyone comes up.  I'll definitely be saving this sketch for future project inspiration, it would be equally great of a scrapbook page or home décor item.
 
I hope you enjoyed today's project, this product suite is so fun everything works so well together!
 
Happy stamping,
 
Diana

Pin It!

Tuesday, February 25, 2014

Scrappy Saturday (a little late): Week 5, The Start of 2014

Good morning all!  So I bet you thought I fell off the wagon with the scrapbooking goal....well actually I've been working on a special page in honor of Aidan's 9th birthday for a couple of weeks looking for the perfect pictures and then things were so crazy with the big birthday party that I forgot to actually share it.  So rather than not share I thought I would do so even if I'm a little late. 
 
So for my first page of our 2014 photobook I wanted to do a page to commemorate Aidan's birthday and where he's come from so this page includes a picture for every year of his awesome life as well as a picture from his 9th birthday!  Aidan's such a fun and happy kid I love to look back at how he's grown and all his expressions and know that I'll cherish this page for years to come.    I made this page in My Digital Studio and since there are so many pictures I didn't had lots of embellishments, but I did include the supply list below the page so you have all the details.


Supply List

Background
     Designer Series Paper\_Designer Kits\Be Awesome Today - designer series paper\Be Awesome Today - 12

Embellishments
    _Designer Kits\Fan Fair - embellishments\Fan Fair - stitching black corner 6
    _Designer Kits\Fan Fair - embellishments\Fan Fair - stitching black corner 6

Stamps
    Moments Ago\Moments Ago - awesome, Color = 230,WATERMARK 255,255,255
    #hashthis\#hashthis - loveyou, Color = 230,WATERMARK 255,255,255

Punches
    Extras\Embark Graduate - punches\Embark Graduate - banner, Fill Color = 225,225,224
Pin It!

Monday, February 24, 2014

Stylin' Stampin' INKspiration Metallic Fun: Ampersand Happenings

 
Good morning!  What a beautiful weekend, we were able to enjoy a brief break in the cold weather and it was perfect since Aidan's birthday party was on Saturday and we were able to relax outside while the kids played.  Today I'm excited to share the card I made for today's Stylin' Stampin' INKspiration blog where it's all about metallic.  Metallic are really popular right now and while it's not something I naturally grab for I'm having fun creating with all the great metallic items in the Occasions Catalog.  I decided to make an anniversary card for today's project (I'm really ahead of plan since our anniversary is in May!!) and it started with a cardbase of Basic Black and then I added a layer of the Metallic Gold Fancy Foil Designer Vellum and added a layer of Whisper White cardstock behind the vellum so it really pops. I used the Countless Sayings 2 Photopolymer stamp set for the "you" and "me" and stamped with Versamark and used Black Embossing Powder and the Heat Gun to heat emboss the words on the vellum.
 
For the ampersand, I used the new Ampersand Embossing Folder and the Big Shot to embossed on the Gold Foil and then cut out the ampersand with Paper Snips.  The final touch was to add some Gold Sequin Trim to the top and bottom corners.
 
I really love how this card turns out and all the sparkly, shiny elements, and the great thing is that all the hard work was done by Stampin' Up! to make sure everything coordinates to project perfect, beautiful projects.  If you haven't embraced all the wonderful metallic items for your projects, give it a try, you'll love it!!
 
Have a great day!
 
Diana

Pin It!

Friday, February 21, 2014

Sketch Frenzy Friday Sketch Challenge: See Ya Later

Happy Friday, yeah!  It’s amazing, I know Friday’s come along once a week but it never fails, I’m always excited for their arrival.  This one is extra special since we’re going to finish of Aidan’s birthday celebration and are having all the kid’s over tomorrow for a party full of good, laughter, and games (we have the Party Trailer coming and Aidan has been excited for months).  Today I’m back with my card for this weeks Sketch Frenzy Friday challenge and this one is extra special since this is the first sketch challenge that I’ve personally designed, I hope you like it!  I also decided that since we’re in the heart of Sale-a-Bration I would really focus on several of the SAB goodies you can earn for FREE during this sale.  The cardbase is Sahara Sand and I added a layer of Pool Party that was embossed with the Big Shot and the Decorative Dots Texture Embossing Folder (SAB Freebe #1).  I then took a sponge and some Sahara Sand ink to help distress the paper.  I added a strip of the Sweet Sorbet Designer Series Paper (SAB Freebee #2) that was matted with Pistachio Pudding (this piece was punched with the Scallop Trim Border Punch).  I added some Summer Starfruit Baker’s Twine from the Sweet Sorbet Accessories Kit (SAB Freebe #3) which is super fun and is thicker than our standard twine as a heads up.

The greeting is from the See Ya Later stamp set and is super fun!  I used my Stampin’ Write Markers to color in the stamp before stamping and then cut the image out with the Big Shot and Circle Collection Framelits and then used the 2 ½” Circle Punch to cut a mat out of Crisp Cantaloupe cardstock (I love that one of the framelits fits perfectly inside the 2 ½” Circle Punch for a perfect mat).  For the remaining circle elements I used the same DSP package and Sahara Sand cardstock along with the ½”, ¾”, 1”, and 1 ¼” Circle Punches to cut out all the different circles.  The final touch a little arrow in Basic Black that was cut with the Big Shot and Label Card Thinlit Die (the elements that come with these Thinlit sets are awesome!).  There are lots of dimensionals on this card, on the stamped image and the arrow for added dimension.

This card is super fun and I’m in love with this years SAB offerings (make sure you stock up now while you can get these items for FREE) and I have to admit the colors in this designer series paper are not what I would normally put together but they’re so fun and can work for either guy or girl cards which is awesome.  I hope you have some time to play along with our sketch this week, would love to see what you create.

Have a great weekend and happy stamping!

Diana


Pin It!

Wednesday, February 19, 2014

Hand Stamped Sentiments Sketch Challenge: Starburst Sayings

Good morning and welcome to the half way point in the week.  Today's going to be a great day, we're finally starting to thaw out and it's going to beautiful for the next couple of days, I can't wait!!!  Today I have a birthday card to share with you that I made for this weeks Hand Stamped Sentiments Color Challenge. The cardbase for this card is Smoky Slate and I added a layer of Midnight Muse cardstock that I had stamped with the On the Grid stamp set and Midnight Muse Classic Ink.  Next I took a piece of Silver Foil Paper and embossed it with the Big Shot and the Chevron Embossing Folder before wrapping a piece of Midnight Muse 3/8" Stitched Satin Ribbon around the foil piece.  I added a couple of Rose Red accent pieces that I cut out with the Big Shot and the Starburst Framelits in different sizes.  The silver elements that I layered over the starburst were cut out with various circle punches and some Brushed Silver Cardstock.
For the main stamped image I used the Starburst Sayings stamp set, stamped it with Rose Red ink and then cut it out with the Starburst framelits.  Some dimensionals were used to attach the greeting to the card so it pops and I added a small arrow that was cut out of Smoky Slate Cardstock, the Big Shot, and one of the accent pieces from the Label Card Thinlit Die.
 
I have to admit, I really like how the Rose Red elements really pop off this card, so fun.  I also love that this new bundle of Starbust Sayings stamp set and coordinating framelits, they're fun and you can even save money with the bundle, which always makes me happy.  It'll be interesting to see all the different ideas that are generated by using the same basic colors for inspiration.

Enjoy and have a wonderful day!

Diana
Pin It!

Monday, February 17, 2014

Stylin' Stampin' INKspiration Scrapbook Sketch Challenge: February 2014


Happy Monday!  What a wonderful weekend.  On Saturday we celebrated Aidan’s 9th birthday.  It’s amazing what a great person he’s growing into and I love to see every moment, even if I do wish he would have stayed smaller longer.  For his actual birthday we just had a family dinner at one of his favorite restaurants, Fogo de Chao and the big party with friends is next weekend so we avoid as many people being out of town for President’s Day and missing his party.  It’s the third Monday of the month, which means its scrapbook sketch day over on the Stylin’ Stampin’INKspiration blog and it’s another great sketch and I love all the inspiration created by the designers.  For my page I decided to use the technique of combining multiple photo blocks to show one picture (very cool and easy).  The photos on the page are from Young Author’s Day at Aidan’s school (the kids all have to write, illustrate, and create a book and then read it in front of the class) and is always a highlight for the end of the school year.  I joined Aidan in his class to hear him and his classmates read their books and it’s so great to see how excited he gets every time I come into school (I’m cherishing this since I know it won’t be long before he doesn’t want me to come in).  Aidan and his friend were really hamming it up so I thought it would be great to scrap this moment so he can always remember the fun times with classmates.

It’s really easy to add in all these different designer series paper elements, I just add punches and change them to the desired sizes and then used the “paper fill or photo fill” functions.  I prefer to do this over just adding page layers since then I can change the sizes of the paper images (in this case I made the patterns smaller).

I used MDS for this page and the supply list is included below:
Supply List

Embellishments
    Chevron Ribbon - embellishments\Chevron Ribbon - cherry cobbler v
    Hodgepodge Hardware\Designer Brad - star2
    Hodgepodge Hardware\Clip Assortment - library clip

Stamps
    _Designer Kits\Back to School\Back to School - grunge 3, Color = SAHARA SAND 194,187,169

Punches
    Basics\1.25 Square Punch,  Filled with: Designer Series Paper\_Designer Kits\Back to School - designer series paper\Back to School - 10
    Basics\1.25 Square Punch,  Filled with: Designer Series Paper\_Designer Kits\Storytime - designer series paper\Storytime - 20
    Basics\1.25 Square Punch,  Filled with: Designer Series Paper\_Designer Kits\Storytime - designer series paper\Storytime - 10
    Basics\1.25 Square Punch,  Filled with: Designer Series Paper\_Designer Kits\Storytime - designer series paper\Storytime - 28
    Labels & Tags\Get It Done - punch 1, Fill Color = 171,217,198
    Labels & Tags\Lots of Tags - shape 4

I'm also using this page for my Scrappy Saturday page as I continue to make progress. 
I must admit, I typically like to add lots of pictures so it took a lot of restraint to not keep adding pictures to fully fill up the page but this is a great way to showcase just a couple of pictures.

I hope you enjoyed this page and I would love for you to check out the sketch and join in on the fun (it’s a great excuse to get those pictures and supplies out and make progress on your scrapbooking).  You can do either traditional, digital, or hybrid pages, it’s all up to you.  Just make sure to share you project on the Stylin’ Stampin’ INKspiration blog so we can all check it out!

Have a great day!

Diana
Pin It!

Friday, February 14, 2014

Extra Valentine Treats

 Good afternoon!  I'm back again with a second post today, you didn't think I'd let Valentine's Day pass without sharing some more projects did you?  These are the projects I made for Chris, I love the coffee cup images from the Perfect Blend stamp set and since I think we're the perfect pair I thought they would be perfect.  I used paper piercing to make the cup Crumb Cake, the lid Whisper White, and used Real Red Designer Series Paper for the coffee collars.  The Gorgeous Grunge is perfect with this stamp since the splatters look like coffee stains.  The greeting is from the Love You More stamp set and I stamped it in Early Espresso and then just colored in the "Love" with a Real Red Stampin' Write Marker.  The final touches were to add some Gold Sequins (I cut them apart so I could attach them individually) and then a little piece of Natural 5/8" Chevron Ribbon

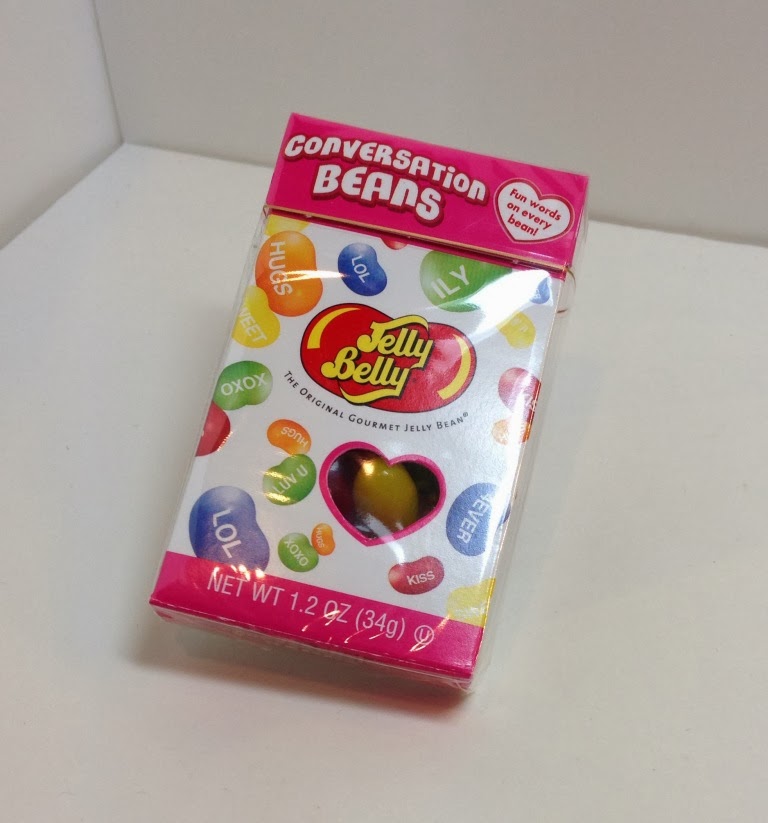
For my second project  made a cute little wrapper for a box of Jelly Belly Conversation Beans I found (Chris is addicted to Jelly Belly Jelly Beans right now).  I just wrapped a piece of Crumb Cake around the box and then added a piece of Fresh Prints Designer Series Paper Stack Paper around the box.  I used the Angled Tag Topper Punch to create the tag and then made it a little narrower by trimming down the sides after punching.  The stamp is from the Love You More stamp set and I added a coordinating piece of Fresh Prints DSP along the bottom and used some Soft Suede 3/8" Taffeta Ribbon to attach the tag.

This is what the Jelly Belly Conversation Beans looked like before I decorated them.
 
I hope you enjoyed these projects, I know Chris will like them and we're looking forward to an evening out at the movies (we're going to avoid restaurants due to the craziness).  Have a special, love filled day with the special people in your life, what a wonderful way to kick off the weekend.
Pin It!

Sketch Frenzy Friday: Frozen Birthday Greetings

Good morning and Happy Valentine's Day!  Have you finished digging out from the snow?  I know there are lots of big plans for today and this weekend so I'm hoping we can all get out and about and have fun.  Today I'm excited to share the card I made for this weeks Sketch Frenzy Friday sketch challenge.  We were at a friends birthday party this past weekend and the theme of the birthday was "Frozen" so I decided to make a winter themed birthday card to coordinate with the party.  The cardbase is Smoky Slate and I added a layer of Pool Party cardstock that I embossed with the Big Shot and the Northern Flurry Texture Embossing Folder and added little rhinestones to the center of the snowflakes.  Next I added a piece of Silver Fancy Foil Designer Vellum for the flag and I backed it with a piece of Whisper White Cardstock so it really pops.
For the stamped image I used the Make a Wish stamp set for the cake and colored in the stamp with Stampin' Write Marker's before stamping on Whisper White Cardstock and cutting out the circle with the Big Shot and the Circle Collection Framelits.  The next circle was punched with the 2 1/2" Circle Punch using Brushed Silver Cardstock and the final element is Bermuda Bay Cardstock cut with the Big Shot and the Window Collection Framelits.  The final touches was to add a strip of Silver Glimmer Paper along the bottom of the card and the greeting is from the Bring on the Cake stamp set, was punched out with the Modern Label Punch, sponged around the edge with Smoky Slate ink and then attached with dimensionals.
 
This card turned out even prettier than I was thinking when I started, I may have to use these colors for cards other than Christmas in the future.  We would love for you to play along with the sketch challenge (snowy weather is perfect for crafting time!) and share what you created.

Enjoy and have a wonderful weekend!

Diana
Pin It!

Thursday, February 13, 2014

Stylin' Stampin' INKspiration Blog Hop: Bundles to Make the Most of Sale-a-Bration


Thank you so much for joining us for our February Stylin' Stampin' Squad Blog Hop! Sale-a-Bration is in full swing and it's one of the BEST specials that Stampin' Up! provides every year! Each of the stops along our hop will give you a bundle of items that you can purchase that will total around $50 and give you a FREE Sale-a-Bration item!! 

You won't want to miss these exclusive Sale-a-Bration items: 


As you hop along, please be sure to comment and show some love on every blog! We are always excited to hear from our followers! This is the first stop on the hop or if you started in the middle you should have just left stop number 17 on the Stylin’ Stampin’ Squad blog hop – Heidi B. of Stuck on Stampin'. If so, you are in the right spot. If a link doesn’t work or you get off track, you will find the full blog hop lineup below.

I decided to create my own bundle to help inspire you so I included the following items:

Love You to The Moon Clear Stamp Set, Item #133143, Price $17.95
Birthday Basics Designer Series Paper, Item#130145, Price $10.95
Bracket Label Punch, Item #132153, Price $15.958.95
Raspberry Ripple 3/8" Stitched Satin Ribbon, Item # 126845, Price $8.95

For my Free Sale-a-Bration item I choose the Decorative Dots Textured Embossing Folder.

I choose these items for my bundle since you can use them for lots of different occasions so they are really

 My first project is a card that uses everything in the bundle.  The cardbase is Bermuda Bay and I added a layer of Going Gray cardstock that was embossed with the Big Shot and the Decorative Dots Textured Embossing Folder.  I used some Summer Starfruit Cardstock to mat the Birthday Basics Designer Series Paper and added some Raspberry Ripple 3/8" Stitched Satin Ribbon around the DSP layer.  The greeting is from the Love You to the Moon stamp set and I colored in the stamp with Stampin' Write Marker's before punching the image out with the Label Bracket Punch.  This punch has a great shape and lots of our stamp images fit inside which makes it great.

For my second project I decided to make a fun treat holder using the Scalloped Tag Topper Punch (these new punches are AWESOME!).  All I did was take a piece of 2" wide cardstock and punched both ends and scored using the Simply Scored Board in the middle for the width of the candy.  For the decoration I added a small strip of Silver Glimmer Paper and another pattern from the Beyond Birthday DSP.  I used the same stamped image and punched it out and attached it with a dimensional.  The final touch was to use some of the Raspberry Ripple ribbon to tie the top together.   To help ensure the candy stays in place I did use a little piece of Sticky Strip on the bottom.  This little treat is so cute and you could use it for all types of occasions.

 I hope you enjoyed this months projects and remember, snowy weather is perfect for crafting, so have some fun and get a little inky.  Click on the "Next" button below to go to Cynthia's blog, she always has wonderful projects to share!
 
http://inkadoodlecreations.blogspot.com/2014/02/get-bundled-with-stylin-stampin-squad.html
Blog Hop Participants:
  1. Diana E. of Stampin' Fun with Diana
  2. Cynthia R. of Ink-a-Doodle Creations
  3. Jennifer C. of Happy 2 Scrap 4 Life
  4. Kathy P. of Katrina P's Creative Corner
  5. Darcy J. of DJ's Stampin' Place
  6. Kim R. of Stamping with Kim
  7. Pamela W. of Stinky Tofu
  8. Erica B. of Stamping Starlette
  9. Donna S. of Organized Chaos
  10. Tonya B. of Stampin' with Tonya
  11. Kristina M. Mama's Sanity
  12. Bree R. of Craft-Somnia
  13. Dawn S. of Dawn's Creative Chalet
  14. Anastasia R. of Stampin' Blondie
  15. Darla R. & Nancy K. of Stampin with Darla and Sisters
  16. Pam S. of Stampin' in the Sun
  17. Heidi B. of Stuck on Stampin'

Pin It!

Wednesday, February 12, 2014

Fab Friday Color Challenge: Hip Petite Petals


Welcome to Wednesday friends!  I have to admit this cold winter is really wearing on me and I'm ready for spring.  I was so excited when I saw this weeks Fab Friday color challenge since I love these colors and their really helping me get into a springtime frame of mind.   For this card I started with Coastal Cabana for the cardbase and added a layer of Crumb Cake cardstock that was stamped with the Woodgrain stamp with Crumb Cake ink and then I sponged around the edges with the same ink.  I added some Real Red 1/4" Stitched Grosgrain Ribbon and then lots of flowers that were stamped with the Petite Petals stamp set and punched them out with the coordinating Petite Petals Punch.  I used my bone folder to curl up the edges of the flowers and then used a glue dot on the back of each flower so the have more dimension and texture.

 
For the greeting I sued the Hip Notes stamp set (this set is so fresh and fun) and colored it in with Stampin' Write Markers before punching it out with the Large Oval Punch and sponged around of the edges of the oval with Crumb Cake ink.  I used the Decorative Label Punch and some Coastal Cabana cardstock to make the perfect mat.
 
 
This card is so bright and cheery it is really helping me warm up and think that spring really will be here soon.  This is such a versatile color combination, it looks great for Christmas as well as all occasion cards, make sure to pin this so you can use it on your upcoming projects.
 
Happy stamping,
 
Diana
Pin It!

Tuesday, February 11, 2014

Monster Valentine Treats, Three Ways

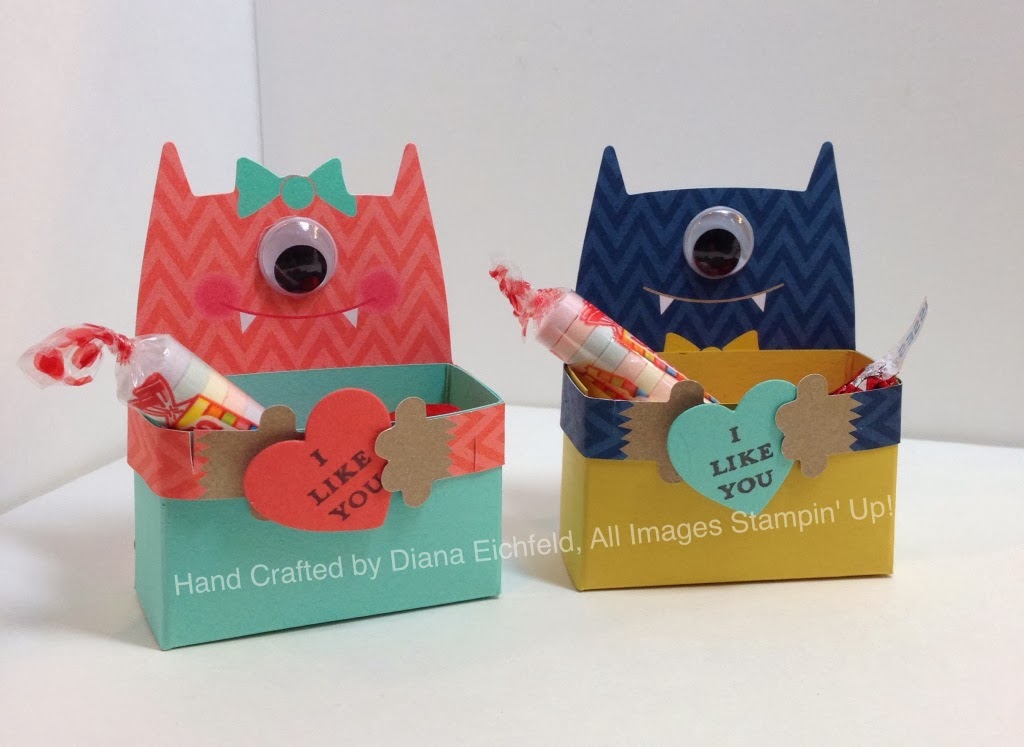
Good morning!  It's almost Valentine's Day, do you have all your cards and projects finished?  I'm still wrapping up the last couple items but I wanted to share some fun and easy ideas to give you some inspiration.  One of the great kits that Stampin' Up! offered this year were the Monster Hugs Valentine Treats in both a Boy (Item 132162) and Girl (Item 132163) Version.  These kits are great because you got all the supplies you need to make 18 of these cute little monsters for only $5.95.  Here are three different ideas all using the kits which are super easy and cute.

These are the basic treats, all you need to do is write the names for the Valentine's attach the candy and wrap the monster's arms around and add the little eyeball and heart, so cute!

For the next version I needed to make some candy treat cards for my Mom and Grandma to give to some special kids so I took the exact same monster and attached it to the front of the card.  For this card I used the  Adorning Accents Embossing Folder for the Heart Embossed strip, the Delightful Dozen Stamp set, and a Rhinestone for the center of the stamped heart.

The final treat is a little valentine box that I found the template online by a fellow demonstrator, Julie Davison, you can find her template HERE.  I gave Aidan the option of how he wanted to use the monster valentine's for his class gifts and he quickly decided on the boxes, because "then I can give more candy", too funny!  Julie's little boxes were so perfect I didn't change a thing and I was able to fit four little pieces of candy inside for a nice little treat.  The "I Like You" stamp set is from the You're Lovely stamp set that you can year FREE this year during Sale-a-bration and it was cut out with the Big Shot and the Hearts a Flutter framelits.
 
I hope I've given you a few ideas on how you can use these cute little monster treats to make valentine's that any kid, young or old will be sure to enjoy!

Pin It!

Monday, February 10, 2014

Stylin' Stampin' INKspiration Card Sketch Challenge: Banner Blast Birthday Greetings


Good morning friends!  How was your weekend?  We had a great time, Aidan's Cub Scout Pack had it's annual Pinewood Derby races and it's so fun to see the boys cheer on all the races.  We were even able to have a date evening since Aidan had a sleepover and it was just nice to relax and enjoy as a couple.  To top off a fun weekend I got to spend the afternoon stamping with a friend, so awesome!  I always love our weekends when we can just enjoy.

Today I'm sharing my card for this weeks Stylin' Stampin' INKspiration card sketch challenge.  I needed to make a card for my brother's birthday and the Soho Subway Designer Series Paper is so perfect for "guy" cards.  The cardbase is Crumb Cake and I added a piece of Island Indigo cardstock behind the DSP.  The banner element in the top corner uses the Banner Blast stamp set and Banner Punch (both items that you can earn for FREE during Sale-a-bration!!)  I used some of the Gold Baker's Twine for the string on the banner since the twine is a more muted vanilla color than our standard Baker's Twine that is bright white.
For the greeting I used the Blue Ribbon stamp set and stamped on Summer Starfruit cardstock with Early Espresso ink before punching it out with the 1 1/4" Circle Punch.  The 1 3/8" Circle Punch was used to mat the circle with Crisp Cantaloupe cardstock and then I used some Early Espresso cardstock and the Decorative Label Punch for the final layer.  Some Burlap Ribbon was used to create the flag element at the bottom and is a great rustic element.
 
I love how this card turned out, it's just the right element of "guyness" that that I hope my brother will enjoy.  This is a fun sketch and we would love for you to come and play along, also the designers came up with some fabulous cards that you definitely want to check out.

Enjoy!

Diana
Pin It!

Sunday, February 9, 2014

Scrappy Saturday: Week 4 (Technical Difficulties Will Not Get me Down)

Good evening!  Did you miss me yesterday?  I did you think I forgot to post my scrapbook page for this week?  As I promised last week I designed the coordinating page to last weeks layout and went to save the file so I could share it and there seems to be a problem with my photobook file and I couldn't open it (trust me, I'm trying not to panic and am hoping Stampin' Up can help fix it) so I wasn't able to share the page I originally designed.  But I didn't want to let you own so I use one of the predesigned page templates in My Digital Studio to create this page for our visit with Santa while we were at Disney before our Christmas cruise.  I love these templates since all the hardwork is done, all I did was alter the page size (the template is 8x8 and my photobook is a 12 x 12, modified the photoboxes and then added my photos.  The final touch was to add some text and some mats around the photos.


Below is the supply is for the elements that were used in this page:

Embellishments
    Staple & Stitching\Very Vanilla - Stitching Straight
    Staple & Stitching\Very Vanilla - Stitching Straight
    Staple & Stitching\Very Vanilla - Stitching Straight
    _Designer Kits\Be of Good Cheer\Be of Good Cheer - Banner 2
    _Designer Kits\Be of Good Cheer\Be of Good Cheer - banner 4
    _Designer Kits\Be of Good Cheer\Be of Good Cheer - Banner 2
    _Designer Kits\Be of Good Cheer\Be of Good Cheer - banner 4
    _Designer Kits\Be of Good Cheer\Be of Good Cheer - Banner 2
    _Designer Kits\Be of Good Cheer\Be of Good Cheer - banner 1
    _Designer Kits\Be of Good Cheer\Be of Good Cheer - banner 4
    _Designer Kits\Be of Good Cheer\Be of Good Cheer - banner 3
    _Designer Kits\Be of Good Cheer\Be of Good Cheer - Banner 2
    _Designer Kits\Be of Good Cheer\Be of Good Cheer - banner 1
    _Designer Kits\Be of Good Cheer\Be of Good Cheer - banner 4
    _Designer Kits\Be of Good Cheer\Be of Good Cheer - banner 3
    _Designer Kits\Be of Good Cheer\Be of Good Cheer - ornament 2
    _Designer Kits\Be of Good Cheer\Be of Good Cheer - ornament 1
    _Designer Kits\Be of Good Cheer\Be of Good Cheer - ornament 2
    Staple & Stitching\Very Vanilla - Stitching Straight

Stamps
    Be of Good Cheer\Be of Good Cheer - joy, Color = GUMBALL GREEN 105,132,51
    Be of Good Cheer\Be of Good Cheer - Be merry, Color = CHERRY COBBLER 165,30,44
    Be of Good Cheer\Be of Good Cheer - rejoice, Color = CHERRY COBBLER 165,30,44
    Be of Good Cheer\Be of Good Cheer - cheers to you, Color = GUMBALL GREEN 105,132,51
    Be of Good Cheer\Be of Good Cheer - 25, Color = 255,250,226
    Be of Good Cheer\Be of Good Cheer - ornament 3, Color = 255,250,226
    Be of Good Cheer\Be of Good Cheer - ornament 3, Color = 255,250,226

Punches
    Basics\1.25 Square Punch, Fill Color = 255,250,226
    Basics\1.25 Square Punch
    Basics\1.25 Square Punch

I love that I can either create projects from scratch or use predesigned templates in MDS, it really does make it the perfect program for every person, and every need.  If you haven't tried MDS you really should, you can even download a FREE 30-Day version of the software so you have nothing to lose.  I'm keeping my fingers crossed that next week I'll have great news and I'll be able to share the other page I designed.
Pin It!

Friday, February 7, 2014

Sketch Frenzy Friday: Express Yourself Birthday Wishes

I'm so excited it's Friday! Not only is it almost the weekend but we're celebrating a couple different birthdays this weekend and Aidan's having going to a sleepover so we get a free night (what to do??)  Also, we have the Pinewood Derby and it's always so fun to see the kids creations and then race them, no matter what they are so proud of their cars.  Today I'm sharing my card for this weeks Sketch Frenzy Friday Blog.  This is a nice and simple sketch that could be interpreted in so many ways.


The cardbase is Crisp Cantaloupe and I added a layer of Island Indigo Cardstock. The designer series paper is Boho Subway and has some of the new Gold Baker's Twine wrapped around the layers (this stuff is so awesome and much thicker than out other Baker's Twine). The sentiment is from the Express Yourself Hostess Stamp set and is punched out with the Modern Label Punch. I sponged around the edges of the greeting with Crumb Cake ink before attaching it the card with dimensionals. To create the flower element I used the 1 1/4" Scalloped circle punch and punched out three scallops using Summer Starfruit cardstock. I misted the cardstock and then crumpled up each layer. Next I sponged each layer while they were still damp with Crumb Cake ink and attached an Antique Brad to the center so I could squish it up while it was still damp and it dried nice and ruffled. A couple of glue dots was all that's needed to attach the flower to the cardfront.

This card turned out nice and fresh with a hint of grunge. I hope you enjoyed and that you're able to play along with us this weekend and share all creations using the linky button on the blog.

Have a great weekend!

Diana
Pin It!

Wednesday, February 5, 2014

Create with Connie and Mary Color Challenge: Perfect Blend Birthday Greetings

Good morning friends!  I don't know about you but I'm officially finished with this winter weather, we got that nice little peak of spring weather this weekend and I loved it!  Time to bring it on for good.  Today I'm sharing the card I made for this weeks Create with Connie and Mary color challenge (I seem to be on a color challenge streak this week).  These are nice springy colors which  is helping keep those warm thoughts.  For this card I used Crisp Cantaloupe for the cardbase and then added a layer of Sahara Sand under the Whisper White layer.  Along the bottom of the card I used the outline of the Chevrons from the Oh, Hello stamp set and stamped them in Sahara Sand.  I also stamp the decorative inside pieces in Pistachio Pudding and Crisp Cantaloupe and cut them out before adhering them to the card. 
 
I love the Perfect Blend stamp set and used it again, stamping the cup three times in Whisper White, Sahara Sand, and Pistachio Pudding so I could cut out the pieces and paper piece them together.  The Oh, Snap! is from the Hip Notes stamp set and I cut out the banner with the Itty Bitty Banner Framelits and Big Shot but made it a smaller banner.  The bow is tied with Crisp Cantaloupe baker's Twine from the Sweet Sorbet Accessories pack (a FREE Sale-a-bration item).  The birthday greeting is from the Bring on the Cake stamp set and after stamping it I added some Rhinestones along the bottom to accent the greeting.
 
This card is kind of funny, not what I pictured when I started but I just kept adding elements, I finally had to put it away so I didn't keep going.  It's interesting and not something I usually make so that's OK, the process was still relaxing which is the best part for me, plus I love to send handmade cards and the reactions you get when you send something you made for them, it's priceless.
 
Enjoy and take care!
 
Diana
Pin It!

Monday, February 3, 2014

Stylin' Stampin' INKspiration February Color Challenge: Layered Labels


Good morning friends! How was your weekend?  Ours was great, we were able to relax and got several things accomplished and enjoyed watching the Super Bowl, actually the ads and half time show were way more interesting than the actual game (I really thought it would be a closer game, come on Denver).  I was only able to spend a little time in the studio off and on over the weekend but I was able to make my card for this weeks Stylin' Stampin' INKspiration card color challenge.  This was fun since I don't normally use these colors together and I needed some birthday cards so I used this challenge to take care of one of the birthday cards on my to do list.
 
This card starts with a cardbase in Wild Wasabi and I added a layer of Whisper White under the Chocolate Chip layer (that was embossed with the Big Shot and the Fancy Fans Texture Embossing Folder).  The stamped image is from the Layered Labels stamp set and is stamped in Pink Pirouette before cutting it out with the Big Shot and the Apothocary Accents Framelits.  I added a couple Wild Wasabi Candy Dots to the corners for a little fun.
 
For the greeting I used the Bring on the Cake stamp set and stamped on Pink Pirouette cardstock with Wild Wasabi ink.  This was then punched out with the Large Oval Punch and then mat it with some Chocolate Chip cardstock that was punched with the Decorative Label Punch. I used dimensionals on both the greeting and the swirled image so it really pops.
 
Here's the color combination, definitely open to lots of options.  We would love for you to play along and show what you come up with, also check out all the other great cards by the designers. 

I really like how simple and elegant this card turned out, just what I was looking for.
 
Have a great week and enjoy!
 
Diana
Pin It!

Saturday, February 1, 2014

Scrappy Saturday: Week 3

Happy Saturday!  I'm so happy I committed to posting my weekly scrapbook pages since it's really help me stay accountable and keep up with my goal.  How are you doing on the goals you set at the beginning of the new year?  I know the statistics don't support success but even if you haven't followed through on your goals completely, whatever they are, you can still recommit and get back at it.  So for this weeks page I decided to take a break from the Halloween cruise (don't worry there are more to come) and decided to do a really quick and easy page from our trip to ICE in December.
 
Chris went out of town one weekend to see the Eagles game so Aidan and I decided to make the most of our weekend alone and headed down to National Harbor stayed over at the Gaylord, did some shopping, and of course the hotel pool had to be visited.  This is the picture they take when you enter the attraction and I'm really glad our package included unlimited visits to ICE since the first time we went Aidan had his mouth open for the picture (really???) So we got bundled up the second day and did it all again.  It was fun to see everything again, and spent a little more time on the ice slides, I even went down them.
 
I used My Digital Studio for this page and several elements from the Winter Frost Product suite (love that things never retire in MDS, I can use it forever and really get a bang for my buck.
 

I'm going to work on the facing page this week and should be able to share it next week so stay tuned.

Have a great weekend and if you have big plans for the Superbowl have fun!

Diana
Pin It!

Search This Blog