Friday, April 29, 2016

SSINKspiration Friday Favorites: Bravo Graduation

http://ssinkspiration.blogspot.com/2016/04/friday-favorites.htmlGood morning!  Now that spring has arrived it's time to start thinking about the end of school and with that comes graduations.  Recently I decided to make a graduation card to be ready for these happy occasions and decided to use one of my favorite stamp sets, Bravo, for this fun card so this card fits perfectly with today's SSINKspiration blog that's all about Friday Favorites.  This card is pretty much stuffed full of retiring items so you're definitely going to want to grab these items if you don't already have them.
 
I started with Lost Lagoon cardstock for the cardbase and then added Hello Honey and Very Vanilla cardstock.  On the Vanilla piece I stamped the greeting using the Bravo stamp set (retiring) and Lost Lagoon ink and then added a piece of Typeset Speciality Designer Series Paper (retiring) to the bottom (the map makes me think of all the adventures ahead of graduates).  I used a piece of Hello Honey 5/8" Stitched Cotton Ribbon (retiring) around the middle of the cardfront to hide the seam.
 
I wanted to personalize this card for this years graduates so I cut out 2016 using the Big Shot and Little Numbers Thinlits (retiring) and some Gold Foil Paper.  I wanted to dress up the numbers so then I embossed them with the Confetti Embossing Folder (retiring) before gluing to a piece of Basic Black cardstock and then matted that with Lost Lagoon cardstock.  Dimensionals were used to attach the year tag to the cardfront.
 
This card is so fun and elegant and could certainly work for any graduates school colors and any way you can personalize a card or gift for the recipient will really help them feel special.  I love to celebrate accomplishments so I know I'll definitely be keeping this stamp set for future projects.
 
Below are easy ordering links for the products used on today's card:


Have a great weekend!
 
Diana
 
 
Pin It!

Thursday, April 28, 2016

Fab Friday Sketch Challenge: Sheltering Tree

Good morning!  My Grandma had surgery last week and thankful she’s doing great but we wanted to send here a Get Well card to let her know we were thinking of her.  I was a little stumped for ideas so I decided to use this weeks Fab Friday Sketch challenge as the inspiration of this card (love when things work out like that!!)

I started with Mint Macaron cardstock for the cardbase and then added a piece of Pretty Petals Designer Series Paper (retiring).  For the main stamped image I used a piece of Very Vanilla cardstock and stamped the tree using the Sheltering Tree stamp set (love how you can build scenes with this set).  The greeting is from the And Many More Stamp set (retiring and on sale right now, whoo hoo!)  This piece was matted with Basic Black cardstock before adding a Paper Doily (also retiring) along the bottom.  Before attaching the stamped layer to the cardfront I added a strip of coordinating DSP (it’s actually the reverse side pattern from the cardfront) along with a piece of Early Espresso ¼” Cotton Ribbon.  I thought the card needed a little something more for dimension so I tied a bow using Pacific Point 3/8” Stitched Satin Ribbon and attached it to the cardfront with a glue dot.

Really hoping my grandma likes this card, but knowing her I think it’ll be a hit and help her to a quickly recovery.  Once again there are lots of retiring products used on this card so make sure to stock up if any of these items are on your wish list.

Below are easy ordering links for the products used on today’s card:


Enjoy and have a great day!
Diana
Pin It!

Tuesday, April 26, 2016

SSINKspiration Teacher's Appreciation: All Boxed Up

Good morning!  As we're rushing into the spring we're rapidly approaching summer and the end of the school year and with that comes Teacher Appreciation and ideas we can do to show appreciation to our teachers and school staff.  Today over on the SSINKspiration blog we're sharing ideas for just this occasion to help you get ready and not be stressed with last minute projects.  Several months ago I saw this great project idea shared by Erica Cerwin shared this great tutorial for a gift box and as soon as I saw it knew it would be perfect for teacher's appreciation.  Here's the information on Erica's creation HERE.

I used the Shine on Speciality Designer Series Paper (retiring) and Simply Scored Board to create the boxes and used the File Label Framelits (retiring) to cut the notch on the top.  I used the Schoolhouse Designer Series Paper (retiring) to wrap a piece around the top of the box.  I used the Be the Star stamp set (retiring) and coordinating framelits to make the large star.  The small star was cut out of Silver Glimmer Paper and the star punch from the Itty Bitty Accent Punch (retiring).  For the greeting I used the All Boxed Up Stamp set (retiring) and cut a coordinating piece of Schoolhouse Designer Series Paper that looks like notebook paper.

For the decoration on the top I used a Metallic Mini Clothespin (retiring) to attach the name tag that I created using my computer and then punched it out with the Washi Label Punch (retiring).  I used some retired Baker's Twine to tie a double bow but we have lots of coordinating baker's twine that would also work.

These  boxes are really easy to make and are so cute (thanks Erica!!).  I filled mine wit Tic Tacs, Yogurt Covered Raisins, and some lemonade packets (perfect to help the teachers get through these last weeks of the school year).  Make sure to check out the other items the design team is sharing, they're so fun!  Don't forget several of the items used on today's project are retiring so make sure to order them soon if you want to ensure they are in your crafting toolbox for future projects.

Below are easy ordering links to the products used on today's project:


Have a great day!

Diana
Pin It!

Monday, April 25, 2016

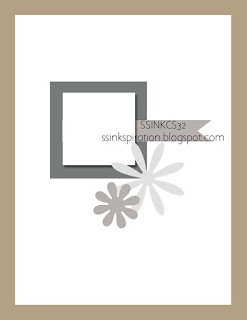
SSINKspiration Mystery Challenge #SSINKMC32: Crazy About You

Good morning!  What a beautiful weekend, we were busy as usual but enjoyed being able to enjoy the nice weather throughout everything.  Today over on the SSINKspiration blog it's time for this months Mystery Challenge and we were given another fun list of items to see what we could come up with, I was able to incorporate 4 items (1, 3, 5, 6).  We made this beautiful Mother's Day card earlier this month, and while it's a little over the top it was fun and certainly a hit. 

I started with Sahara Sand cardstock for the cardbase and then added a piece of Whisper White cardstock for the cardfront.  I cut a circle out of Vellum cardstock using the Big Shot and Circles Collection framelits and then embossed it with the Zig Zag Embossing Folder and then sponged all over it with Mint Macaron ink.  I used two pieces of coordinating DSP from the Botanical Gardens Designer Series Paper.

For the flowers they were a breeze using the Big Shot and the Botanical Builders Framelits using Crushed Curry, Basic Black, Cajun Craze, Old Olive, and Mossy Meadow cardstock.  I did add some sponging to the flowers using Cajun Craze ink and Mossy Meadow ink to the leaves.  I added pearls to the small flowers and a Metal Rimmed Pearl to the center of the large flower.

For the greeting I used the Crazy About You stamp set and coordinating framelits and cut the "happy" out of Basic Black cardstock.  The "Mother's Day' was punched out with the Washi Label Punch, sponged around the edge with Mossy Meadow ink, and then attached with dimensionals. The final touch was to add a knot tied using Mint Macaron Lace Trim.

This card has so much texture and dimension, it really is stunning and you can certainly change up the greeting for whatever you need.  Make sure to check out what the other designers are sharing for this challenge and then play along and share your creations, we would love to see them!

Below are easy ordering links to the products used on today's card:


Enjoy,

Diana
Pin It!

Wednesday, April 20, 2016

SSINKspiration Birthdays: Party Pop-Up Thinlits

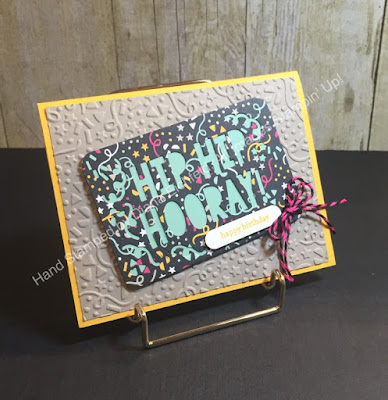
Good morning!  One of the things that I love celebrating all year long is birthdays and this years Occasions catalog has so many fun products perfect for birthday greetings.  Today over on the SSINKspiration blog it's all about birthdays and this is a fun birthday card we made at this months card class.

I started with Crushed Curry cardstock for the cardbase and then took a piece of Tip Top Taupe cardstock and embossed it with the Big Shot and Confetti Embossing Folder.  Have you seen the new Party Pop-Up Thinlits in the Occasions catalog?  I love them and not just to make 3-D cards but it makes a fun focal point for a card that's super easy.  I used a piece of It's My Party Designer Series Paper and ran it through the Big Shot with the Party Pop-Up Thinlit and then trimmed it down to remove the card connector pieces.  To help the words pop up I added a piece of Mint Macaron cardstock behind the DSP piece.

I added a small "Happy Birthday" greeting using the Teeny Tiny Wishes stamp set and punched it out with the Word Window Punch.  The final touch was to add a bow using the Melon Mambo Baker's Twine from the Baker's Twine Combo Pack (I used two pieces of twine for a double bow).

I love how easy the tools make this card but it really packs a punch, perfect to celebrate a special day!

Below are easy ordering links for the product's used on today's card:


Enjoy,

Diana
Pin It!

Tuesday, April 19, 2016

Retirement List is Here!!


The time has arrived!  The retirement list for this years Annual Catalog, and the Occasions Catalog has been released and is HERE!
 
I have to tell you this is HUGE!!!!  There are lots of items that we'll be saying goodbye to but I have to say, I've seen the new Catalog and you will LOVE IT!!!  There is are lots of fun, fresh items that I can't wait to get my hands on and know that you will feel the same way.
 
Now remember, items that are on the retirement list are only available, WHILE SUPPLIES LAST, so don't wait or you may miss out on getting those things you just have to have!!  Also, some of the retiring items are on sale for up to 50% so this is going to be even more fun, but may also mean things see out faster.
 
You can place your order online, 24/7 on my website, http://www.stampinup.net/esuite/home/deichfeld/ or contact me and I can help you place an order.
 
Happy shopping!!!
 
Diana
Pin It!

Thursday, April 14, 2016

SSINKspiration Blog Hop: Surprise Baby Shower!


Good morning!  Spring is here (even if there’s seems to be a little battle to get winter to officially leave, haha!)  and with spring comes thoughts of new things and arrivals.  On the Stylin’Stampin’ INKspiration blog that one of our team members Kim Ryden was expecting her third baby next month.  Of course we’ve all been very excited for this new arrival so we’ve decided to dedicate this months blog hop as a surprise virtual baby shower for Kim (all the projects shown in this months hop will be making their way to Kim’s nursery).  This is also perfect timing since little Mister Micah decided he was ready to join the family and arrived last weekend, whoo hoo!!

As you hop along, please be sure to comment and show some love on every blog! We are always excited to hear from our followers! You should have just left stop number #8 on the Stylin' Stampin' INKspiration Blog Hop - Donna at Geek Squad Crafting. If so, you are in the right spot. If a link doesn't work or you get off track, you will find the full blog hop lineup below.

I made two items for the new mom, a card and fun 3D item.  For the card I decided to combine a couple of different challenges for inspiration, specifically the Fab Friday color challenge and the Creativate  sketch challenge (I love when I can use different sketch and color challenges for inspiration to get the creative juices flowing.

For the card I started with Pool Party cardstock for the cardbase and then took a piece of Calypso Coral cardstock and embossed it with the Big Shot and Confetti Embossing Folder.  For the center strip I layered Whisper White and So Saffron cardstock and then wrapped some Basic Black Baker’s Twine around the layers before attaching to the cardfront.
These little ducks are so cute and are from the Something for Baby stamp set and I used So Saffron and Calypso Coral Stampin’ Write Markers to color the images before stamping.  I used Paper Snips to cut out each of the ducks and then cut out Pool Party and Calypso Coral circles using the Big Shot and the Circle Collection Framelits for the perfect mat.  There are tons of dimensionals attaching the circles and the ducks to the cardfront.  The final touch was the greeting and I used the Suite Sayings stamp set and stamped it in Basic Black ink on Whisper White cardstock and then punched it out using the Washi Label Punch, dimensionals were used to attach the greeting to the cardfront.
When Micah decided to arrive early I was still working on a gift idea and then I remembered how much I enjoyed receiving items that commemorated my son’s birth so that’s what I decided to make.  I found this great frame that has two openings so Kim can add her favorite picture to the bottom.  On the top I used a piece of retired designer series paper (Basic Gray) as a mat for a piece of Whisper White cardstock that I had printed Micah’s statics (I used a Star Wars font since I’ve heard the Ryden’s are Star Wars fans).  Then I stamped some more images from the Something for Baby stamp set, cut them out and attached them to the cardstock with dimensionals.  The final touch was to added some pieces of ribbon and bow for a colorful accent (most of the ribbon pieces are retired but I did use a piece of Whisper White 3/8” Stitched Satin Ribbon which is current).
I don’t make lots of baby items but I really had fun with this and hope that Kim enjoys them.  I love  how fun and easy it is to make personal and unique gifts for any occasion you may need.
Below are easy ordering links for the products used on today’s projects: 


Make sure to check out the rest of the blog hop for lots of other great ideas.  If you click the “Next” button, you’ll go to Bree’s site but you can also access any of the hopper’s site from the full blog list below. 
 
http://craft-somniamomma.blogspot.com/2016/04/hello-baby-micah.html


Blog Hop Participant List:

  1. Diana at Stampin Fun with Diana
  2. Bree at Craft-Somnia Momma
  3. Jenny at Jenny G Paper Crafts
  4. Kathy at Kathy's Stamping World
  5. Melissa at The Stamp Doc
  6. Jennifer at Happy 2 Scrap 4 Life
  7. Heidi at Stuck on Stampin'
  8. Donna at Geek Squad Crafting

Have a great day,

Diana
Pin It!

Monday, April 11, 2016

Stylin' Stampin' INKspiration Card Sketch SSINKCS32: Bravo

Happy Monday!  What a crazy weekend, I think we saw almost every type of weather on Saturday (except for warm weather) but it did change our plans and gave us some unexpected family time which is always fun, and I even had time in the studio which is always refreshing.  Since it's the second Monday of the month, you know it's time for this months card sketch challenge over on the Stylin' Stampin' INKspiration blog.  Bree gave us a really fun sketch this month to play with and I decided to use for a congratulations card (with SOL testing coming up soon I like to have some cards on hand to cheer Aidan on as he works so hard to get ready for complete these test, it can be a little stressful.

I started with Garden Green cardstock for the cardbase and then added a piece of Schoohouse Designer Series Paper (love that this looks like notebook paper).  On the DSP I stamped splatter using the Gorgeous Grunge stamp set and Garden Green and Daffodil Delight ink.

For the greeting I used the Bravo stamp set and stamped on Pool Party cardstock using Garden Green ink and then matted it with Tangerine Tango cardstock.  I added a piece of Pacific Point 3/8" Stitched Satin Ribbon to the side for a little flair.

For the final elements I decided to go with stars, you know I love them.  I used the Big Shot and Star Framelits dies to cut a star outline out of Gold Glimmer Paper and the Brights Designer Series Paper (used Pacific Point).  For the smallest star inside the gold star I used another piece of the Schoolhouse Designer Series Paper and the star punch from the Itty Bitty Accents Punch Pack.  I used dimensionals to attach the two smallest stars to the cardront.

I definitely seem to be in a brights frame of mood right now (maybe I'm compensating for the delayed spring) but I love the bright cheery colors and know my little man with enjoy the message and bit of bling (and not a trace of pink in sight which he really dislikes).  The other design team members have also made some great cards using this sketch layout so make sure to go check them out for inspiration and then come play along.

Below are easy ordering links for the products used on today' card:


Enjoy!

Diana
Pin It!

Thursday, April 7, 2016

SSINKspriation Occasions Catalog Bundles: Sunburst Sayings

Good morning!  As you know, one of the things I love about Stampin’ Up! is our coordinating products, stamps, punches, framelits/thinlits, papers, etc. when it is designed to work together it really helps take a lot of the guess work out of crafting for us and now Stampin’ Up! offers some of these coordinating products as bundles so we get to save 15% when we purchase the items that naturally go together (bonus!!)  Today over on the SSINKspiration  blog we’re sharing projects made with our favorite product bundle items from the Occasions Catalog.  There are so many great bundles to choose from but I decided to use the Sunburst Thinlit and coordinating stamp set (one, it’s a recent addition to my studio, and 2, the framelit is currently one of the weekly deal specials so if you didn’t want the stamp set you could purchase just the framelit and save some money this week!!)

I started with Crumb Cake cardstock for the cardbase and then added a piece of Soft Sky cardstock to mat the Typeset Specialty Designer Series Paper and wrapped a piece of Hello Honey 5/8” Striped Cotton Ribbon around the bottom with a knot.

For the main image I used the Big Shot and Sunburst Thinlits Dies and cut a piece of Hello Honey Cardstock.  I used the coordinating stamp set, Sunburst Sayings and stamped the dotted lines on the sunburst using Hello Honey ink. Next I took the Square Framelits collection and some Very Vanilla cardstock and used two framelits to create a frame (and rubbed around the frame with a sponge and Crumb Cake ink.  Next I took a piece of Soft Sky cardstock for the background of the sunburst and aligned it in my frame the way I wanted and trimmed off the excess.

For the center of the sunburst I stamped the greeting also from Sunburst Sayings, using Basic Black ink on Crumb Cake cardstock, punched it out with the 1 3/8” Circle Punch and sponged around the edge with Soft Sky ink.  I used the Circle Collection Framelits and Big Shot to cut a mat for the greeting out of Gold Glimmer Paper and attached both circle pieces to the sunburst with dimensionals (lots of them!!)

This card turned out so bright and cheery (but I’ll admit I stamped the dotted lines on the sunburst after I attached the frame, if I had remembered I would have done it before so it was easier.  Sometimes you just need to let people know that you’re thinking of them and care and this card is perfect for that!  the other design team members are sharing some great cards using their favorite Occasions bundles so make sure to go check them out!

Below are easy ordering links for the current products used on today’s card:


Have a great day!

Diana
Pin It!

Wednesday, April 6, 2016

Retro Sketchs Sketch Challenge: Giggle Greetings

Good morning!  It’s been a super stressful week with a major family issue we’ve been dealing with and I have to admit, I’ll be very happy once it’s resolved.  I was able to get a little time in the studio last night and found this fun sketch challenge over on the Retro Sketches blog so I decided to play along.  I was looking through my stamp collection and realized I haven’t been showing a lot of love to some of my stamp sets from the main catalog and since we’ll be starting to think about next years catalog soon I decided to show some love to some of these great stamp sets. 

I started with Pool Party cardstock for the cardbase and then took a piece of Basic Gray cardstock for the cardfront and embossed it with the Big Shot and Chevron Embossing Folder.  Next I decided to use the School House Designer Series Paper (love this paper!!) and cut a large oval using the Big Shot and Oval Collection Framelits and then layered three different strips of the coordinating DSP in different lengths and dimensions for a fun focal effect.

For the main stamped image I used the Giggle Greetings stamp set but just wanted the image and not the words so I inked the stamp up with my Basic Black Stampin’ Write Marker and stamped it on Whisper White cardstock and punched it out with a 2” Circle Punch.  I used blender pens and Stampin’ Write Markers to color in the cute little dog.   I added a piece of Pacific Point 3/8” Stitched Satin Ribbon and folded it over for a couple of flags under the greeting.  The greeting is from the Boys will be Boys stamp set (another one of my favorites!!) and it was stamped using Basic Gray ink on Tangelo Twist Ink.  The greeting and the circle stamped image were both attached to the cardfront with dimensions.

For the final element I wanted to add a button accent but there isn’t a yellow button in the Bights Button Package so I used the Crushed Curry button from the Regals Buttons Package and it coordinates perfectly and Basic Black Baker’s Twine was used to tie a bow in the button before attaching it to the cardfront.

The colors as so fun and cheery I love it and it using so many of my favorite stamps and products, it just makes me smile.  Now to figure out the perfect person to give this card to….

Below are easy ordering links for the products used on today's card:


Enjoy,

Diana
Pin It!

Monday, April 4, 2016

Stylin' Stampin' INKspiration Color Challenge SSINKCC32: Feel Goods

Good morning!  What a crazy weekend, that weather really impacted our weekend activities, from Boy Scout Trout-a-ree to the Cherry Blossom 10 Miler the weather and particularly the wind really was a force to be reckoned with.  It's time for another color challenge over on the SSINKspiration blog and I decided to focus on some products from the Annual catalog that may be overlooked at times.
I started with Marina Mist cardstock for the cardbase and then layered a piece of Pear Pizzaz cardstock behind a Whisper White cardfront.  On the cardfront I started by stamping the swirl design from the Chalk Lines stamp set in Pear Pizzaz ink and then took the Clear Wink of Stella glitter pen to outline the swirls for a little sparkle (see the close up picture).  Next I took the splatter stamp from the Gorgeous Grunge stamp set and stamped in both Marina Mist and Pear Pizzaz ink.  I used some Fast Fuse adhesive to attach a strip of Marina Mist 1/4" Cotton Ribbon across the center of the cardfront.
For the greeting I stamped this saying (one of my favorites!!) from the Feel Goods stamp set and stamped on Whisper White cardstock and punched it out with the 2 1/2" circle punch before sponging around the edge with Pear Pizzaz cardstock.  For the mat for the circle I started by cutting a piece of Crushed Curry cardstock using the Big Shot and Deco Labels Framelits and then embossed it with the Brickwall Embossing folder (and then sponged all over with Sahara Sand ink).  I used dimensionals to attach the greeting piece to the cardfront.  To finish things off I took strip of pearls and colored them with a marker (use a sharpie or Blendabilities marker) before attaching them to the card.
 
I had lots of fun with this card and was really feeling this message this weekend, which we all need.   Make sure to check out the other cards the design team is sharing for inspiration and then play along with use, would to see what you come up with. 
 
 
Below are easy ordering links for the products used on today's card:


Enjoy!

Diana
Pin It!

Search This Blog