Wednesday, March 20, 2013

Feeling Sentimental, Only Two More Days of Sale-a-Bration, Don't Miss Out!

Today I want to share with you another project I made with lots of different Sale-a-bration items since there are only two more days in this promotion and I want to make sure you don't miss out, you'll definitely want to add these items to your crafting toolbox.  This card uses my favorite SAB stamp set, Feeling Sentimental, the images are so soft and charming.  I also used the Sycamore Street DSP and coordinating Sycamore Street Ribbon and Button pack.  The colors in these images are so fabulous, works equally well with masculine and feminine projects, AWESOME!  I used the Ovals Collection Framelits to cut out and mat the images and Island Indigo Baker's Twine to tie a bow in the button. 
 
Since I used the Ferris wheel image I immediately thought about circus tickets that you use to purchase rides and used one of the images from the That's the Ticket stamp set (stamped it on Tangerine Tango so it looked like an actual ticket) and then punched it out with the Ticket Duo punch.  A small metallic brad made attaching the ticket a snap.
 
This card just makes me smile and I know that the person who receives it will enjoy it just as much.  Make sure to let me know if you need to place an order so we can make sure to get it place before Sale-a-bration ends!
 
Enjoy,
 
Diana

Pin It!

Tuesday, March 19, 2013

Sneak Peak Stamp Set and Discounted Punch Bundle, So Fun!

How fun is this??
 
Stampin' Up! has just released a BRAND NEW Stamp Set available as a PRE ORDER item until May 30! 
 
This is a stamp set that is going to be in next years annual catalog, but you can order it now to begin using, and get a discount by purchasing the bundle.
 
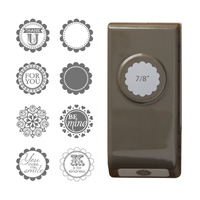
Round Array Stamp Set
 
 
Each stamp fits in the 7/8" Scallop Circle Punch (available in the Spring Catalog)
 
PRE ORDER YOURS today!
 
Bundle $23.95 (clear set & punch) #133899
Clear set only $14.95 #129090
 
You will find the wood mount set available in the NEW catalog in June.
 
Also, if you place your order by this FRIDAY, you'll be able to take advantage of FREE Sale-a-bration items as well with a qualifying order, double fun!

Pin It!

Monday, March 18, 2013

Paper Player's Challenge: Farewell to SAB and Collage Curios

Good morning and welcome to a start to another week!  So since the weather forecasters are predicting a snowy, rainy day today I thought I would use some bright cheery colors for this weeks Paper Players Challenge creation.  This is also the last week of our annual Sale-a-bration promotion (ends on Friday) so I thought I would highlight several different items that you only have until Friday to earn for FREE.  The cardbase for this card is Pool Party and then I added a layer of Rich Razzleberry and then used the Sycamore Street DSP (this is definitely one of my favorites, you'll want to make sure you get some for your craft projects!  I also added some of the coordinating Sycamore Street Ribbon and button for a lovely accent. 
 
For the three circles I used the College Curios stamp set and stamped the script image in Sahara Sand ink and then used Rich Razzleberry, Tangerine Tango, and Island Indigo ink for the different center images.  Each of the circle were punched with the 1" circle punch and then matted with 1 1/4" scallop circle punchDimensionals make it really easy to attach each of the circles to the card so they "pop."  The final touch is to add the greeting from the Feeling Sentimental stamp set (another free SAB item) using Summer Starfruit ink.

I love how bright and cheery this card turned out, perfect to help brighten the day.  Check out the sketch layout provided, this is such a fun and easy layout that you could use for lots of different shapes, colors, and occasions.  You'll definitely want to save this layout for great idea when you're looking for new inspiration.  Make sure to take the time to see all the other great creations that have been made with the same inspiration.
Take care and happy stamping,
 
Diana

Pin It!

Sunday, March 17, 2013

ColourQ Challenge: Happy St. Patrick's Day

Good evening friends!  Why does it always seem like weekends go by faster than the week days, I feel like we need an extra day in the weekend just to get everything done and recharge.  I hope you had any enjoyable St. Patrick's Day today, our was pretty laid back after Aidan's baseball tryouts this morning.  So I've found a new challenge, which is a color challenge, ColourQ, which I've been wanting to play with so this was the perfect opportunity.  When I saw this weeks color challenge I knew it would be perfect for Aidan's St. Patrick's Day card.  I had fun making this shamrock with the Large Heart Punch (for the Garden Green designer series paper) and the Fashionable Hearts embosslit with the Lucky Limeade cardstock.  The stem is from the Secret Garden stamp set and I used a Vintage brad for the center.

For the greeting I used the very versatile Teeny Tiny Wishes Stamp set and punched it out with the Modern Label punch.  I sponged around the edge with Lucky Limeade ink.  Now check out those black rhinestones, aren't they awesome???  Now Diana, how did you get black rhinestones?  So glad you asked, I simply colored our rhinestones with a black sharpie marker (how cool is that????)  The last items are a piece of Basic Black cardstock that I embossed with the Delicate Designs embossing folder and used Paper Snips to trim around the edge of the scallops and then added a piece of Basic Gray 1/4" Stitched Grosgrain Ribbon for the final touch.


Now here's the color sketch we were provided.  Perfect for St. Patrick's Day but you could create so many different options as well.  I had so much fun with this challenge and Aidan loved his card, it makes me feel so great that Aidan loves getting handmade gifts and cards and enjoys reading each own (so sweet!)  Have some fun and play along, I would love to see what you come up with!
Have a great week!
 
Diana

Pin It!

Thursday, March 14, 2013

Paper Players Sketch Challenge: Oh, Hello

Good evening and another Friday is upon us!  While it's been a crazy week I was able to sneak down into the studio for a little bit to make card for this weeks Paper Player's Sketch Challenge tonight.  This weeks challenge was a color challenge and these are fun ask they really help get you out of your comfort zone.  All week I've been thinking about the card I was going to create however I have to admit the final product looks nothing like what was in my head.  The cardbase is Crumb Cake and I embossed it with the Big Shot and Hexagon embossing folder.  Next I added a half of a circle paper doily, Lucky Limeade Designer Series Paper and strip of cardstock that I stamped the chevron image from the Oh, Hello stamp set, first in Early Espresso for the outline and then the patterned stamp in Regal Rose (definitely need the stamp-a-majig for this). 

For the main focal image I stamped the chevron oval, from the same stamp set, in Pool Party the greeting in Early Espresso and then cut the whole thing out with the Oval Collection framelits and the Big Shot.  I added lots of embellishments, first with a bow made from Lucky Limeade ruffled ribbon and the Pool Party printed designer brad.  The final touch is one of the flowers from the floral trim the I died with a sponge dauber and Regal Rose ink.  This is a close up of the main image.
 
Now check out the challenge we were provided.  I have to admit while this card didn't end up how I initially envisioned I really like how it turned out.  It's got just the right amount of softness which is offset with the graphical elements, so fun.  Feel free to use this color challenge and see what fun things you can come up with.
Have a great weekend!
 
Diana

Pin It!

Beautiful Madison Avenue Birthday Greetings

Good morning friends!  I have a quick card share for you this morning that your sure to love.  This is a simple "mailable" card, which means it's really flat so it will have no problems going through the mail system.  The cardbase is Island Indigo and then I added a piece of Whisper White cardstock.  The greeting is the Beautiful Birthday single stamp and is stamped in Rich Razzleberry ink and accented with a small rhinestone
 
Next I took the graphic image from the Madison Avenue stamp set (can't believe we only have 8 more days of Sale-a-bration where you can earn this stamp set, and 18 other items for FREE!)  I cascaded the stamp down the page with different colors for a rainbow effect.  You definately need to use the Stamp-a-majig for this card, even with the clear stamps.  I must admit this is a tool that many are intimidated by but once you use it you'll love it, especially if you are particular about straigh placement of your stamping.  If you haven't tried this out, let me know, I would love to show you how easy it is.
 
This card is so simple but I love the richness of the colors. 
 
Have a great day!
 
Diana

Pin It!

Tuesday, March 12, 2013

Feel Goods Chalkboard Technique

Good morning!  We had such a crazy, on the go weekend this past weekend I didn't actually have a lot of creating time in the studio, definitely need to rectify that this weekend.  Today I wanted to share a fun card we made at last month's Just Cards class.  This features the Feel Goods stamp set and the chalkboard technique that is all the rage right now, it was so fun.  We were also able to incorporate the fun new chevron pattern from the Parker's Patterns designer series paper (I'm enjoying this paper package since it helps to make cards more masculine than some of our other papers).  The final touch was to add a Rich Razzleberry button, these buttons are so fun since there is a different pattern on each size so you have double the options (FREE during Sale-a-bration) with a bow tied with Whisper White Baker's Twine.
 
This card is such a nice mixture of texture and patterns I love it, plus it really let's the greeting stand front and center and this Feel Goods stamp set has such perfect sayings, LOVE IT!!!!
 
Just a reminder that my Spring BOGO sale and crafting blitz is this Saturday, from 2-5 and this is your opportunity to make a fun project, have yummy treats, while shopping from the catalog for all the must haves on your wish list, plus you get to take advantage of the Sale-a-Bration rewards and pick out some awesome finds from my retired stash, including stamps, DSP, Big Shot Dies, Ribbon, etc.  This is a great opportunity to stock your crafting tool box.  I hope you can make it!
 
Happy Stamping!
 
Diana

Pin It!

Saturday, March 9, 2013

Loving Greetings, Patterned Occasions Style

I have to admit, I'm loving this year's Sale-a-bration offerings and can't stop using them!  Today I decided to use the Patterned Occasions stamp set and thought this little tea cup with steam heart was just too cute.  After coloring in the stamp with Stampin' Write markers directly on the stamp I punched out the image with a 1 3/4" circle punch and then matted it on Island Indigo cardstock that I cut out with the Big Shot and the Window Collection framelits (I even added a little paper piercing around the edge of the frame).
 
The designer series paper is from the Sycamore Street DSP package and I used the Adorning Edgelits and Big Shot to cut the edge on the DSP.  Before attaching the paper to the white piece of cardstock I ran it through the Big Shot with the Adorning Accents Embossing folders (these little hearts are so cute!)  The final touch was to add a small piece of Summer Starfruit Stiched Satin Ribbon as an accent.
 
I love the clean simple lines of the card, and once again so easy to change out the colors and stamped image to create a completely different look.   Just a reminder there are just a few short weeks left to take advantage of Sale-a-Bration 2013, you won't want to miss out on this opportunity to earn all these awesome tools for FREE!
 
Enjoy,
 
Diana

Pin It!

Thursday, March 7, 2013

Spring Stylin' Stampin' Blog Hop, Ears to You


Good morning and welcome to the March Stylin' Stampin' Blog Hop. This month it's all about Spring and I'm so excited because spring brings warm weather, flowers, and everyone emerges from hibernation in their houses and we get to spend time outside, love it! I'm especially excited for spring since we've been getting a lot of snow this week, my son loves it but I'm ready to be done with winter.  If you just joined me from Bree's page didn't she make a fabulous project? If you're just starting here, don't worry you can follow the hop all the way around so you don't miss out on any of the spring fabness. 

For my projects this month I decided to focus on the Ears to You single stamp.  I love the single stamps, they're inexpensive and easy to get one for a holiday to use without a major commitment. This card has a Marina Mist cardbase and then added a piece of Pacific Point cardstock and Whisper White cardstock that was embossed with the Cloudy Day embossing folder and Big Shot.  Next I added a piece of Sunshine & Sprinkles designer series paper along the edge with a piece of Melon Mambo 3/8" Striped Organdy ribbon.  The greeting is from the Delightful Dozen stamp set and is punched out with the Modern Label Punch

For the main focal image I inked up the bunnies in the Ears to You stamp with Stampin' Write Markers and then cut them out with paper snips (little rhinestones make the perfect little eyes).  I used a piece of So Saffron cardstock and cut out a large oval with the Oval Collection Framelits and Big Shot and then used the Perfect Polka Dot embossing folder to add some texture.  Then I used the sponge and Daffodil Delight ink so the polka dots really "pop."  Each of the bunnies were attached to the oval with dimensionals so they look like they're sitting inside an easter egg.  I decided to create a strip of grass by taking a piece of Old Olive cardstock and punched the edge with the scallop edge border punch (ran it through the punch twice and offset it to create the choppy grass).  Then I embossed the cardstock with the Lattice embossing folder and sponged with Old Olive ink to add dimension.

This card is so cute and fun.  I had so much fun with the bunnies I decided to make a box that coordinates with the card for my second project.

This box uses the Fancy Favor XL die (awesome!) to cut the basic box out of Marina Mist cardstock.  Then I added a piece of Pacific Point cardstock and Sunshine & Sprinkles designer series paper to create the background.  I used the same technique for the bunnies from the Ears to You stamp and grassy strip along the bottom.  The greeting for the box is from the Teeny Tiny Wishes stamp set and was punched out with the Modern Label Punch and trimmed so it was straight along the left edge.  The final touch, a bow made with Basic Gray 1/4" Stiched Grosgrain Ribbon

This box is so cute, and not too girly so I'm sure Aidan will love it. Thanks for joining me and I hope you've enjoyed this month's projects.  Make sure to click on the link below to continue on the hop and you'll get to see Shellie's projects, enjoy!


Blog Hop Participants:
  1. Shellie G. of Craft Smashup
  2. Annie L. of Love Me Cards
  3. Nancy B. of Lady Stamps-A-Lot
  4. Rose C. of Stamp with Rose
  5. Tonya B. of Stampin' with Tonya
  6. Dawn S. of Dawn's Creative Chalet
  7. Darcy J. of DJ's Stampin' Place
  8. Pamela W. of Stinky Tofu
  9. Kim R. of Stamping with Kim
  10. Heidi B of Stuck on Stampin'
  11. Jennifer B of NW Stamper
  12. Bree of Craft-somnia
  13. Diana E of Stampin' Fun with Diana
Pin It!

Wednesday, March 6, 2013

March Just Cards Class Samples

Boy time is flying this week!  I wanted to drop in to share the projects we'll be making at this months Just Cards Class.  Join me this Sunday, March 10 at 2:00 PM where we'll be making 5 all occasions cards, as well as the usual Christmas Card add on option.  There's still time to RSVP so make sure to register to save your seat where we'll be learning some fun new techniques.


Hope to see you there and happy stamping!

Diana
Pin It!

Tuesday, March 5, 2013

Just 5 days left to be one of the First to receive Paper Pumpkin Papercrafting Kits by mail this month!


Do you want an awesome card kit that includes stamps, ink spot, clear block, precut cardstock, prescored cardstock, embellishements, self adhesive die cuts, envelopes, full color instructions that is delivered to your home?


To receive a kit this month (MARCH) you need to be signed up by March 10th

TO SIGN UP

1. CLICK HERE – My Paper Pumpkin

2. Click on Subscribe

3. Scroll down and enter the quantity of kits you want

4. Click Continue

5. Enter your name, address, phone

6. Click Continue

7. Enter your billing information (you will not be charged until kit is shipped).

8. Click Continue

9. Select ME DIANA EICHFELD– Bristow, VA as your demonstrator

10. Click enter

Here are some more details on the program:

I come in a sweet box, but you'll really love what you find on the inside:

* All the stamps, ink, paper, and accessories to create pinable projects. Create stuff like cards, journals, décor, and more!

•Each month we send you a unique, surprise kit with a project-cards, journals, décor, and more! (We've even color-coordinated, measured, and cut everything for you!)

•Each kit includes stamps, ink, paper, and accessories-everything but adhesive.

•Each kit gives you a 30-minute creativity escape.

•We will ship your Paper Pumpkin on or around the 15th of the month.

•You need to sign up for a kit by the 10th of the month to get that month's kit. If you sign up on the 11th of the month, your first kit will come the next month. (Let's say you sign up on May 10th, we'll send your kit around May 15th. If you sign up on May 11th, we'll send your first kit around June 15th.)

•A Paper Pumpkin membership is $19.95 per month (and shipping is included!)

•There's no commitment, you can cancel your monthly Paper Pumpkin at anytime. You can also skip a month if you want.

A Free Gift in Your Very First Kit
The Welcome Kit is the very first Paper Pumpkin you will receive in your first month of membership. The Welcome Kit includes a free gift-a clear acrylic block!

This is a great program to help provide you a creative project each month, with little work on your part. Get a group of friends together for a monthly Girls Night where you call create your Paper Pumpkin projects together and have fun!

Make sure to contact me if you have any questions!
Pin It!

Sunday, March 3, 2013

Feels Good Fab Friday Challenge

Hi friends!  I'm back after another fun filled weekend to share my card for this weeks Fab Friday Sketch Challenge.  I've been having lots of fun with the fabulous products from the Spring catalog but wanted to take a more masculine turn and the Parker's Patterns Designer Series Paper provides the perfect color palette.  The cardbase is Cajun Craze and then I added a piece of Early Espresso cardstock and Crumb Cake (embossed with the Big Shot and Woodgrain embossing folder).  The blue accent pieces are Marina Mist and were punched with the Decorative Label Punch (one on each side).  Next I added a strip of the designer series paper and the Natural 7/16" Trim Ribbon as flags. 
 
For the greeting I used the Feels Good stamp set and stamped on the Canvas Creations fabric with Early Espresso Ink.  This canvas is really soft and fun to stamp on and provides a more distressed look.  I also sponged around the edge with Crumb Cake and Cajun Craze ink, just like regular cardstock.  I even matted the canvas on Daffodil Delight cardstock (also sponged with Crumb Cake).  The final touch was to add a Naturals Button to the top corner with a bow tied with Early Espresso Baker's Twine for a soft finish.


I love how this card turned out with so many different textures and colors, you find something new to draw your attention each time you look at it.  Now check out the sketch we were working with, so fun and open to so many possibilities with shapes, etc. you've got to try it out for yourself.
 
I would love for you to leave a comment and let me know what you think and share your cards.
 
Enjoy,
 
Diana

Pin It!

Friday, March 1, 2013

Photopolymer Stamp Sets, New Options for Stamps


We've searched long and hard for just the right material to be able to introduce completely clear stamping. And we've found it. We're excited to announce that we now have wood-mount, clear-mount AND photopolymer stamps! The new photopolymer will be an addition to our stamp line and will appeal to all types of stampers. Our top-quality photopolymer has just enough give to create a perfectly stamped image every time and with the introduction of our firm-foam pads, let's just say they're meant for each other! Photopolymer stamps will also be unique, fun designs that will inspire you and provide more versatile options you may not see in our traditional wood- and clear-mount stamp options.


What makes them so great?

•They're entirely transparent for perfect placement every time!

•They are durable. The photopolymer material is designed to last.

•Can you say sticky? (Don't worry; in a good way.) These stamps stick amazingly well to our clear blocks.

•They're age tested. They won't yellow or cloud up over time.

•They use FDA, food-safe material. How far can you stretch your stamping creativity?

•We could go on, but we'll let you try them for yourself.

They are clearly a great choice.


Item Description Price

132956 Designer Typeset Photopolymer Stamp Set $13.95

Recommend clear blocks A, B, G, F, and I. Purchase separately.

Includes 57 pieces. (Don't faint! This is a good overwhelming feeling.)


The Fine Print

•Photopolymer stamps will be offered on a trial basis. Based on popularity, we hope to release more photopolymer stamp sets over the coming months. At this time we don't plan on offering a line of photopolymer sets as expansive as our wood-mount and clear-mount lines.

•Available on all order types beginning March 1, 2013.

•Not available in wood-mount or clear-mount.

•All photopolymer will be packaged in cello bag w/insert, but don't forget you can store them in our clear cases.

These are going to be a great new option to try out!
Pin It!

Vintage Verses Meets Tea for Two

Happy Friday and welcome March!  Today is excited not only since the weekend will be starting shortly but it's the official start of my birthday month which always makes me happy, I love to celebrate birthdays and believe you should celebrate them all month long!  Today I'm sharing another card that uses one of the Sale-a-bration stamp sets, this time Vintage Verses.  After coloring it in with Stampin' Write markers I cut out the image with the Labels Collection Framelits and Big Shot.  I used the layered framelit and cut it out with So Saffron cardstock.  Both of these layers were sponged with Crumb Cake ink.
 
The cardbase is Crumb Cake and I added a piece of Tea for Two Designer Series paper (this paper is so fun with all the fabulous patterns inside patterns on the paper, it makes for lots of fun.  I had to add several flags to this card and used First Edition Speciality DSP, Bashful Blue cardstock, Victorian Lace Trim Ribbon, and Calypso Coral Ruffled Ribbon to get the layered effect.  It's hard to tell from the card but the final touch was to add a couple of small pearls to the label for a little "pop".
 
Love the antique look and feel to this card, so lovely.
 
Hope you have a great weekend, we have a busy weekend with Aidan's Tae Kwon Do tournament so we'll be on the go.  Enjoy and spend some time being creative!
 
Diana


Pin It!

Thursday, February 28, 2013

Paper Player's Challenge: Patterned Occasions Birthday Greetings

Good evening friends!  We've had a crazy week but the end of the week is definitely looking to end on the positive which is so great.  So I've decided to start participating in some more sketch challenges which are so much fun and today I wanted to share the card I made for the Paper Player's Challenge.  This was a sketch challenge and I love to see all the great ideas people can come up with based on the same basic design.  For this card I started with an Old Olive cardbase that I ran through the Big Shot with the Hexagon embossing folder (you know this is one of my new fav's).  Next I added a strip of designer series paper from the Sunshine & Sprinkles DSP.  The next flag is a strip of Pacific Point cardstock that's embossed with the new Cloudy Day embossing folder, and then a piece of Melon Mambo 3/8" Striped Organdy Ribbon.

The stamped image is from the Patterned Occasions stamp set, which is so versatile (I love that you can get it for FREE during Sale-a-bration!)  I used Stampin' Write Markers to color directly on the rubber and then stamped.  I used the 1 3/4" circle punch to punch the image out and then layered it with the 2 3/8" scallop circle punch in Daffodil Delight and used a White Gel Pen to add dots to each of the scallops.  Dimensionals are so perfect to attach the stamped element to the card so it pops.
No check out the sketch provided.  You'll definitely want to save this sketch idea, you can use it for any stamps, colors, and occasions to create a card unique to you.  Thanks for stopping by and I hope you enjoyed tonight's share.
Pin It!

Monday, February 25, 2013

Petite Pairs Birthday Greetings

Good morning!  I was able to spend some quality stamping time this weekend and noticed after I finished all the cards that I was using a ton of Sale-a-Bration reward items (I love that during this awesome sale you earn a FREE, exclusive item for every $50 I spend, I definitely stock up during this sale to take full advantage).  This card actually uses four of the 19 items and was a breeze to pull together.  I started with a Pool Party cardbase and added a piece of designer series paper from the Sycamore Street DSP pack.  I also added a flag from other print from the same DSP package as well as the First Edition Speciality DSP.  Next I added a Tangerine Tango button (from the Sycamore Street Ribbon and Button package, also FREE) and tied a bow with Island Indigo Baker's twine.  The stamped image is from the Petite Pairs stamp set and coordinates perfectly with the Petite Curly Label punch (both SAB items).
 
I must admit this is the first time I've used this stamp set and coordinating punch, they're so cute and have so many greeting options so you have lots of potential.  I'm also excited that the punch will be available after Sale-a-Bration (for purchase) so I don't have to say goodbye to it after a few months.  Make sure you add these items to your crafting tool box now during this awesome sale!
 
Enjoy,
 
Diana

Pin It!

Friday, February 22, 2013

Perfectly Penned Birthday Thank You's


I'm so glad it's Friday, looking forward to a great weekend.  As promised, I'm back to share the thank you cards I made for Aidan's birthday.  I love how easy it is to make perfectly coordinating items with the same stamp sets, designer series paper, etc.  This card uses the Your Amazing and Perfectly Penned stamp sets, along with the Basic Label single stamp.  I used the same Apothecary Accents framelits as the previous projects, just another shape.  I also decided to add the ticket border with the Take a Ticket wheel
 
To make the card nice and mailable I added two small circles punched out with the Itty Bitty Punches pack.  I once again used the World Spectacular designer series paper and just used several different patterns to change things up. Here's another one of the cards, just changed up the DSP.
These cards are perfect for the birthday boy to send out and I was able to pull them together nice and quick, LOVE IT!!  The other great thing is that you could use the same tools and layout and change this up with just different color paper, ink, and designer series paper.
 
Have a great weekend!
 
Diana

Pin It!

Wednesday, February 20, 2013

Your Amazing Party Favors

Happy Wednesday!  We had a great weekend celebrating Aidan's birthday this past weekend so I thought I would share some of the items I made for the party.  Today I'm sharing the bag I made for party favors.  Aidan picked out the perfect Lego set to give each of his friends but I wanted a cool and easy way to wrap them.  I figured out that they perfectly fit into a standard brown paper lunch sack.  Of course I had to dress it up.  I decided to use the World Spectacular designer series paper and Your Amazing stamp set so it would coordinate perfectly with Aidan's birthday card.  I used the frame from the Your Amazing stamp set and stamped it in Island Indigo ink and then stamped the words from the Perfectly Penned stamp set in the center.  I love how these images fit perfectly into the framelits, this time the Apothecary Accents.  The matching paper piercing template is so fun and I was able to piece both around the tag and on the inside border of the tag. 
 
I add three little flags with the designer series paper and then a bow made with the Daffodil Delight 1/4" Stitched Grosgrain Ribbon.  These bags are perfect for having little details without being over the top.
Enjoy and check back later in the week for another coordinating project.
 
Happy Stamping,
 
Diana

Pin It!

Sunday, February 17, 2013

Secret Garden Feel Goods Fab Friday Sketch Challenge

Good evening!  Another weekend has come to and end.  We had a great time celebrating Aidan's birthday but I know he's definitely happy to have an extra day off from school to recover, who knew a sleepover with friends could take so much out of you.  This evening I wanted to share the card I made for this weeks Fab Friday Sketch Challenge.  This challenge was lots of fun since it's a color challenge and given the colors I definitely wanted to make something cheery and Springy.  The card is so fun and uses lots of fabulous new products from the Spring catalog, including the Feel Goods stamp set, Secret Garden Stamp set and matching framelits (love that you can get the bundle for a 15% discount), as well as the Hexagon embossing folder (a must have item from the Spring catalog, the geometric patterns are a great contrast for the floral images).

After cutting out all the flower images I curled the edges with a bone folder and added Dazzling Details to the center of each flower so it has a little sparkle.  This card is so lovely and I love the messages in this stamp set, so uplifting.  We make a lot of cards but sometimes we get so busy that we only send them at major holidays and events and I'm working this year to send more handmade cards, just because since it's so awesome to receive a handmade and handwritten card and these messages are perfect for such occasions.  I hope you enjoy this weeks card, and feel free to play along and share your card as well.

Have a great week!

Diana
Pin It!

Friday, February 15, 2013

Blue Ribbon, Your Amazing Birthday Greetings for My Little Man!

Happy Friday!  Today is a very exciting day in the Eichfeld house, its Aidan’s birthday.  Aidan’s so excited for his birthday (just like mommy) and he’s been getting ready for it all week, in fact yesterday was not only Valentine’s Day but “Aidan’s Birthday Eve,” too funny!  So I’ve had an idea in mind for what I wanted to do for Aidan’s birthday card ever since I saw the Blue Ribbon and Your Amazing stamp set that were released last summer.  I used MDS2 and the World Explorer Digital kit to make Aidan’s birthday party invitation so it only made sense that his birthday card would coordinate. For this card I made all the little elements first before determining the card size, which was a good thing since I ended up needing a 6x6 card to fit everything.  The cardbase is Daffodil Delight and then I added a piece World Spectacular Designer Series paper that was matted with Early Espresso.  I added a coordinating strip of DSP, also matted with Early Espresso that I punched with the Scalloped Trim border punch.  The greeting is from the Your Amazing stamp set and I inked the words in with Stampin’ Write Markers, and the border is one of the new single stamp sets, Basic Label (definitely one of my favorites and I love that it coordinates with the Apothecary Framelits).  I added a couple of Turquoise brads from the Brights Brads as accents. 

The medallion piece has lots of layers, including the Blue Ribbon “ribbon” stamp, Calypso Coral Ruffled Ribbon, Daffodil Delight tails and a lolly made with the same package of DSP and the Simply Scored board (love this!!!).  I changed the original card since I realized it said Happy Birthday twice so changed out the center of the ribbon and added a stamped circle and then a glitter “8” cut with the Typeset Alphabet Bigz Die since Aidan is turning 8 today.  The final touch was the small elephant from the Your Amazing stamp set, I stamped him in Island Indigo ink, cut him out with Paper Snips and colored him in with markers.  An Island Indigo Dalia made a perfect accent for the top of the party hat.  I even stamped a couple balloons from the same stamp set on the inside of the card.

Due to the size of this card I had to make a matching envelope with the World Spectacular DSP, Simply Scored board, and Diagonal Scoring Plate (you can get this FREE during Sale-a-bration so don’t miss out adding it to your tool box). 

I have to admit this card was a labor of love, I don’t know if I’ve ever spent this much time on one card, it must have been about 1 ½ hours to make all the little elements.  I really love how this card turned out and can’t wait to see how Aidan likes it.  We’re off to a busy weekend celebrating, we have our family celebration tonight and then Aidan is having some friends over for laser tag and a sleepover this week, lots of fun!
Have a great weekend!

Diana
Pin It!

Search This Blog