Showing posts with label Fun Fold Challenge. Show all posts

Wednesday, November 22, 2023

30 Day Gratitude Challenge: Day 22 (Paper Craft Crew Fun Folds Challenge #545)

Good morning!  

I'm sure everyone is busy with last minute Thanksgiving prep or traveling, I know we are.  Before getting started I wanted to share today's gratitude card, which I used this weeks Paper Craft Crew Fun Folds Challenge for inspiration.

I cut the cardfront in half so the inside peaks through and then the cardfront covers both sides.

The cardbase is Berry Burst and I added a piece of Basic White cardstock on the inside.  On the front panel I added a piece of Berry Burst DSP from the Gorgeous Gingham Designer Series Paper and matted it with Basic Black cardstock.


The stamped image is from the Everyday Thanks and I stamped three of the bandages and the greeting before coloring them in with Stampin' Blends.  This piece was matted with Basic Black and I matted it to the cardfront being careful to only put adhesive on the one side so the card will open.

This card is bright and cheery and perfect to say thanks.  We would for you to play along with this weeks challenge and share what you create.


Below are easy ordering links for the products used on today's project:

Product List


Enjoy,

Diana

Pin It!

Monday, August 20, 2018

SSI Fancy Fold Challenge (Gate Fold): Bokeh Dots

 Good morning!  We’ve arrived safely and we’re having a wonderful time at Disney.  Today the SSINKspiration team has a fun fold challenge and we’re using the gate fold.  I like this fold as it’s really easy but dresses up your card.  I’m actually using this fold for our family Christmas card so I’ve been using it quite a bit recently.  I’m also showcasing the Bohek Dots stamp set so I’m using that set as well.

I started with Mint Macaron cardstock for the carbase then added two pieces of Share What You Love Designer Series Paper on the “front panels”.  Next I took a piece of Whiper White cardstock and used the Bokeh Dots stamp set and stamped in Grapefruit Grove (stamped off once) for the background on Whisper White cardstock and then used the Love What You Do  stamp set to stamped the flower image in Basic Black ink and the greeting in Blackberry Bliss.  I matted this with Basic Black cardstock and then attached the piece to the right panel so it overlaps the “front panels.”

To finish off the card I wrapped a piece of Berry Burst 3/8” Ruffled Ribbon around the card and tied a knot to keep the card closed.

I love how all the different colors work together from this DSP, I wouldn’t normally think to have all them together, but they work.  And the Bokeh Dots stamp plays off the dots in the DSP.  Make sure to check out the other cards the design team is sharing using this challenge and then play along with us and share what you create!

Pin It!

Monday, June 18, 2018

SSINKspiration Fun Folds Challenge SSINKFF5: Easel Card

Good morning! We're back at the start of a new week which means the SSINKspiration blog has a new challenge, and this time its a Fun Folds challenge and we're making Easel Cards.  These cards really pack some WOW but are actually really easy to make.  I decided to make a modified easel and have a partial easel on top of my cardfront so the card does also open the traditional way, but the steps are pretty much the same.

I started with Mossy Meadow cardstock for the cardbase and then added a pieces of DSP from the Share What You Love Speciality Designer Series Paper (make sure not to glue it down yet).  Next I cut my easel piece out of Mossy Meadow and after scoring it I glued the one piece down between the cardbase and cardfront.  Next it was just like a regular easel card.  I used Basic Black as my mat and for the stamped piece I used Whisper White cardstock and the Love What You Do stamp set.  The watercolor image was stamped in Mint Macaron (stamped off once) and then the flower in Basic Black. 

Before attaching these stamped pieces to the easel I took a piece of Whisper White 1/8" Sheer Ribbon that I had colored with a Mossy Meadow Stampin' Write Marker and wrapped it around the back and then tied a bow.

To help my easel stay up I used the Big Shot and the small flower die from the Springtime Impressions Thinlits and cut it out of Basic Black cardstock.  Now since I can't use a dimensional on an open flower like this I just cut three of these flower pieces and then glued them together so they were taller and then added a silver metallic pearl, from the Metallic Pearls, to the center.

The final touch was to add the greeting which is stamped in Mossy Meadow ink on Whisper White cardstock and then I used the Big Shot and Stitched Shapes Framelits to cut it out into a rectangle shape (just run it through the Big Shot twice and move the die to adjust from a square to rectangle shape.

This is such a fun technique and is a great way to show off a fun stamped image, but also a picture, I've used this fold for Christmas cards in the past and wouldn't it also make a great graduation, baby, or wedding announcement?  Make sure to check out the other cards the design team is sharing and then we would love for you to play along with us and share what you create using this fold technique.

Below are easy ordering links for the products used on today's card:

Product List

Enjoy!

Diana
Pin It!

Monday, April 16, 2018

SSINKspiration Fun Folds Challenge SSINKFF4: Gate Fold

Good morning!  We had a peak of beautiful spring weather this weekend but now take a step back with this rainy cool day, so I decided to use our springtime fun this weekend as inspiration for today's card.  Today the SSINKspiration team has a fun fold challenge, and this month we're using the gate fold.  This is a great technique because you really just adjust where you score your cardbase for a fun twist.

I started with Peekaboo Peach cardstock for the cardbase and used Tutti-Fruitti Designer Series Paper (retiring) for the two front panels, I love this citrus pattern and color pallet.  I used a piece of Lemon Lime Twist 3/8" Mini Striped Ribbon (retiring) to wrap around the card and tie a bow and this will help hold the card closed.

The greeting is from the Layering Love stamp set (retiring) and I love this saying so I just used my Stampin' Write Markers (Pumpkin Pie, Lemon Lime Twist, Peekaboo Peach, and Daffodil Delight) on Whisper White cardstock and then matted it with Flirty Flamingo cardstock.  I used dimensionals just on the left side of the greeting to attach it to the card so the card will open.  Of course I needed a little extra pop so I added some of the Tutti-Fruitti Adhesive-Backed Sequins (retiring).

This card is so fun and will certainly brighten someone's day, no matter what the weather is when they receive it.  Make sure to check out the other design teams card using this fun fold and then play along and share what you create, we would love to see it!

Below are easy ordering links for the products used on today's card:

Product List

Enjoy!

Diana
Pin It!

Monday, December 18, 2017

SSINKspiration Fun Fold Challenge #SSINKFF2: Window Card

Good morning!  It was a crazy weekend and we were on the go non-stop, as well as my mega Christmas Cooking Baking weekend, and the last large race simulation which included 30 miles this week, let's just say I'm a little tired and didn't get much time in the studio.  I knew the SSINKspiration designers were having a fun fold challenge today using a Window Card so I had to pop down the studio to make a quick card since a glitter window card was the very first card I made when I was introduced to Stampin' Up! and made me fall in love with stamping.  This is also a really quick way to add some sparkle and dress up the card.  Because you use Dazzling Diamonds Glitter to make the window I decided to fully embrace the bling with lots of sparkly items on this card.
 
I started with Pool Party cardstock for the cardbase and then added a mat using Bermuda Bay cardstock and then a piece of the Year of Cheer Speciality Designer Series Paper.  I used the Big Shot and Layering Ovals framelits to cut the oval in all three pieces so they would all line up (don't glue the pieces together yet).  Next I took a piece of packing tape and applied it on the back of the DSP layer so the sticky side was facing out through the hole and generously sprinkled the packing tape with Dazzling Diamonds glitter which will stick perfectly.
 
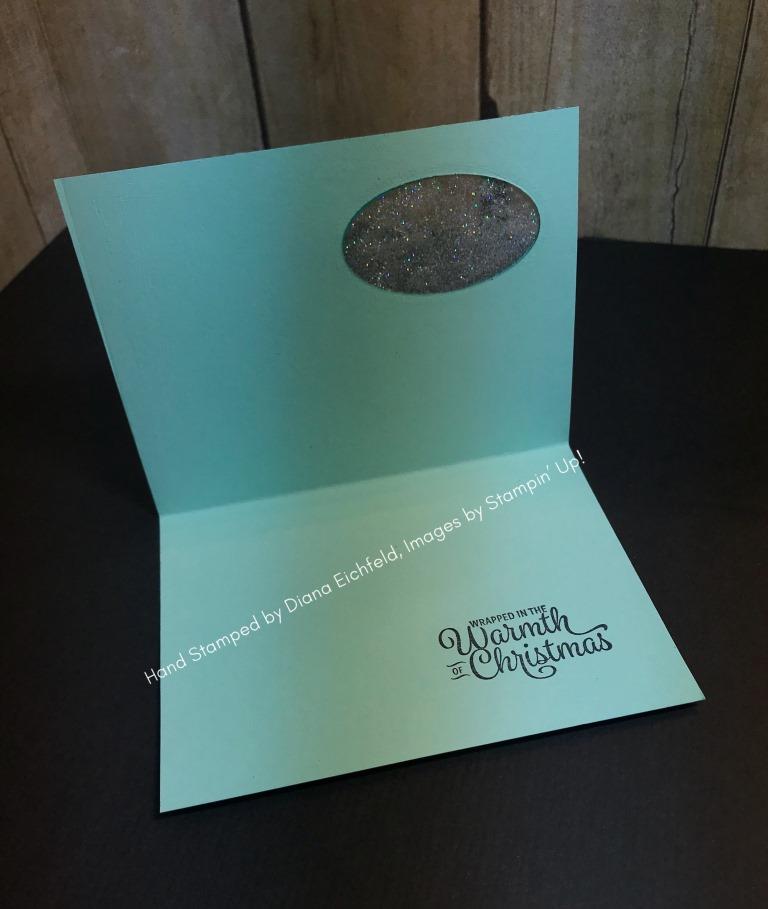
Next I stamped the greeting through the window hole in the cardbase basing the Snowflake Sentiments stamp set and Basic Black ink.  Here's a view from inside the card.
 
To finish of the card I attached the Bermuda Bay piece to the back of the DSP (this will hide the packing tape from view) and then wrapped a piece of Pool Party 3/8" Shimmer Ribbon around the top corner of the cardfront and then tied a double bow using Basic Black Solid Baker's Twine before attaching the cardfront to the cardbase so it lines up with the oval cut out.
Every time I make a card using this technique I still love it, and especially it's simplicity!  Make sure to check the other design teams cards using windows and then play along and share what you create.  I know we're a week away from Christmas but there is still time to get those last minute projects done for all other special people!
 
Below are easy ordering links for the products used on today's card:

Product List

Enjoy!
 
Diana
Pin It!

Search This Blog