Showing posts with label Endless Birthday Wishes Photopolymer. Show all posts

Wednesday, July 13, 2016

SSINKspiration July Blog Hop: Summer Fun!


Good morning!  It’s so nice having everyone at home this week and getting back into the summer camp/work routine.  We were looking at the calendar last weekend and realized there are only 7 more weeks of summer vacation before Aidan heads off to the 6th grade (how is that possible??)  Today over on the Stylin’ Stampin’ INKspiration blog it’s time for our monthly blog hop (the hop has moved from Thursday to Wednesday) and this month’s theme is all about summer, how perfect is that?  I spent quite awhile looking through my current stamps to find something that inspired me with this theme and wasn’t feeling anything and then I remembered that Aidan just got back from boy scout camp and the new Always an Adventure stamp set and coordinating framelits were just delivered last week, whoo hoo I decided to scrap Aidan’s camp adventures Project Life style!!

As you hop along, please be sure to comment and show some love on every blog! We are always excited to hear from our followers! You should have just left stop number #4 on the Stylin' Stampin' INKspiration Blog Hop - Darcy at Dj's Stampin' Place. If so, you are in the right spot. If a link doesn't work or you get off track, you will find the full blog hop lineup below.

This layout was interesting since I didn’t actually attend camp, so I relied on the one picture Aidan took (really kiddo, need to work on that), what the troop posted, and the departure and arrival pictures I took.  Since I knew it was going to be very heavy on the pictures I made two inserts using the Always an Adventure Bundle, one journaling card, and the rest was left for pictures.
I used most of the same supplies for both the 4x6 and 3x6 card inserts and started with Soft Sky cardstock and sponged along the top with Whisper White Craft Ink to help it look more sky like.  Next I used the stamp set and framelits to cut lots of pieces (and then kept adding and adding until I was happy with the result).  For the clouds, I stamped using Basic Black ink on Vellum cardstock, cut them out with the framelits and then sponged around the edge with the White Craft Ink for some extra effect (the Thin Tip Glue pen worked perfect to glue the clouds to the cards and the adhesive doesn’t show through the vellum, score!!)


I did also swipe the Cucumber Crush pieces for the grass and treelines along the Cucumber Crush ink pad to add additional dimension to the color.  Also, I didn’t use the framelit for the snow cap on the mountains (honestly missed seeing it so I just cut the mountains a second time using Whisper White cardstock and then hand cut the edges so they are not all the same, a little more realistic.


The journaling card is retired (I stocked up) and I just stamped along the top and added a tree and bear and then left it for Aidan to do the journaling (he didn’t want to do that last night, go figure!!)  This way he can record his favorite things about the trip and it will be a piece of his handwriting as a keepsake, double duty!!

 
I really like this stamp set and framelits and see myself using them quite a bit for all our outdoor adventures.  It was also fun when I showed the page to Aidan he loved it and thanked me for making it (I love that he appreciates things like this and enjoys looking through our old albums remembering our adventure, that’s what this is all about).  I will admit these can be kind of “putsy”, meaning I took several hours to just make those two cards and just enjoyed playing.  Don’t know if these are quick and easy, but the more I use them we’ll see.

Below are easy ordering links for the products used on today’s project: 


 Make sure to check out the rest of the blog hop for lots of other great ideas.  If you click the “Next” button, you’ll go to Pamela’s site but you can also access any of the hopper’s site from the full blog list below.
 
http://www.stampinup.net/esuite/home/stinkytofu/blog?directBlogUrl=/blog/2075584/entry/7_13_16_july_blog
 

Blog Hop Participant List:

1. Tobe at The Craft Sea
2.
Jennifer at Jenny G Paper Stamps
3.
Cheryl at Create with Cheryl
4.
Darcy at Dj's Stampin' Place
5.
Diana at Stampin' Fun with Diana
6.
Pamela at Stinky Tofu
7.
Jen at Faith. Grace. Stamp.

Have a great day,

Diana 
Pin It!

Monday, July 4, 2016

Stylin' Stampin' INKspiration Color Challenge SSINKCC35: Endless Birthday Wishes

Good morning and Happy 4th of July!  Aidan's away have fun out boy scout camp and Chris and I have been enjoying some adventures of our own.  I love holiday weekends since they give us extra family to enjoy relax.  I also have had a little crafting time and am planning more later today.  It's the first Monday of the month, which means it's time for this month's SSINKspiration blog color sketch challenge.  Of course Red, White, and Blue is perfect for today and it's been the theme of several recent projects lately so I decided to embrace these colors but used a often neglected stamp set to be a card that's perfect for birthdays or other celebrations, Endless Birthday Wishes.

I started with Whisper White Thick cardstock for the cardbase and then then added another layer of Whisper White cardstock.  On this layer I sponged around the edge with Dapper Denim ink and stamped in two of the corners using Basic Gray ink and the dots from the Endless Birthday Wishes stamp set.

Next I took a piece of Dapper Denim cardstock and embossed it with the Big Shot and Confetti  Celebration Embossing Folder.  This layer is offset with a piece of Real Red DSP from the Brights Designer Series Paper Stack.  For the main stamped image I stamped the cake image using Basic Black ink on Whisper White cardstock and punched it out with the 1 3/4" Circle Punch and then used my blender pen to color in the cake and then added a little bit of shimmer to the candles using the Clear Wink of Stella Pen.  This piece was attached to the cardfront with dimensionals.

I used a half of a small metallic doily as an accent and then added a strip of Dapper Denim 3/8" Ruched Ribbon (attached using fast fuse adhesive).  The final touch was to add the greeting that is from the same stamp set and was cut out with the Big Shot and Layering Ovals Framelits and sponged around the edge using Basic Gray ink before attaching it with dimensionals to the cardfront.

I love the bright colors and how they really pop against the white, with just a few gray/silver accents.  The other design team members their cards based on these colors so you'll want to go check them out for further inspiration before you create you're project.

Below are easy ordering links for the products used on today's card:


Enjoy your holiday!

Diana

Pin It!

Friday, July 24, 2015

Sketch Frenzy Friday Card Sketch Challenge: Endless Birthday Wishes

 Good morning!  It’s Friday and we’re having a blast at convention.  Before the events start this morning a few of us are heading out to run the Deseret Classic Half Marathon as part of the Utah’s Pioneer Day holiday.  We’re really looking forward to the opportunity to run with friends that don’t live close and see some of the sights of the city. I’m have several fun posts scheduled for today so you’ll want to make sure to come back and check them out for lots of fun.  I’m going to start this morning with this weeks Sketch Frenzy Friday sketch challenge.  I provided this weeks sketch and it’s really fun to see what different designers come up with using your basic sketch idea, love all the possibilities!  I have lots of friends birthdays in July so I’m busy making sure I’m ready for all the birthday greetings.

For this card I started with Tip Top Toupe cardstock for the cardbase and then added a piece of Pool Party cardstock that was embossed with the Big Shot and the Arrows Embossing Folder.  Next I added a piece of the Cherry on Top DSP and used some Bermuda Bay Sequin Trim along the top of the DSP.  I added a couple of flags using the different patterns from the same DSP and tied a double bow using Bermuda Bay Baker’s Twine for a fun touch.

For the greeting I used the Endless Birthday Wishes stamp set and stamped the cake using Tuxedo Black Memento Ink, colored it in with Stampin’ Write Markers and then punched it out with the 1 3/8” Circle Punch.  For a little extra bling I added some Dazzling Details to the birthday cake candles using the 2 Way Glue Pen.  It was matted with Cucumber Crush cardstock that was punched out with the 1 ¾” Scallop Circle Punch and attached with dimensionals.   The greeting is from the same stamp set (I really like how all the words are separate so you can build your own greeting) and was punched out with the new Washi Punch.

I made this for a special friend and this fits her cheery personality perfectly and she loves bling and sparkle just like me.  You can check out the other design team cards for further ideas and their favorite items and then play along (perfect crafting time is when it’s crazy hot since I can escape to my studio which is nice and cool).

 Below are easy ordering links for the products used on today’s card:
Built for Free Using: My Stampin Blog


Have a good morning and I’ll be back soon with another fun project!

Diana
 
Pin It!

Friday, June 26, 2015

Sketch Frenzy Friday Sketch Challenge & SSINK Friday Favorities: Endless Birthday Wishes

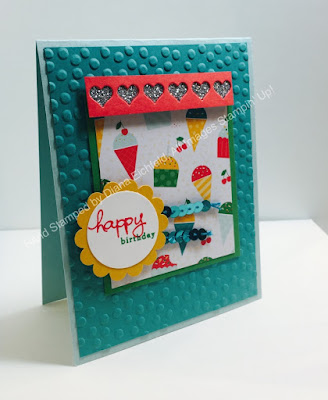
Good morning!  It’s Friday and we’re looking forward to another eventful weekend, plus they’re expecting rain starting tonight through Sunday morning so that should make things interesting.  Aidan and I are also volunteering at our first race, a triathlon, Sunday morning so it will be fun to see races from the other side and help cheer on some fabulous athletes, we’re both very excited.  It’s time for this weeks Sketch Frenzy Friday sketch challenge and I’ve also combined this with the Stylin’ Stampin’ INKspiration Friday favorites post.  Not only do I love the new Cherry on Top Designer Series Paper Stack but the particular piece I used has ice cream and cupcakes (who of my favorite foods, yum!!!)  for a super fun birthday card. 

I started with Pool Party for the cardbase and then added a piece of Bermuda Bay cardstock that was embossed with the Big Shot and Decorative Dots Embossing Folder.  Next I added a piece of the Cherry on Top DSP and matted it with Cucumber Crush cardstock.  For a fun decoration along the top I cut a piece of Watermelon Wonder cardstock using the Big Shot and Mini Treat Bag Thinlit piece (you know this thinlit is on sale this week as a Weekly Deal, don’t miss out!!!) and added some Silver Glimmer Paper (also a Weekly Deal this week) behind the cut out hearts and attached it to cardfront with dimensionals.   


For the greeting I used the Endless Birthday Wishes stamp set and stamped the greeting (love that you can build your own greeting with this set) and then punched it out with the 1 3/8” Circle Punch and matted it with Crushed Curry cardstock that was punched out with the 1 ¾” Scallop Circle Punch and attached with dimensionals.  I needed a little more bling (of course!!) so I added a couple pieces of Bermuda Bay Sequin Trim for a fun accent.

I made this for a special young lady and I think she’ll like it (can’t share more details until after she receives the card).  You can check out the other design team cards for further ideas and their favorite items and then play along (if we really get all this rain it will be perfect indoor crafting time).


Below are easy ordering links for the products used on today’s card:

Built for Free Using: My Stampin Blog


Have a great weekend,

Diana
Pin It!

Friday, September 26, 2014

Sketch Frenzy Friday Sketch Challenge: Bloom with Hope

Happy Friday!  Looking forward to a beautiful and relaxing weekend, love this time of year.  Today I'm sharing my design team card for this weeks Sketch Frenzy Friday sketch challenge.  This is a great sketch and the designers really came up with some great ideas so I hope you can check them out and play along.  For my card I started with Sahara Sand for the cardbase and added layers of Basic Black cardstock and some DSP from the In Color Designer Series Paper Stack.

For the main stamped image I decided to play with the Blendabilities markers and the Bloom with Hope stamp set.  I stamped the flower in Memento Ink (this is a fabulous black ink and I now use it whenever I need black) and then colored the flower in with Old Olive, Daffodil Delight, and Coastal Cabana Blendabilities markers (it's fun to just relax and color).  I cut out the flower using the Big Shot and the Oval Collections framelits (do you know that these are currently on sale as part of this weeks Weekly Deals, awesome!!!) and cut a matching mat out of Old Olive cardstock.

For the greeting I used the Endless Birthday Wishes Stamp set (did you know that with the photopolymer stamps you can bend them when you attach them to your clear blocks to get different shapes?  I made mine curve along the bottom to match the shape of the oval and stamped it in Daffodil Delight ink.  I added some fun ribbon details, including a bow out of 1/8" Basic Black Taffeta Ribbon and a couple of little flags using the Crushed Curry Chevron Ribbon (it coordinates quite well) and the Natural 5/8" Chevron Ribbon.

This card is lots of fun and sure to brighten someone's day, just because.

Below are easy ordering links for all the products used on today's card:


Diana
Pin It!

Friday, July 25, 2014

Sketch Frenzy Friday Sketch Challenge: Endless Birthday Wishes

Happy Friday friends! Chris has been out of town this weekend so Aidan and I have been hanging out and looking forward to a fun weekend before we pick Chris up (I think we'll be spending lots of time at the pool as long as the weather cooperates).  Before we get the weekend started it's time for another Sketch Frenzy Friday sketch challenge and we have another great sketch designed by Patrice.  I was excited with the recent announcement that the Endless Wishes Photopolymer Stamp set is back in stock and available so I decided to use this set for this weeks card.  I started with a Pistachio Pudding Cardbase and added a layer of Bermuda Bay cardstock that was embossed with the Big Shot and the Arrows Embossing Folder.  For the greeting I used the Remembering Your Birthday stamp set and used Stampin' Write Markers so I just got the "Happy Birthday" words from the set (the sentiment in full is about belated birthdays) and matted that piece with Melon Mambo cardstock.
 
I thought the birthday cake from the Endless Wishes stamp set is so cute so I stamped it with Memento Ink (I love the crisp image you get with this new ink and it doesn't run when you watercolor the images.  I used Stampin' Write Markers and a blender pen to color in the cake.  I punched this piece out with the 1 3/4" Circle Punch and matted it with Basic Gray cardstock punched out with the 2" Circle Punch.  I used a two way glue pen to add some Dazzling Diamonds to the top of the candles for extra sparkle.
 
To amp up the birthday fun I used a couple of the script words from the same stamp set and punched them out with the Large Oval Punch and used dimensionals to attach all the different elements to the card.  This is a pretty simple card but has lots of different elements for added fun. 
 
The other designers are sharing some great ideas to go along with this sketch so go check them out and then come play along with us, it's great to see all the different ideas people come up with.
 
Below are easy ordering links for all the products used in today's card:
 
Pin It!

Thursday, July 10, 2014

Stampin' Stylin' INKspiration Blog Hop: Oldest to Newest and Lots of Fun


Good morning!  It's the second Thursday of the month, which means it's time for another Stylin' Stampin' INKspiration blog hop.  We have some great designers in this group and it's always so fun to see what they come up with for each months theme.  This month we're focusing on our oldest and newest stamp sets.  Like all stampers I have lots of stamp sets from back when we first started stamping and they may be a little neglected but it's always fun to pull them out, show them some love, and mix them with our current products to show they still work great.

As you hop along, please be sure to comment and show some love on every blog! We are always excited to hear from our followers! You should have just left stop number 3 on the Stylin' Stampin' Squad Blog Hop - Jennifer B. of Northwest Stamper. If so, you are in the right spot. If a link doesn't work or you get off track, you will find the full blog hop lineup below.
 
The first card I made to show uses the oldest stamp set I have, Backyard BBQ which was released in 2005.  Since our family loves BBQ's and parties this set was a must have.  I started with Baked Brown Sugar Cardstock for the card base and then layered Cherry Cobbler under my Whisper White cardstock.  I decided to create my own DSP by stamping the hamburger and hotdog stamps repeatedly on the cardstock in Baked Brown Sugar ink.  Next I took a piece of DSP from the Lullaby Designer Series Paper (even though this paper is themed for babies I love that there are patterns you can use for any occasion) and matted it with Cherry Cobbler Cardstock.

For the greeting I used the Angled Tag Topper Punch to create a tag to stamp the birthday greeting.  The greeting, Endless Birthday Wishes, is my newest stamp set and this is the first time I used it (this stamp set is back in stock but only available while supplies last so make sure to get yours soon so you don't miss out!)  I also stamped a hotdog and colored it in with Stampin' Write markers and cut it out with Paper Snips for a fun accent.  The final touch was adding some Natural 5/8" Chevron Ribbon ( I like that this ribbon is only printed on one side so you can use the reverse plain). 

This card is perfect for a summertime birthday with a whimsical touch.

Unfortunately you can't purchase the BBQ stamp anymore so I decided for my second card to use my oldest stamp set that is in the current catalog, in this case Lovely as a Tree (I have to say, every year I think this set will retire and every year it manages to come back for more fun).  This card has Crumb Cake cardstock for the cardbase and then I added another layer of Crumb cake that I embossed with the Big Shot and the Woodgrain Embossing Folder and the sponged all over with Chocolate Chip ink really help the embossed image pop.  Next I wrapped a piece of Mossy Meadow 3/8" Stitched Satin Ribbon around the embossed layer and tied a bow around the ribbon with Linen Thread.

For the stamped image I stamped the tree from Lovely as a Tree in Chocolate Chip ink on Very Vanilla cardstock before cutting it out with the Big Shot and the Circle Collection Framelits.  I used markers and a sponge to color in the tree and then sponged around the edge with Crumb Cake ink.  This piece is matted on a piece of Chocolate Chip cardstock that was cut out with the Window Collection Framelits and attached to the cardfront with dimensionals.

For the greeting I used another one of my brand new stamp sets, Bloom with Hope and stamped it in Chocolate Chip ink and cut it out with the Project Life Framelits (isn't this a fun shape?).  I sponged around this layer with Crumb Cake ink and attached it to the card with dimensionals.  A small In Color Sequin (Baked Brown Sugar) was the perfect accent for a little bling.

This card is certain to spread a little joy, even in tough times which really is the point of cardmaking, to make people smile.

I hope you enjoyed this month's projects, and the projects from the other designers and we've helped inspire and motivate you to use some of those older, neglected stamp sets for lots of new fun.  Now make sure to continue along the hop by clicking the "next" button below and if you get lost, don't worry you can pick up the hop using any of the links in the list below.
 
 
http://sudonna112244.blogspot.com/2014/07/ssinkspiration-july-blog-hop.html
Pin It!

Search This Blog