Showing posts with label Suite Sayings. Show all posts

Monday, April 24, 2017

SSINKspiration Technique Challenge #SSINKTC44: Salted Background

Good morning!  It's the start of a  new week, can't believe April is almost over so it's time for another challenge over on the SSINKspiration blog, this time it was a Technique Challenge.  We used the Salted Background Technique this month and I have to say I had never heard of or seen this technique before so it was fun to try, and since glossy white cardstock is returning to the catalog for next year (yeah)  you'll be able to get the perfect paper to try this out (if you don't already have some in your stash (I had some from when we used to sell it, plus it was one of the supplies in my display stamper box so I got an early hint it was coming back).

This card has a Pool Party cardbase and since there's so much going on with the cardfront I decided to let it take center stage.  To make it I took a piece of Glossy White cardstock and spritzed it with water, then applied a few drops of reinker directly on the paper and spread it around with my aqua painter.  I started with Pool Party in the bottom left, then added Emerald Envy to the center (yeah didn't stay that color when it dried) and then added Sweet Sugarplum to the top right.  I blended the colors where they matched and added a little swirls of the darker colors to add effect.  Next I took my coarse sea salt and sprinkled it all over the top, spritzed again with water and walked away (seriously go to dinner, for a walk to let it dry).  When it was mostly dry I brushed the salt off and then I let it dry overnight.

The greeting is from the Suite Sayings stamp set (retiring) and was stamped in Tempting Turquoise, it matched the background when it was fully dry, and then punched it out with the decorative label punch (retiring) and sponged around edge with Pool Party ink.

I wrapped a piece of Sweet Sugar Plum 3/8" Ruched Ribbon (retiring) around the cardfront and then after attaching the greeting with dimensionals tied a knot with the ribbon.


What a fun technique and I really didn't take that long to make, the longest part was the dry time and each one you make would come out completely different.  I'll definitely be using this technique again and see what fun color combinations I can create.  Make sure to check out the other design team creations for inspiration and then play along with us and share what you come up with, can't wait to see!

Below are easy ordering links for the product's used in today's card:

Product List
Enjoy!

Diana

Pin It!

Tuesday, November 22, 2016

30 Day Gratitude Challenge: Day 22

Good morning!  Today's the last day of school and work before the holiday break and I have to admit, I'm very excited for some extended time off with the family and to see some friends we visit every year (it's definitely a highlight).  Even though Thanksgiving is a couple of days away you really can't escape all the Christmas "everywhere" so today's gratitude card is another Christmas theme and uses some fun stamp sets and colors.

I started with Real Red cardstock for the cardbase and then added a piece of Old Olive cardstock and stamped the greeting in Basic Black from the Suite Sayings stamp set (I used my Stampin' Write Marker to just ink up part of the greeting).  I added a piece of Basic Black Designer Series Paper from the Neutrals Designer Series Paper Stack that was matted with Real Red cardstock to anchor my fun jar element.

It seems like masons jars are everywhere and all the rage so it's only fitting that we now have mason jar stamps (Jars of Love) and coordinating framelits.  I love to use mason jars for giving little treats so I decided to make one holding peppermint candies but I didn't have the holiday stamp set that coordinates with the jars so I decided to make my own using the Sweet Home stamp set.  I stamped the mason jar on Whisper White cardstock using Basic Black ink and then cut it out with the Big Shot and Everyday Jars Framelits.  Next I took the candy stamp from the Sweet Home stamp set and stamped it one in the bottom corner.  Next I used my 3/4" Circle Punch to create a mask and set it over the candy I just stamped and stamped again so the candy didn't overstamp.  I continued to do this until I had the far filled as I wanted.  Then I stamped the candy again on a scrap of paper and punched it out with the circle punch and attached it with a dimensional so it popped up a little more than the rest.

Of course every mason jar needs a lid so I heat embossed mine using Silver Embossing Powder and my Heat Tool, then I cut it out with the framelits and attached it with dimensionals.  The finishing touch was to add a bow I tied using Old Olive Baker's Twine so it looks like it was wrapped around the jar (kind of clever I thought!!)

This is such a fun card, I really just want to reach out and eat one of the candies.

Below are easy ordering links for the products used on today's card:


Enjoy!

Diana
Pin It!

Friday, August 26, 2016

Thoughtful Branches Birthday Wishes

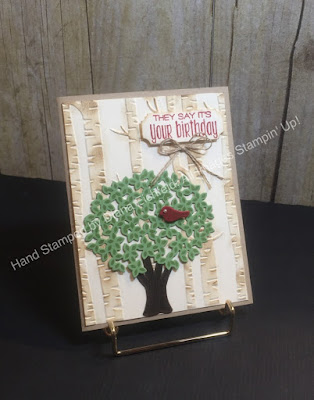
Happy Friday! Hopefully you’re having a great week and finally enjoying some cooler weather.  We’re wrapping up our trip out west and heading home tonight.  It’s been an amazing time, love all our crazy family adventures.  So the end of the month is rapidly approaching and I want to make sure your aware of the limited time stamp set and matching framelits Thoughtful Branches is only available this month so you have just a few more days to place this order for these great products (it’s also available as a bundle so you can save 10% when you purchase both items together).  To further tempt you I’m sharing another card I made using this fun bundle. 

I started with Crumb Cake cardstock for the cardbase and then added a layer of Very Vanilla cardstock that was embossed with the Big Shot and Woodland Embossing Folder (then I sponged it lightly with Soft Suede ink, I really like this technique to color the trees).  Next I used the Thoughtful Branches stamp set and coordinating framelist to make the tree trunk (Early Espresso) and tree leaves (Wild Wasabi), as well as the cute little bird (Cherry Cobbler).  After gluing the trunk and leaf piece to the cardfront I used piece of dimensional to attach the bird and then added a tiny pearl for his eye.

The greeting is from the Suite Sayings stamp set and was stamped with Cherry Cobbler ink on Very Vanilla cardstock before being cut out with the Big Shot and Project Life Cards and Labels Framelits.  I sponged around the edge of the greeting with Crumb cake ink and then attached it to the cardfront with dimensionals.  The final touch, a double bow I tied using Linen Thread and then attached with a glue dot.

This is a great masculine card but could easily work for ladies as well and I love how it’s really easy to put together once you stamp and cut all the pieces.  And the details are sure to impress whoever receives it (and it can be our secret to how quick and easy it is!!)  I’ve seen so many great ideas with the set you’ll definitely use it for all sorts of projects and occasions.

Below are easy ordering links to the products used on today's card:


Have a great weekend!

Diana
Pin It!

Friday, August 19, 2016

Paper Players Color Challenge Meets SSINKspiration Back to School: Suite Sayings


Happy Friday! Just a few short hours until vacation officially begins (can you tell I’m just a little excited??) and I get to start by heading out to see Aidan who’s been at his grandparents this week.  I totally miss that kiddo!  Part of this week in addition to getting ready for vacation was trying to get things ready for school that starts when we get back so it was perfect timing for the SSINKspiration designers to focus on Back to School projects so I decided to make a card to go in Aidan’s backpack on his first day for a little surprise encouragement.  I also decided to use the Paper Players Color challenge which was just perfect for this occasion.
 
I started with Whisper White Thick cardstock for the cardbase and then added a layer of Pacific Point Designer Series Paper from the Brights Designer Series Paper Stack.  Next I took a piece of Basic Black cardstock and using the Writing Notes Background Stamp stamped using Whisper White Craft ink.  The greeting is from the Suite Sayings stamp set and was stamped using Basic Black ink on Daffodil Delight cardstock and then cut out with the Big Shot and Layering Ovals Framelits.  I attached just a small piece of a Silver Metallic Doily (the smaller one) behind the oval so it just peaks out and offers a touch of sparkle!
Next it was time for all the fun details…I used the Big Shot and Stars Collection Framelits and some Red Glimmer Paper to cut the large star and then cut out a smaller star for the center using the same framelits and some Pacific Point cardstock and then embossed it with the Confetti Embossing Folder (the smaller star was attached with a dimensional to pop up).  The final touch was to add a couple of Silver Metallic Enamel Stars to contrast the metallic doily.
I love how this card turned out, it just screams school and those bright colors are a perfect way to send some extra special vibes for the start of the new year.  Make sure to check out other projects the design team as created for even more inspiration if you’re looking to get ready for school in your house as well.
 
Below are easy ordering links to the products used on today's card:


Have a great weekend!

Diana
Pin It!

Monday, August 8, 2016

Stylin' Stampin' INKspiration Card Sketch SSINKCS36: Suite Saying Basketball Wishes

Happy Monday!  After a wonderful on the go and relaxing visit to Williamsburg we're heading back home today and back to school and camp.  I have a little fun project to share with you today, it's time for this months sketch challenge over on the SSINKspiration blog.  I enjoyed using this sketch for a thank you card I needed for a thank your for Aidan's summer basketball coach for the end of season party.

I started with Pumpkin Pie cardstock for the cardbase and then added a piece of Crumb Cake cardstock as a mat for the Whisper White card front.  To the card front I added a piece of Basic Black cardstock that was embossed with the Big Shot and the Sparkle Embossing Folder. On top of that I added a strip of stripped DSP from the Neutrals Designer Series Paper Stack.  Next I took a piece of Crumb Cake cardstock and stamped it with the Hardwood stamp set, I stamped it off using Sahara Sand ink to mimic the hardwood of the basketball court.

For the greeting, I used the Suite Sayings stamp set and just inked the thanks before stamping on Whisper White cardstock.  For the net effect behind the greeting I used the Timeless Textures stamp set and used Basic Gray, stamping off first.  This layer was matted with Pumpkin Pie cardstock before attaching it, over a flag of 5/8" Burlap Ribbon.

The final touch was to add a basketball and since I don't have a current basketball stamp I had to get a little creative and cut out a piece of Pumpkin Pie cardstock using the Big Shot and Layering Circles Framelits then hand drew the lines using a Sharpie and then embossed it with the Softly Falling Embossing Folder before attaching to the card front with dimensionals.

This card was a lot of fun and I'm hoping coach appreciated it.  The other design team members have some great cards using this sketch so go check them out for further inspiration and then play along with this month's challenge for lots of fun.

Enjoy!

Diana
Pin It!

Monday, July 25, 2016

SSINKspiration Technique Challenge #SSINKTC35: Watercolor Resist Bab Greetings

Good morning!  We survived the hot and humid weekend and even got to check out the new Star Trek Beyond movie, which we loved.  With the start of the new week it's time for another challenge over on the SSINKspiration blog, this time it's a technique challenge and we're using Watercolor Resist as the technique.  I love this technique, not only since we have some fun UV treated papers that already have printed designs ready for color, or you can make your own using heat embossing.  Hubby had a coworker who recently had a baby and I've been working on the baby gift which of course means we needed a card.
 
I started with So Saffron cardstock for the cardbase and then added a piece of Calypso Coral cardstock as a mat for the Whisper White cardfront.  For the background of the cardfront I used the Playful Backgrounds stamp set and stamped using Pool Party ink.  The greeting was stamped directly on the cardfront using Basic Black ink and the Suite Sayings stamp set.
 
For the main image I started by stamping the cute rubber duck from the Something for Baby stamp Stampin' Write Markers before stamping on Whisper White cardstock.  I cut it out using Paper Snips (since I don't have the Baby's First Framelits but they coordinate so cutting out the baby images are super easy).  Next I used the new Jar of Love stamp set and stamped the medium jar using Basic Black ink on Whisper White cardstock and then cut it out using the Big Shot and Everyday Jars Framelits.  To create the technique background I started by stamping the same bubble image from the Playful Backgrounds set using Versamark ink and heat embossed it using the Heat Tool and White Emboss Powder.  To color in the background I used Pool Party ink and swirled it to create a water look effect (so fun and easy).  I attached the duckie in the jar using a dimensional.  To make the lid for the jar I heat embossed it using Copper Emboss Powder.  The final touch was to add some Copper Metallic Thread looped behind the jar and then attached the jar to the cardfront.
 
I love how this card turned out and how you can use a couple of little techniques and embellishments t elevate the card without going over the top.  There are so many great ways to use this technique for the perfect effect on any project you have so check out the other projects the design team is sharing and then play along and share what you come up for even more ideas.
 
Below are easy ordering links for the products used on today's card:


Enjoy!
 
Diana
Pin It!

Friday, July 1, 2016

SSINKspiration Red, White, and Blue: Baseball Fun

Happy Friday!  The holiday weekend is just about here and I can’t wait!  Aidan is heading to Boy Scout camp for the week which means we have a “kid free” week and Chris and I are planning some adventures while he’s gone.  Earlier this week we finally had Aidan’s baseball team end of the year party (with all the crazy rain we had this spring there wasn’t a tournament and the end of the season ended with a cancelled game so things were up in the air but we finally got an email that said “The Cubs Win, The Cubs Win”)  I decided to make cards for all of the team coaches for Aidan to thank them for all their support and instruction this year so I decided to use today’s Red, White, and Blue and star them over on the SSINKspiration blog as the inspiration for the card design (plus it fits since it matches the Cubs colors).  Earlier this week a lady shared a card she made using on of this months Paper Pumpkin stamps for a perfect baseball so I was off and running.

I started with Pacific Point cardstock for the cardbase and then added a layer of Crumb Cake Cardstock.  I did a lot of stamping on this piece to really build texture and dimension.  I used the Timeless Textures and Gorgeous Grunge stamp set along with Crumb Cake, Pacific Point, Real Red, and White Craft ink for each of the elements.  Some stamps were stamped off once or even twice before stamping to help soften the coloring.  After about the sixth different stamp I finally had to back away and be done with the background.  I also stamped the greeting on this layer, using a stamp from the Suite Sayings stamp set and used my Real Red Stampin’ Write Marker to color in just the “thanks” part of the stamp before stamping.

Next I added a piece of Real Red Designer Series Paper (from the Brights DSP Stack) and matted it with Pacific Point cardstock.  To make the baseball I started by cutting a circle out of Whisper White cardstock using the Big Shot and Layering Circles Framelits and then I stamped using the Paper Pumpkin dashed circle using Real Red ink and only stamped part of the circle to make the strings on the baseball (isn’t it perfect??)  I attached the baseball with dimensionals to the cardfront and then wanted a little bling (I know…) so I cut a small star using the Star Framelits set and Gold Glimmer Paper and it was also attached with dimensionals.

This card really came together fast (once I stopped stamping layers on the cardfront) and I love the fun baseball and will definitely be using this idea again for other projects, including scrapbook pages.  The other design team members are sharing some fun ideas using this theme so if you have time to check them out.

Below are easy ordering links to the products used on today's card:


Have a great holiday weekend!

Diana
Pin It!

Thursday, April 14, 2016

SSINKspiration Blog Hop: Surprise Baby Shower!


Good morning!  Spring is here (even if there’s seems to be a little battle to get winter to officially leave, haha!)  and with spring comes thoughts of new things and arrivals.  On the Stylin’Stampin’ INKspiration blog that one of our team members Kim Ryden was expecting her third baby next month.  Of course we’ve all been very excited for this new arrival so we’ve decided to dedicate this months blog hop as a surprise virtual baby shower for Kim (all the projects shown in this months hop will be making their way to Kim’s nursery).  This is also perfect timing since little Mister Micah decided he was ready to join the family and arrived last weekend, whoo hoo!!

As you hop along, please be sure to comment and show some love on every blog! We are always excited to hear from our followers! You should have just left stop number #8 on the Stylin' Stampin' INKspiration Blog Hop - Donna at Geek Squad Crafting. If so, you are in the right spot. If a link doesn't work or you get off track, you will find the full blog hop lineup below.

I made two items for the new mom, a card and fun 3D item.  For the card I decided to combine a couple of different challenges for inspiration, specifically the Fab Friday color challenge and the Creativate  sketch challenge (I love when I can use different sketch and color challenges for inspiration to get the creative juices flowing.

For the card I started with Pool Party cardstock for the cardbase and then took a piece of Calypso Coral cardstock and embossed it with the Big Shot and Confetti Embossing Folder.  For the center strip I layered Whisper White and So Saffron cardstock and then wrapped some Basic Black Baker’s Twine around the layers before attaching to the cardfront.
These little ducks are so cute and are from the Something for Baby stamp set and I used So Saffron and Calypso Coral Stampin’ Write Markers to color the images before stamping.  I used Paper Snips to cut out each of the ducks and then cut out Pool Party and Calypso Coral circles using the Big Shot and the Circle Collection Framelits for the perfect mat.  There are tons of dimensionals attaching the circles and the ducks to the cardfront.  The final touch was the greeting and I used the Suite Sayings stamp set and stamped it in Basic Black ink on Whisper White cardstock and then punched it out using the Washi Label Punch, dimensionals were used to attach the greeting to the cardfront.
When Micah decided to arrive early I was still working on a gift idea and then I remembered how much I enjoyed receiving items that commemorated my son’s birth so that’s what I decided to make.  I found this great frame that has two openings so Kim can add her favorite picture to the bottom.  On the top I used a piece of retired designer series paper (Basic Gray) as a mat for a piece of Whisper White cardstock that I had printed Micah’s statics (I used a Star Wars font since I’ve heard the Ryden’s are Star Wars fans).  Then I stamped some more images from the Something for Baby stamp set, cut them out and attached them to the cardstock with dimensionals.  The final touch was to added some pieces of ribbon and bow for a colorful accent (most of the ribbon pieces are retired but I did use a piece of Whisper White 3/8” Stitched Satin Ribbon which is current).
I don’t make lots of baby items but I really had fun with this and hope that Kim enjoys them.  I love  how fun and easy it is to make personal and unique gifts for any occasion you may need.
Below are easy ordering links for the products used on today’s projects: 


Make sure to check out the rest of the blog hop for lots of other great ideas.  If you click the “Next” button, you’ll go to Bree’s site but you can also access any of the hopper’s site from the full blog list below. 
 
http://craft-somniamomma.blogspot.com/2016/04/hello-baby-micah.html


Blog Hop Participant List:

  1. Diana at Stampin Fun with Diana
  2. Bree at Craft-Somnia Momma
  3. Jenny at Jenny G Paper Crafts
  4. Kathy at Kathy's Stamping World
  5. Melissa at The Stamp Doc
  6. Jennifer at Happy 2 Scrap 4 Life
  7. Heidi at Stuck on Stampin'
  8. Donna at Geek Squad Crafting

Have a great day,

Diana
Pin It!

Sunday, March 27, 2016

Happy Easter: Suite Sayings

Happy Easter!  I hope you are enjoying a wonderful day full of family and traditions.  We're enjoying a nice and relaxing day, which is perfect!  I wanted to share a quick and pretty Easter card (and it could easily use other greetings for whatever you need.

I started with Soft Suede cardstock for the cardbase and then added a piece of Birthday Bouquet Designer Series Paper (this was my first time using this paper and it's so soft and pretty, stunning) and let it be the focus of the card.  I wrapped a piece of Watermelon Wonder 1" Stitched Satin Ribbon around the DSP.

For the greeting I used the Suite Sayings stamp set and stamped it using Soft Suede ink on Pool Party cardstock and cut it out with the Big Shot and Oval Collection Framelits.  To frame the greeting I used some Soft Suede cardstock and cut it with the Big Shot and the Lots of Labels Framelits.  The greeting was attached with dimensionals and for a final touch I used a couple of pearls at the top and bottom.

These flowers are so pretty, it really makes me think spring which is perfect for Easter wishes.

Have a happy and enjoyable Easter Sunday!

Diana
Pin It!

Wednesday, March 16, 2016

Fab Friday Color Sketch FabFri82: Easter Suite Sayings

Good morning!  Boy I must say we're having some roller coaster weather this week but yesterday afternoon was beautiful, I could definitely get used to that.  With the coming of spring it definitely has me thinking about Easter so I decided to make one of my first Easter cards of the year using this weeks Fab Friday color challenge for inspiration.

I started with Mint Macaroon cardstock for the cardbase and then added a piece of Whisper White cardstock and stamped a couple of the images from the Timeless Textures stamp set using Basic Black and Blushing Bride ink.  Next I added a piece of Mint Macaroon designer series paper from the 2015-2017 In Color Designer Series Paper Stack and matted it with Blushing Bride cardstock.

Being an Easter baby (I was actually born on Easter Sunday) I love this holiday so I decided to make an Easter Egg by cutting out an oval of Whisper White cardstock using the Big Shot and Oval Collection Framelits and then used the brush stroke image from the Work of Art stamp set to create the different colored stripes.  The greeting is from the Suite Sayings stamp set (this new set has some great greetings and fonts, love it) and stamped using Basic Black ink on Pool Party cardstock and then cut it out using the Big Shot and Circle Collection Framelits and then attached the greeting with dimensionals (behind the greeting is some silver metallic thread that I just made some loops of attached to the back of the greeting so it peaks out.

The final touch was to add a bow and I struggled to find just the right thing, and then I saw the Baker's Twine Combo Pack sitting on my desk and I decided to  separate the black from the Melon Mambo Twine and just use the Basic Black part to tie a bow and attach it to the cardfront with a glue dot, perfect!

I love how the soft subtle colors contrast with the bold black on the card, they really help accent and great a great combo.

Below are easy ordering links for the products used on today's card:


Enjoy

Diana
Pin It!

Monday, January 25, 2016

SSINKspiration Mystery Challenge #SSINKMC28: Groovy Love Birthday

Good morning!  If you're like me and on the East coast we spent the weekend hunkering down and waiting out the snow storm and then working to dig out (I'm still so sore, can barely lift my arms).  Since it's the start of a new week it's time for a new challenge over on the Stylin' Stampin' INKspiration blog, this time it's the mystery challenge.  We were given 5 items that we needed to incorporate any combination of in a project, I decided to go with gusto and use all 5 elements, not as easy as it sounds.

I started with Whisper White Thick cardstock for the cardbase (this stuff is great) and then added a piece of Bermuda Bay cardstock and then Watermelon Wonder cardstock that was embossed with the Big Shot and the Happy Heart Embossing Folder.  Next I took a piece of Wild Wasabi cardstock and the Hearts Border Punch and then added Silver Glimmer Paper behind it so the hearts sparkle and then I added a piece of 1 1/4" Bermuda Bay Striped Grosgrain Ribbon that I punched up by attaching with Fast Fuse adhesive.

For the heart stamped image I started by taking a piece of Whisper White cardstock and heat embossed the heart from the Groovy Love stamp set using the heat tool and Whisper White Embossing Powder.  Next I good ink in my 3 colors and sponge daubers and applied the ink so it has a tye-dyed effect before cutting it out with the Big Shot and Circle Collection Framelits and then matted it with a piece of Whisper White cardstock that I cut out with the 2 1/2" Circle Punch.  The greeting is from the new Suite Sayings stamp set and was stamped in Wild Wasabi ink on Whisper White cardstock before cutting it out with the XL Oval Punch and then sponging the edges with Watermelon Wonder ink before attaching the greeting to the cardfront with dimensionals.

This card is lots of fun and I made it for a young girl and thought the bright colors and tye-dyed look is so fresh and fun, she'll love it!  The other designers are sharing some great ideas for inspiration and then come join us and play along!

Below are easy ordering links for the products used on today's card:

Built for Free Using: My Stampin Blog


Enjoy,

Diana

Pin It!

Search This Blog