Thursday, August 2, 2012

Virginia Tax Holiday, August 3-5, Don't Miss out on Stocking up on Stampin' Up! Essentials!

Good morning friends!  Just a quick reminder to let you know that the state of Virginia is having a sales tax holiday for school supplies up to $20.00 per item from August 3-5. Because school supply items are included in this sales tax holiday, the list of items below will be state tax-free during the holiday period.  This is a great opportunity to stock up on these essential items for your upcoming crafting projects!

Please note that you must place your order with Stampin’ Up!® during the tax holiday period in order to receive these items tax-free. Also, keep in mind that this is a state sales tax holiday and may not apply to additional city, jurisdiction, or county taxes.  You can either email me your order or you can order directly from my website at:  http://www.stampinup.com/ECWeb/default.aspx.

  The following items are tax-exempt during the Virginia sales tax holiday:
NumberDescription Price
100425 2-Way Glue Pen $4.50
104332 Snail® Adhesive $6.95
104331 Snail Refill $4.50
104294 Sticky Strip $6.95
104430 Stampin' Dimensionals® $3.95
103683 Mini Glue Dots $4.95
103579 Paper Snips $9.95
103179 Craft & Rubber Scissors $19.95
101879 Watercolor Pencils $19.95
105021 uni-ball Signo® Gel Pen $3.95
102845 Blender Pens $9.95
various Stampin' Write® Markers $3.50
119802 Subtles (10) $16.95
119803 Regals (10) $16.95
119804 Brights (10) $16.95
119805 Neutrals (10) $16.95
110755 Multipurpose Liquid Glue $3.95
104045 Anywhere Glue Sticks $3.95
123002 2011-2013 In Color Stampin' Write Markers $14.95
128978 Silver Stampin' Dazzle Marker $3.50
128979 Gold Stampin' Dazzle Marker $3.50

Please let me know if you have any questions and happy shopping!

Diana
Pin It!

Tuesday, July 31, 2012

Patterned DSP Flowers, oh my!

One of the things about convention that I love is all the creativity that your exposed to all the fabulous opportunities to learn new techniques and projects.  For the past two years during convention Stampin' Up has offered additional evening classes that you can sign up and pick a class that you're interested in.  One of the extra classes I took this year was on mixing patterned paper and Carrie Cudney was the instructure and it was wonderful.  We made this great decor item uses tons of different designer paper.  We painted directly on the First Edition DSP very lightly and the canvas frame.  Once the paint was dry we used stamps and craft in to stamp on the paint and then sanded it so it was distressed.

We then made lots of flowers with different size scallop circle punches and designer papers.  Some were four petal flowers and other were cone type flowers.  These flowers were so fun to make and then we finished them off with stems and leaves made with different designer papers and even new Naturals buttons for the centers. 

This class was so fun and the fact that I was able to finish the project during the two hour class was definately great for me.  As an added bonus, while we were waiting for the paint to dry Carrie shared several tips for mixing different types of DSP so they'll work perfectly and even shared several completed projects so we got even more great ideas.

I hope you enjoy and if you're interested in making a project please let me know and we can see about setting up a class if there's enough interested.

Happy stamping,

Diana
Pin It!

Sunday, July 29, 2012

Wacky Wishes: Sketch Challenge

Good evening friends!  After traveling for several weeks we enjoyed spending some quality time together as a family this weekend and I have to say I'm LOVING the start of the Olympics and watching all the amazing athletes, it was a great accompaniment in the stamp studio.  For this weeks Stamping 411 challenge I decided to nice and bright.  I used the Summer Smootches DSP as the foundation of the card (this paper is definately one of my favorites this year).  The card base is Island Indigo and is a 4 1/2" square card.  Alternating with the DSP is a square of Old Olive that I embossed with the Lattice embossing folder and the main image which was stamped with the Wacky Wishes stamp set (colored directly on the rubber with different Stampin' Write markers to make the rainbow) and then embossed with the Perfect Polka Dot embossing folder.  The finishing touch was adding a bow with Rich Razzleberry stiched 1/4" grosgrain ribbon, perfect.

This was a fun challenge and something that could definately be used for different occasions and stamp sets.  I have to tell you something funny, part of my projects this weekend was to make all the birthday and thank you cards we were going to need for August.  So after making this card I was looking through my supplies since I needed to make a birthday card for one of Aidan's classmates.  All the sudden a light came on, why don't I just use the sketch card I made, which I knew would be perfect for a little 7 year old princess, it's great when unexpected things just work out.

Hope you enjoy and have a great week!

Diana
Pin It!

Friday, July 27, 2012

Convention Swaps, Perfect for Christmas Gift Giving

Good morning friends and happy Friday!  We've had a busy week of getting settled back into the regular routine and adjusting back to our normal time zone, thankfully I think we're finally there.  So I have lots to share including and I've been busy editing pictures so I thought I would continue sharing some of the swap projects I took to convention, can you believe there are still more?  I was definitely a busy little bee leading up to the big event.  Today I'm sharing my second gift bag and tag, this time Christmas themed.  I decided to go with something more vintage and classic so I used the Bells and Boughs stamp set.  I stamped the Crumb Cake background with the large image with Crumb Cake ink.  Then I used a piece of Cherry Cobbler cardstock and ran it through the Big Shot with the Vintage Wallpaper embossing folder.  This was layered with a piece of Always Artichoke that I punched with the Scallop Trim Border punch.  After I glued that to the back I spritzed the whole thing with Champagne shimmer mist so it sparkles.  I greeting uses the same stamp set and was punched out with the Large Oval punch and sponged around the edges before adding it to an oval embossed with the Designer Frames folder and I tore around the edges and sponged with Early Espresso ink.

For the tag I used the Two Tags die to cut the basic shape and then stamped it with the same Bells and Boughs stamp set and used the Tags til Christmas stamp set for the To and From.  I used a mixture of Stampin' Write markers and ink pads and blender pens to color in the bell and sponged around the edge with Crumb Cake ink.  The final touch was to tie the tag to the bag with Early Espresso Baker's Twine and a Cherry Cobbler seam binding ribbon bow. 
These bags turned out so pretty and since I use tons of gift bags for all sorts of occasions I'm thinking about starting to decorate my own (if I can plan ahead of time).  Would you like to do this, let me know as I'm working on planning a gift bag and tag class so we'll be all set for any further gift needs.

Enjoy your weekend!

Diana


Pin It!

Wednesday, July 25, 2012

Convention Make & Takes

Good morning friends!  I had a fabulous time at our Stampin' Up annual convention last week and enjoyed seeing friends, meeting new people, stamping, swapping, and learning about all we have to look forward to in the new year.  On Wednesday I participated in an alternate Make & Take session where we had four hours to work on our projects which I loved since I was able to get all the projects done leaving a little bit of relaxing time during the rest of the convention.  Below are pictures of each of our projects:


The two projects above use the It's Amazing stamp set and while ver detailed were lots of fun!


This box and matching card set uses the Daydream Medallions stamp set.  SU had a great idea to save the round rubber stamps from the middle of the medallion stamps and using them as their own stamps to stamp on the kraft box (love it!)


The last two projects above use the Affection Collection stamp set.  This set will be released next month in the Holiday catalog and you're definately going to want to add this to your stamp library.  I really liked the card we made it it may actually be one of our projects for an upcoming stamp class.

Hope you enjoyed and stay tuned for more inspiration from convention.

Happy stamping,

Diana
Pin It!

Saturday, July 21, 2012

Convention Swaps: Day 5

It's been non-stop fun and laughter these last few days and I can't wait for our closing ceremony this afternoon, we're expecting a new announcement and I'm on my toes with anticipation.  Today I'm sharing a card for a masculine swap I participated (we always need more manly card ideas).  This card uses the Bring on the Cake stamp set. This card uses Crumb Cake, Soft Suede, and Not Quite Navy as the foundation colors.  I also the First Edition Speciality DSP and stamped the compass image from The Open Sea set before sponging the edges.  I also used the Houndstooth Embossing Folder and Denim Jean Ribbon.  The greeting is punched with the Decorative Label punch and matted on a piece cut with the apothocary accent framelits and popped up with dimensionals.

This card was a big hit during the swap.  I'll admit I love how this card turned out but after making 76 of them I'm not in any rush to make them anytime soon, but I know I'll make it again.

Have a happy Saturday!

Diana
Pin It!

Thursday, July 19, 2012

Convention Swaps: Day 4

Happy Thursday!  I'm so excited this morning, not only do we have our first full day of convention events but also my mom and Aidan are flying in this afternoon and after a week and a half I can't wait to see my little man.  Today I'm sharing a little treat box I made for the same halloween swap as yesterday.  These are so fun and easy to make, I actually made a version of it for Leadership this past January and you can check that one out HERE.  This uses the new Tricky Treats stamp set which is so cute and love that every single image fits in one of our punches which make them a breeze to use for any of your projects.  This box uses the Petite Pocket XL Bigz Die and with just four simple scores with the Simply Scored pad it creates a box perfect for a small candy treat (Kit Kat's in this case).  The other great thing is that the stamped image is mounted with dimensionals and overlaps the flap on the box to keep it shut.

Enjoy and have a great day,

Diana
Pin It!

Wednesday, July 18, 2012

Convention Swaps: Day 3

Good morning friends from beautiful Salt Lake City!  I'm can't wait to get our first glimpse of what's in store for us at convention this year, including Momento Mall (what girl doesn't love shopping!!), stamping, and catching up with friends old and new.  Today I'm sharing a card I make for an halloween swap.  It uses the Kidoodles stamp set (this little spider is too cute).  The cardbase is Cajin Craze and I layered that with a piece of Old Olive designer paper and Basic Gray that was embossed with the Spider Web embossing folder and Big Shot.  I also added a cute little rhinestone to the web like a drop of water and Basic Black scalloped polka dot ribbon.

The stamped image was stamped on Whisper White with Basic Black ink and I used Stampin' Write markers to color in the images.  It was then punched out with a 2 3/8" scallop circle punch, sponged with Basic Gray ink, and then matted on a piece of Rich Razzleberry cardstock punched with the 2 1/2" circle punch

This is a classic design and easily adapted for any occasion and stamp, you'll have to try it out.

Enjoy,

Diana
Pin It!

Tuesday, July 17, 2012

Convention Swaps: Day 2

Good morning!  Later today I'm flying to SLC and I'm so excited that my toes are actually tingling!!  I signed up for several organized swaps this year (which means you sign up in advance and the creations are within specific parameters).  Today is the first of two gift bag and matching tag sets I'm swaping.  This set is so fun and perfect for birthdays.  It uses the Kidoodles stamp set which I love and you'll see in several different items this week.  The piece of Island Indigo cardstock was run through the Big Shot with the Perfect Polka dot embossing folder on the top and then I added a piece of patterned paper from the Summer Smootches DSP and Calypso Coral 3/8" Ruffled Ribbon.  Next I stamped the image on whisper white with Basic Black ink and colored it in with Stampin' Write markers before punching it out with the 2 3/8" scalloped circle punch.  This piece was matted on a piece of Pool Party cardstock that I punched with the 2 1/2" circle punch.

For the tag I used the same stamped image and DSP so it would coordinate and made a 3x3 card.  I also added Wisteria Wonder cardstock to the card to highlight all the colors in the octopus image.  I punched a small circle in the back so I could use a piece of white baker's twine to tie the tag to the handle of the gift bag.

This bag was so fun to make and I'll definately be making more since I love to use gift bags for all our gift giving occasions.  This is also a great way to use up all the designer paper, ribbons, etc. that I've been stocking up on.

Enjoy,

Diana
Pin It!

Monday, July 16, 2012

It's Time to Get our Convention Groove on!

Good morning friends!  We had a great weekend relaxing and enjoying our quiet weekend with our kiddo but I also spend a large chunk of item wrapping up all my swaps for this weeks Stampin' Up! convention.  I leave tomorrow and I'm so excited to see fabulous friends and learn all of what is coming up in the new year, plus Aidan and my mom are going to meet me on Thursday so I get to see my baby (I've definately missed him!)  So this week I'm going to be sharing all the projects I've been making the past couple of months to swap. 

Today I'm sharing a card I make for general floor swapping.  I'ts actually a copy of of a card we made at a workshop several months ago and I updated the colors and added the new Itty Bitty Banners stamp set.  It also features the Mixed Bunch set (I was definately doing the happy dance when I found out this set was carried over to the new catalog).  I also used two different packs of DSP, Summer Smootches for the orange piece and Brights DSP pack for the Daffodil Delight strip.  I used the apothocary framelits and big shot to cut out the orange piece.  The finishing touch was a bright button with a bow of white baker's twine that just fit these flowers perfectly.

Hope you enjoy and check back tomorrow for the next sample!

Diana
Pin It!

Sunday, July 8, 2012

Lattice Flower: Sketch Challenge

Good evening friends.  After a fun-filled vacation we arrived home this morning after flying home on the red-eye so I've been pretty tired today and worked hard to stay busy so I didn't fall asleep.  I'm hoping this will help me get adjusted back to from the time difference in WA.  Part of my day was spent in the studio working on swaps for convention and I definately wanted to play with this weeks Stamping 411 challenge.  This weeks challenge was a lot of fun and definately open to different possibilities.  I used the Summer Smootches DSP as the foundation of the card and to select all the coordinating colors.  I decided to try something different with the flower and used the Lattice die and Big Shot.  After cutting out two of the lattice pieces I trimed them down and layered them to create a flower.  I also ran the flower pieces through the Big Shot with the Vintage Wallpaper embossing folder to add some texture.  For the center I added a Pumpkin Pie button tied with Lucky Limeade baker's twine (I've fallen in love with using buttons in the center of flowers lately). 

The greeting uses the new Itty Bitty Banners stamp set and matching Itty Bitty Banner framelits.  I decided the card needed something towards the bottom so I added a piece of Real Red 1/4" Stiched Grosgrain Ribbon tied in a knot, the perfect addition.  This was a fun challenge and it's so fun to see what everyone comes up with and could be adapted with all kinds of DSP and embelishment shapes. 
Hope you enjoy and have a great week!

Diana
Pin It!

Reversed Punched Blossom Flowers

I can't believe the end of the weekend has arrived.  We've had a great time visiting family in Washington State.  Aidan is actually staying and spending some time with his grandparents so it's going to be two whole weeks before he comes home (what will mommy and daddy do???)  Today I have the last card from last month's stamp-a-stack.  This card is suprisingly simple but packs quite a punch.  The cardbase if Tangerine Tango and then we added a piece of designer paper from the Floral District DSP pack.  Next we took a piece of Whisper White cardstock and ran it through the Big Shot with the Polka Dot embossing folder and then sponged around the edges with Tangerine Tango ink.  Next we took the blossom punch and punched out a couple of partial flowers from the white piece so when it's layered the flowers show through in the shape of the blossom.  We also added buttons from the Brights button package and tied bows on each button with Lucky Limeade Baker's TwineGlue dots make quick work of adhering the buttons to the paper and they're not going anywhere.  Added a little Baja Breeze Seam Binding and a greeting stamped from the Teeny Tiny Wishes stamp set which was punched with the Word Label Punch and matted with the Modern Label Punch

This card is easy peasy and the ladies loved it!  It's fun to find new ways to use products we already have and this is perfect to showcase our great designer paper.

I'll be back shortly to share lots of new projects you won't want to miss.

Have a great week,

Diana
Pin It!

Friday, July 6, 2012

Reason to Smile, Birthday Wishes

TGIF!  We've had a fabulous week and hope you have as well.  I'm back again to share another card made with the Reason to Smile stamp set.  You are not going to want to miss out on this stamp set, you'll only be able to get in July and when you place an order of $50 or more you can purchase the stamp set for only $5 (that's awesome!).  This card uses Marina Mist, Rose Red, and Pretty in Pink colors.  Since this is a two step stamp it's a cinc to color in the followers with coordinating colors.  The ribbon is Marina Mist Polka Dot Scallop Ribbon.  The greeting uses two of the new framelits from the apothecary accents framelit set which are so fun.   The greeting is from one of the fun new hostess sets, Wacky Wishes, which has lots of fun greetings perfect for any any occasions.  We sponged the edge with Pretty in Pink ink after stamping and punching it out. 

I know that one of the samples I've shared will make you need to have this stamp set so please contact me and I can help you get your set before they are gone.

Happy stamping,

Diana
Pin It!

Wednesday, July 4, 2012

Happy Fourth of July!

Wishing you and your family a Happy and Safe 4th of July!  Thank you to all the men and women who serve to protect us and the freedoms we enjoy!!

Pin It!

Monday, July 2, 2012

Blue Ribbon Wishes

Well, it's the start of another week, at least it's a holiday week with lots of fun and celebration.  Today I'm sharing another card from last month's class.  This card uses the new Blue Ribbon stamp set.  I knew as soon as I saw this stamp I had to have it since it makes such fabulous ribbons which are really hot right now, Aidan loves to get ribbons, for birthdays, accomplishments, etc.  This card also uses the coordinating World Spectacular DSP.  We ran the card base (Daffodil Delight) through the Big Shot with the Polka Dot embossing folder.  The ribbon is punched from Early Espresso cardstock with the Dotted Scallop Ribbon Border punch.  We have several layers on the ribbon, either cut out with scallop and circle punches or paper snips for the tails.  We also added small pieces of Calypso Coral 3/8" ruffled ribbon as extra tails. 

This card is perfect and really helps celebrate your special one's special day!

Enjoy,

Diana
Pin It!

Saturday, June 30, 2012

Garden Beauties

Good morning friends!  When I'm not stamping and trying to keep up with Aidan I love gardening.  It seems like I always work on my flowers but forget to take pictures and they end up getting abused by the heat of summer.  This year I wanted to play with my new camera and lens and popped out on the patio to take pictures of the beauties before the summer heat gets really bad.  I love looking at them as they always cheer up my day and thought you would enjoy.


Pin It!

Thursday, June 28, 2012

Quintessential Flower Meets 2012-2014 In Colors

Happy Thursday! Today I wanted to share one of the cards we made at last weekends stamp-a-stack.  This was a great card since we used all the new 2012-2014 In Colors as well as the new firm foam stamp pads.  I have to say, these new stamp pads are amazing and once you use them you'll want to get them in all our colors.  The flower image is the new Quintessential Flower single stamp set.  I loved how the new Annual Catalog showcased this stamp and how you could make all the different color layers with our punches so we recreated it here.  In the center of the flower is a Dahlia flower that come in all the new In Colors. 

The cardbase is Raspberry Ripple and layered with a piece of Gumball Green (this green is awesome!) cardstock that was run through the Big Shot with the Striped embossing folder.  We also used the new Midnight Muse Stiched Satin Ribbon.  The greeting is from the Loving Thoughts stamp set and we cut the banner with the Petal Cone Die and Big Shot.

This card is nice and simple, a perfect way to showcase our new colors which we're sure to love.

Enjoy,

Diana
Pin It!

Tuesday, June 26, 2012

Reason to Smile: Sketch Challenge

Good evening friends!  I know I've been missing lately but we've been getting ready to head out on vacation but don't fear I have lots of new projects to share.  For this weeks Stamping 411 challenge I have a great new preview of a stamp set that will be available next month, Reason to Smile.  The card starts with a cardbase of Pool Party and used a piece of Summer Smooches DSP matted on Whisper White.  The main stamped image used Tangerine Tango and Island Indigo for the outline of the flowers and Daffodil Delight and Pool Party for the inside coloring.  I love the two step stamps since it's so easy to to color in images.  I also stamped the large flower with Old Olive ink on another piece of Whisper White and colored it in with Tangerine Tango and the blender pen before cutting it out with paper snips.

The ribbon is 1/4" Daffodil Delight Stiched Grosgrain ribbon which is new and so fun.  For the greeting I used the new Itty Bitty Banners stamp set with Tangerine Tango and cut the banner out with the new matching Itty Bitty Banner framelits and the Big Shot.  I also sponged around the edges of the banner with Daffodil Delight ink.  Both the large flower and banner were popped up with dimensionals.  This card is not my normal color combinations but I love how bright and summery it is.

While I'm away I'll be sharing the projects from last weeks stamp-a-stack and we make another card with the Reason to Smile stamp set that you'll love so you have to check it out.

Happy stamping!

Diana
Pin It!

Tuesday, June 19, 2012

End of the Year Teacher Gifts

Good morning friends!  So Aidan's last day of school was on Friday and he wanted to make special gifts for some of his teachers this year so I whipped up these quick gifts.  I saw these on Becky Roberts blog so you can check out her version HERE and get the dimensions for the cardstock and scoring.  I used the Berry Blossoms and Just Add Cake designer paper (both retired) and picked out the cardstock and ribbon colors based on the DSP.  I cut two flowers with the Blossom punch and used Paper snips to cut two slits in each petal and layered them so they kind of looked like daisies.  Next I tied a bow with Lucky Limeade baker's twine in various Brights designer buttons

I stamped the thank you greeting with the new Itty Bitty Banners stamp set and cut it out with the new Itty Bitty Banners framelits.  I also cut an extra banner to write Aidan's name.  Inside each of the boxes are gift cards and chocolate, perfect.  These were so fun to make and came together in a snap which was perfect since I needed to make nine of them.  Aidan was so exited to give them out and was even more excited to finish school and is now a second grader.  Enjoy!
Pin It!

Sunday, June 3, 2012

Happy Greetings: Sketch Challenge

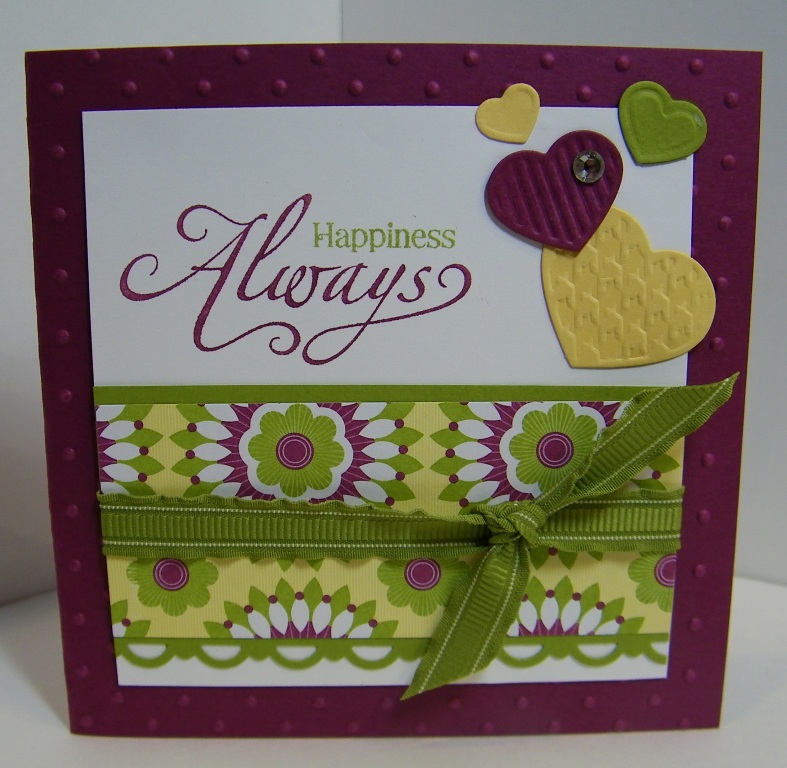
Happy Sunday friends!  We had another great weekend with the highlight being the neighborhood BBQ that we host every year.  Not only were we joined by great friends and neighbors but the weather was absolutely perfect, sunny and cool enough we were able to be outside and even turned off the AC and opended the windows, love it!  After getting the house cleaned up I was able to pop in the studio to do a little work before we were off to Chris' softball game.  For this weeks Stamping 411 challenge I combined a little old and a little new to come up with this cute square card.  I used the new Foral District DSP to come up with the color scheme.  I ran the Rich Razzleberry cardbase through the Big Shot with the Perfect Polka Dot embossing folder.  The next layer is Whisper White and I added a strip of the DSP that was matted with Lucky Limeade cardstock that was punched with the Scallop Trim border punch along the bottom. 

I The greeting is from the Happy Greetings stamp set (retired) but I loved the sentiment and I thought it would be perfect the little heart details.  I cut out the hearts with the Fashionable Hearts Embosslit.  I added a large rhinestone to one of the hearts and a little Lucky Limeade 3/8" ruffled ribbon for the finishing touch. 
This card turned out nice and pretty, so much fun.

Have a great week,

Diana 
Pin It!

Search This Blog