Showing posts with label Project Life Holiday Cheer. Show all posts

Monday, December 22, 2014

Quick and Easy, Last Minute Christmas Gifts

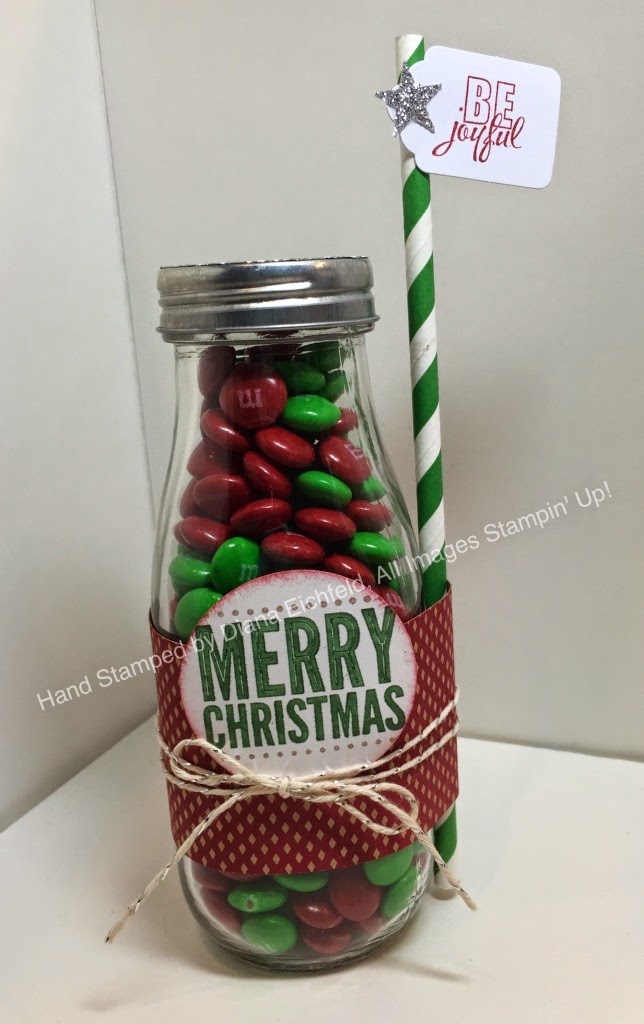
Good morning!  We've entered the last days before Christmas, are you ready?  We had a great weekend relaxing and enjoying some holiday traditions but I must admit I still have more things to get finished than I would care for.  It always seems like you have some last minute gift needs that come up so I thought I would share a super quick and easy gift that is sure to please.  There are some friends that Aidan wants to give a little something to so I found this glass milk bottles in the dollar section of a local store (they were sold in packages of two) as wells as these cute paper straws, I thought of adding the straws to go with the "milk".  I just filled each of them with candy and then decorated them for a fun threat.  I added circles of DSP from the Trim the Tree Designer Series Paper Stack that were punched out with the 1 3/4" Circle Punch on the top of the bottle top for some extra festive fun.

I wrapped a piece of Under the Tree Specialty Designer Series Paper around the bottle and made sure to include the straw inside the DSP wrap.  Next I tied a piece of Silver Baker's Twine around the bottle.  I used two different stamp sets for the greeting, Mingle all the Way and Merry Everything and after stamping the greeting used the 1 3/4" circle punch to cut them out and use dimensionals to attach them to the bottle.  I added cute little flag to the top of the straw using extra tags I had from the Many Merry Stars Simply Created Kit (the Cherry Cobbler stars are also from the kit).  I also used some Silver Glimmer Paper and the star punch from the Itty Bitty Accents Punches Pack to make some glimmery stars.  The greeting on the flag tag uses the Project Life Holiday Cheer Stamp set.

Here' a close up of one of the bottles, aren't they cute?  These are so easy and Aidan's really excited to deliver these to his friends in the next couple of days.


Below are easy ordering links for the products used on today's projects:
Built for Free Using: My Stampin Blog


Good luck wrapping everything up on your To Do list, enjoy!

Diana

Pin It!

Wednesday, November 19, 2014

Holiday Gift Card Holder: Santa Suits Up

Sometimes just one’s is not enough and I’ve been having fun making lots of projects that are so cute.  So today on the Stylin’ Stampin’ INKspiration blog we’re sharing gift card holders and the designers have lots of great ideas to help you package your gift card so it really impresses.  One of the great new items in the Holiday catalog that isn’t getting a lot of love right now is the new Gift Card Envelope and Trims Thinlit Die.  This set makes a super cute and easy gift card envelope along with several different tags and enclosures to finish the envelope.  I’ve also figured out that these envelopes perfectly hold a fun size back of plain M&M’s or Skittles so I’ll be using it for school class gifts in the future.  I’m in love with the classic look if Santa’s suit so I used that for inspiration for this gift card holder.  I used the die and a piece of Smoky Slate cardstock to cut the envelope and then cute two of the circles in black for the back enclosure.

To decorate the front I took a piece of Real Red cardstock and embossed it with the Big Shot and Perfect Polka Dot Embossing Folder.  Next I added a strip of Basic Black cardstock, a square of Silver Glimmer Paper, and then a small square of Basic Black on top (love how that easy layering make the buckle look.  For the greeting I used the Project Life Holiday Cheer stamp set and stamped it in Real Red cardstock and cut it out with the Big Shot and Itty Bitty Framelits (I trimmed off one side) and attached it to the front with a dimensional before tying a small know in 1/8” Silver Ribbon and attaching it with a Glue Dot.

For the back I kept it pretty basic, I used my paper piercer to make the holes in the black circles and the envelope flaps and used the Mini Silver Brads to attach them so I could add some Basic Black Baker’s Twine for the ties and they would wrap around the circles to hold everything in place.  Of course I had to add a “to” and “from” so I used the Many Merry Stars stamp set (from the Holiday Supplement) and stamped them in Real Red.

I have to admit I absolutely love how easy and fast it is to make gift card envelopes with this die, maybe I should do less shopping and give more gift cards so I can make more of these (haha, that’s a whole other story!)

Below are easy ordering links for the products used on today’s card:

Built for Free Using: My Stampin Blog


I hope you enjoyed this project and it’s given you an idea to help with your upcoming holiday gift giving need. 

Happy creating,

Diana
Pin It!

Saturday, November 15, 2014

Scrappy Saturday: Halloween Project Life Style

I told you I would be back….of course it’s Saturday so I also have my Scrappy Saturday project to share.  I decided to change things up and not use My Digital Studio for today’s page (don’t worry I have another layout to share soon) but today I’m embracing the Project Life style of memory keeping.  Stampin’ Up! sells some great products to help make your memory keeping quick and fun.  What’s also great is you can use our traditional products as well with this approach.  I recently participated in a demonstrator swap where we made our own Project Life cards using our Stampin’ Up! products.  Today’s page uses the two cards I made for this swap, perfect for Halloween and I designed them to coordinate so I was able to finish the page in less than 5 minutes. 


I like my layouts to have dimension and with our framelits, ribbon, baker’s twine, and stamps I was able to create pocket inserts that match my need and have the extra layers and texture I enjoy.

Below is a list of products used on today’s layout and pocket inserts:

Built for Free Using: My Stampin Blog


Even if you aren’t into traditional or digital scrapbooking the Project Life approach is so fun and easy you should give it a try.  Stampin’ Up! has released some new limited edition projects for the Daily December memory keeping and I’m giving it a try and would love to show you how to take all those fabulous pictures you have on your phone (let’s be honest how often do they come off your phone to a medium you can enjoy in the future??) and into an album to enjoy and cherish.

Take care,

Diana
Pin It!

Friday, October 31, 2014

Stylin' Stampin' INKspiration: Family Halloween Fun!

I'm back!  There's so much fun with the Holiday I had to come back and share one more Halloween project.  Every holiday I like to send family and friends cards to let them know we're thinking of them so this is the card I made to send this year.  It was inspired by a card by Patty Bennett (loved how she created the tombstone using the Note Tag Punch).  Today over on the  Stylin' Stampin' INKspiration blog we're sharing Halloween projects and this was the second card I shared.

For this card I started with Sahara Sand for the cardbase.  Next I took a piece of Basic Black cardstock and used the Confetti Stars punch to punch the stars along the border and then added a piece of Crushed Curry cardstock behind the cardstock to create a starry sky.  I also added a piece of Motley Monsters Designers Series Paper along the bottom of the card.

I had lots of fun with punches and framelits to fill out this card.  I stated with the Note Tag Punch and punched out a piece of Smoky Slate cardstock and stamped the "fright night" and bat and stars from the Project Life Holiday Cheer stamp set before sponging around the edges with Basic Black Ink.  Next I used the Holiday Invitation stamp set to create the moon image by stamping the moon and stars on Crush Curry cardstock, punching it out with the 1" Circle Punch, and adding a small rhinestone for a little sparkle.

I love the little ghost and pumpkin and they are too cute, and super easy thanks to the Fun Fest Photopolymer stamp set and matching Fall Fun framelits.  I cut the ghost out of Whisper White cardstock and then used Momento Ink to stamp the ghost face.  For the pumpkin I used Stampin' Write Markers to color in the pumpkin before stamping it and then stamped the face in Black before cutting it out with the framelits.

The final touch was to add the greeting.  For this I used the Bite Me Photopolymer stamp set (love that this set is still available).  I stamped the greeting in Tangerine Tango ink on Sahara Sand cardstock before punching it out with the Modern Label Punch.  Of course I had to sponge around the edges with Basic Black ink before attaching the greeting to the cardfront.

Below are easy ordering links for the products used in this card:

Built for Free Using: My Stampin Blog


Have a wonderful Halloween and enjoy all the festivities!

Diana
Pin It!

Thursday, October 30, 2014

Halloween Treat to Impress!

Tomorrow is Halloween and one of the things I love about this holiday is of course of the tasty treats and candy (who doesn’t???)  Of course I can’t just give someone a piece of candy, I love to decorate and pretty it up so it’s a little more special.  Today I’m sharing several treats I’ve made to give to our little ghosts and goblins.

The first item is a treat bag for Aidan to give to some of his neighbor friends.  In the past the neighborhood “Booing” tradition has taken place but it’s kind of died down but Aidan really liked this idea.  We decided to make these little treat bags that Aidan can give to friends.  We used some small paper bags I had in my stash and stamped on them with the Gorgeous Grunge stamp set in Basic Black, Tangelo Twist, and Blackberry Bliss.  For the tag I used the Scalloped Tag Topper Punch (these punches are awesome!!!) and Very Vanilla Cardstock.  For the “Boo” and “to” images I used the September Paper Pumpkin stamps and the “You” is from the Merry Everything stamp set.  It’s great using Stampin’ Write Markers to only ink up part of the image for even more possibilities.  The spooky trees stamped along the bottom is also from the Paper Pumpkin kit as are the stickers and Orange Sequins.  I love how versatile the Paper Pumpkin kits are and you can use it for so much more than the initial kit projects.  The final step is to use the 1/8” Circle Punch and then attached the tag to the bag with Black Baker’s Twine (also from the Paper Pumpkin kit).  

 While there is so much candy already involved with Trick-or-Treating and other activities I still like
to give a little treat to Chris and Aidan, along with their holiday cards.  I found little bags of each of their favorite candies and have just decorated them.  For Aidan's I created my own DSP using the spooky faces from the Fall Fest stamp set and then matted it with Basic Black cardstock.  Next I wrapped a piece of Tangelo Twist Two Toned Trim around the treat and then frayed the edges for a fun effect.  The greeting is from the Frightful Wreath Photopolymer Stamp set and was stamped with Elegant Eggplant ink on Smoky Slate cardstock and then I stamped the splatter in Silver Encore ink.  The final touch is cute pumpkin using the Fall Fest stamp set and framelits.

For Chris' treat I decided to do a little recyclying and used some packing paper and used the fringe scissors and then crumpled it for a straw-like effect.  I added a belly band of Motley Monsters DSP and Basic Black cardstock in front of the packing paper.  I wrapped some Basic Black Baker's Twine around the treat to attach the tag that I made using the Note Tag Punch, and Project Life Holiday Cheer stamp set to create a tombstone and a Fall Fest Pumpkin.

I hope these have given you some cute treat ideas that you still have plenty of time to make before Halloween.

Easy ordering links for the products used in these projects are below:

Built for Free Using: My Stampin Blog


Enjoy!

Diana
Pin It!

Search This Blog