Pages

Wednesday, December 31, 2014

Stylin' Stampin' INKspiration New Years: Mingle All the Way

Good morning and Happy New Years Eve!  Why is it that vacation time moves even faster than regular time?  We've been having a great time and enjoying every minute.  Today over on the Stylin' Stampin' INKspiration blog we're sharing ideas for New Years cards so I decided to combine this with the Create with Connie and Mary Sketch Challenge for double the fun.  I started with Pool Party for the cardbase and then added a piece of Whisper White cardstock under by decorative pieces (white looks best in my opinion when using the Gold and Silver Vellum paper).    I added two pieces of the striped Silver Vellum Paper and then created my own paper for the other two panels.  To mimic the drink theme in my greeting stamp I took a piece of Basic Black cardstock and used the Small Oval punch (with Old Olive cardstock) and 1/4" Circle Handheld Punch (with Real Red cardstock) to create olives on the paper. Then I ran it through the Big Shot with the Perfect Polka Dot Embossing Folder to embed the olives in the cardstock for added fun.

For the stamped greeting I used the Mingle all the Way stamp set (will be sad this set is going away next week but it's on sale now so make sure you have it for your crafting toolbox for future projects!)  It was stamped in Memento Ink and then I colored in the drink with Real Red and Old Olive Stampin' Write Markers.  I used Olive Olive for the mat and attached it to the cardfront with dimensionals.  I added a piece of Real Red 3/8" Satin Woven Ribbon.  For extra fun I decided to add a shaker element to the card since I had some White and Black stars that were punched out with the Confetti Star Border Punch (from another project).  I used the Shaker Frames, Window Sheets, Silver Foil cardstock, along with the 1" Circle Punch and 3/4" Circle Punch to create the element (so fun in person!).

I have to admit, this card is a little over the top but since I had time I couldn't stop fussing and adding fun things to the card, it's fun to just play and tinker.  Make sure to check out the other design team cards for additional inspiration and hope you get a little crafting in over the holiday!

Below are easy ordering links to the products used on today's card:
Built for Free Using: My Stampin Blog


Have a wonderful and a great start to 2015!

Diana

Monday, December 29, 2014

Stylin' Stampin' INKspiration Masculine Monday: Playful Pennants

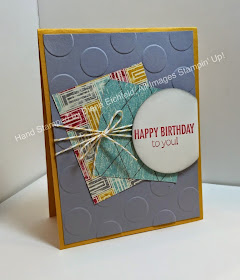
Good morning!  What a fabulous, extended Christmas weekend!  We had such a great, relaxing time just enjoying time as a family which is perfect.  Thankfully we are off this week as well so there is lots more of this planned.  Today I decided to double up on the fun for today's card I used the Hand Stamped Sentiments sketch challenge for today's Stylin' Stampin' INKspiration Masculine Monday card.  This sketch is so easy and really lends itself to letting the DSP take center stage.  I started with Crushed Curry cardstock for the cardbase and then added a piece of Smoky Slate cardstock that was embossed with the Big Shot and Polka Dot Embossing Folder.  Next I added two pieces of DSP from the Flashback Designer Series Paper Package and then wrapped some Crushed Curry Baker's Twine around the cardfront.
 
For the greeting I used the Playful Pennants stamp set that I just recently got an this was my first time using I (so fun!).  I stamped the greeting in Real Red ink on Very Vanilla cardstock before cutting it out with the Big Shot and Circle Collection Framelits. I also added a little sponging around the edge of the circle with some Smoky Slate ink before attaching it to the cardfront with dimensionals.
 
This card is so fun and playful it will be great for sending birthday greetings and I definitely need to restock my stash of birthday cards so this will fit the bill, and I may have to make a few more (this would also be a great card to use up some of those scraps of paper we all have lying around).  Make sure to check out the other cards the design team members are sharing for additional inspiration.

Below are easy ordering links for the products used on today's card:
Built for Free Using: My Stampin Blog


Have a great day!

Enjoy,

Diana

Friday, December 26, 2014

Sketch Frenzy Friday Sketch Challenge: Get Your Santa On Christmas Thank You

Happy Friday!  I hope you had an enjoyable Christmas, ours was nice and quiet and relaxing which was perfect.  It's always great to see all the join the Christmas season brings to each of us.  Now that the frenzy is over it's time for the clean up to begin and we get to continue to have fun, we don't head back to work until next year.  Of course I had to make one more Christmas card for this weeks Sketch Frenzy Friday sketch challenge  but since the holiday is over I decided to use this for one of my Christmas thank you cards (I'm going to need a lot of these to thank people for all the lovely gifts we've received).  I designed this weeks sketch and wanted to provide something that was open to lots of possibilities for fun.

I started with Sahara Sand cardstock for the cardbase and then added a piece of Whisper White cardstock.  The greeting is from the Sassy Salutations stamp set and was stamped in Cherry Cobbler ink.  I also used the Paper Piercing Tool and the Essentials Paper Piercing pack to  punch the accent element in the top right corner.  The flags of patterned paper are from the Trim the Tree Designer Series Paper Stack and cut with flag tails.

For the main stamped image I used the Get Your Santa On stamp set and stamped it in Memento Ink before coloring it in with Cherry Cobbler Blendabilities markers and the Basic Gray Stampin' Write Marker.  After coloring in the Santa suit I cut the piece out with the Big Shot and Circle Collection Framelits.  The mat was cut out of Garden Green cardstock and cut using the Window Collection Framelits and then embossed it with the Perfect Polka Dot embossing folderDimensionals were used to help pop the stamped image off the cardfront and I added a small bow made with some Silver 1/8" Ribbon.

The card turned out so fun, it's really helping me embrace every last minute of this holiday season, I don't want it to end.  Make sure to check out he cards the other design team members are sharing and then come play along with the extra time you have this weekend.


Below are easy ordering links for the products used on today's card:

Built for Free Using: My Stampin Blog


Have a great weekend!

Diana

Thursday, December 25, 2014

Stylin' Stampin' INKspiration: Design Team Family Christmas Cards

 Merry Christmas!  I hope you are enjoying a wonderful day with your family.  This is a day we like to just chill and relax and enjoying the family time.  Today on the Stylin’ Stampin’ INKspiration blog we didn’t want to leave you lacking inspiration so we thought we would share our families Holiday cards with you.  Given that I make cards it’s kind of expected and anticipated to see what I come up with and usually I design and make my cards in the summer so I just have to add the picture and write in them so the hard part is finished before the holiday craziness starts.  This year I was running behind so I didn’t make our card until Thanksgiving so it had to be a bit easier but still WOW!  The other thing I have to tell you is that like most crafters I have a large stash of product and quite a bit of it is retired that I don’t use in my business but I still love it so I use it for our family cards and projects to help use up the stash (so I can get more, right???)

This years card started with Baja Breeze for the cardbase.  I added a piece of Whisper White cardstock that was stamped with the Hardwood Stamp set and Crumb Cake ink, embossed with the Big Shot and Star Embossing Folder, and then sponged with Crumb Cake ink to help distress the look of the cardstock (there was a lot of steps but I LOVE how the background turned out).  I used the Big Shot and Star Framelits to cut out the shape of our family picture.  I added a piece of retired DSP along the bottom (of course it has glitter for my sparkle!)

The greeting is from the Merry Everything and was stamped in Real Red ink on Whisper White cardstock before punching it out with the Note Tag Punch.  I used the ¼” Circle Punch to punch a whole to add my ribbon (retired, of course, I won’t even admit how much ribbon I have) and dimensionals were used to attach the greeting to the cardfront.

Typically I leave the inside of our cards blank so I have lots of room to write each card.  This year we actually had a lot go on and I really didn’t want to write the same info 70 times so I decided to design and insert using My Digital Studio.  I opened a blank file using an 8 ½” x 11” standard cardstock size (so I could get 4 card inserts per page).  I added text with the family letter and then added 5 circle punch pieces along the left side so I could add more pictures for highlights of the year.  I did also add a holiday embellishment that coordinated with the cardstock color and DSP from the cardfront (the great thing about MDS is that digital elements never retire so you can use them forever, even after we stop selling the physical products).

In the end I really love our card and it fits our family and personalities!

Below are the easy ordering links for the current products used on today’s card:

Built for Free Using: My Stampin Blog


I want to thank all my customers, friends, readers, and followers, I love sharing my creativity and love of stamping and crafting with you and I hope I can inspire and help you create the projects you want.

I hope you enjoyed and have a Merry Christmas!

Diana

Monday, December 22, 2014

Quick and Easy, Last Minute Christmas Gifts

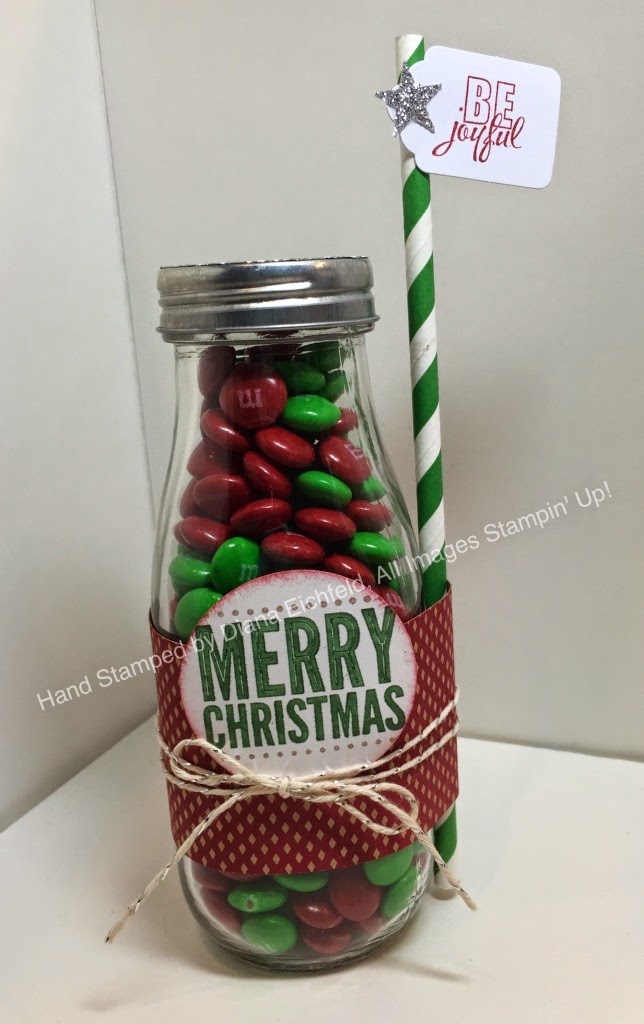
Good morning!  We've entered the last days before Christmas, are you ready?  We had a great weekend relaxing and enjoying some holiday traditions but I must admit I still have more things to get finished than I would care for.  It always seems like you have some last minute gift needs that come up so I thought I would share a super quick and easy gift that is sure to please.  There are some friends that Aidan wants to give a little something to so I found this glass milk bottles in the dollar section of a local store (they were sold in packages of two) as wells as these cute paper straws, I thought of adding the straws to go with the "milk".  I just filled each of them with candy and then decorated them for a fun threat.  I added circles of DSP from the Trim the Tree Designer Series Paper Stack that were punched out with the 1 3/4" Circle Punch on the top of the bottle top for some extra festive fun.

I wrapped a piece of Under the Tree Specialty Designer Series Paper around the bottle and made sure to include the straw inside the DSP wrap.  Next I tied a piece of Silver Baker's Twine around the bottle.  I used two different stamp sets for the greeting, Mingle all the Way and Merry Everything and after stamping the greeting used the 1 3/4" circle punch to cut them out and use dimensionals to attach them to the bottle.  I added cute little flag to the top of the straw using extra tags I had from the Many Merry Stars Simply Created Kit (the Cherry Cobbler stars are also from the kit).  I also used some Silver Glimmer Paper and the star punch from the Itty Bitty Accents Punches Pack to make some glimmery stars.  The greeting on the flag tag uses the Project Life Holiday Cheer Stamp set.

Here' a close up of one of the bottles, aren't they cute?  These are so easy and Aidan's really excited to deliver these to his friends in the next couple of days.


Below are easy ordering links for the products used on today's projects:
Built for Free Using: My Stampin Blog


Good luck wrapping everything up on your To Do list, enjoy!

Diana

Friday, December 19, 2014

Stylin' Stampin' INKspiration Christmas Cards: Lots of Thanks

Good morning, I'm back.  Sometimes you can always use a little extra creative inspiration so today over on the Stylin' Stampin' INKspiration blog we're sharing some ideas for Christmas thank you's.  I'm a big believer in the importance of hand written thank you's and have been teaching Aidan about them so this time of year I need lots of cards.  Just like my post earlier this morning I'm working on using up some of the extra kit pieces I have on my desk before the holidays are over so this card was super fast to pull together.  I started with Cherry Cobbler for the cardbase and then added a layer of Garden Green Cardstock.  The Whisper White piece that is woodgrain embossed is from the Watercolor Winter Simply Created kit (there are lots of fabulous pieces in this kit for lots of fun).
 
All the stars are elements from the Many Merry Stars Simply Created kit, the large newsprint one, Crumb Cake printed one as well as all the small Cherry Cobbler and Gold Glimmer Stars (can you have too many stars or glimmer?)  I also used the Gold Baker's Twine from the Many Merry Stars Kit to make the bow.  The greeting is from the Lots of Thanks stamp set and I stamped it with Versamark ink on Basic Black cardstock before embossing it with the Heat Tool and Cherry Cobbler Heat Embossing Powder.  I punched the greeting out with the 1 3/8" Circle Punch and attached with a dimensional for extra texture.
 
I love it when I can make a quick and easy card that still has a lot of details for the eye and look like you spent a lot of time on it, and being able to use some of those scrap pieces up is an added bonus.  I think I'm going to try to use up all the rest of these little kit pieces now so they don't take up space in my studio and get forgotten about.  Don't forgot to thank all the special people in your life who did something special for you and your family this holiday season and make them a personal thank you that will really let them know how much you appreciate their thoughtfulness!
 
Just a reminder, the Watercolor Winter Simply Created kit is currently on sale as part of the End of Year Closeout so make sure to order your kit for lots of crafting fun before it sells out (there are lots of great holiday projects on sale that are perfect!)

Below are easy ordering links for the products used on today's card:
Built for Free Using: My Stampin Blog


Enjoy and have a wonderful weekend!

Diana

Sketch Frenzy Friday Sketch Challenge: Many Merry Stars Inspired

Good morning and Happy Friday!  Can you believe it's the last Friday before Christmas?  Today's also the last day of school here and Aidan's so excited to have two weeks off.  This morning I'm here sharing the card I made for this weeks Sketch Frenzy Friday sketch challenge. This sketch is so basic and easy (perfect for this time of year).  I'm still working on finishing up m last few Christmas cards and projects (there are so many ideas in my head and on my To Do list will I ever finish?)  so I'm looking for quick projects and if I can use up some of the little pieces I have sitting on my desk even better.  I got the Many Merry Stars Simply Created Kit and made all the stars for a beautiful display with lights and greenery on my plant ledge.  Of course the kit had some extra pieces so I decided to use them for my card.

I started with Crumb Cake for the cardbase and then stamped the star outline in the center using the Many Merry Stars stamp set.  I used my Big Shot, Gold Glimmer Paper, and the Star Collection Framelits to cut the glimmer star out for inside the stamped star.  Next I used two of the small newspaper print stars also from the kit.  The greeting is from the Watercolor Winter Too stamp set and was stamped with Cherry Cobbler ink on Very Vanilla Cardstock.  The wooden snowflake embellishment and Gold Baker's Twine are also from the Many Merry Stars kit (they are so cute but very fragile!!)

This card turned out nice and pretty, with just the right amount of bling.  You should make sure to take a few minutes to check out the other design team card and then come play along, this sketch will be perfect for any project your working on this weekend and can help you knock those items off your To Do list.

Below are easy ordering links for the products used on today's card:

Built for Free Using: My Stampin Blog


Enjoy and stay turned I have another card to share with you today!

Diana

Wednesday, December 17, 2014

Fab Friday Color Challenge: Watercolor Winter Inspired Holiday Greetings


It’s the midpoint of the week, these days are really flying!  Aidan only has a couple more days of school before winter break and we can hardly contain him and the excitement, it’s great to see the joy of the holidays through the eyes of a child (magical!).  Today I decided to play along with the Fab Friday color sketch.  The colors are based on the Watercolor Winter Simply Card Kit and these are great colors but I wouldn’t normally think to combine them all together at once.  I happen to have a few leftover pieces from the card kit so I decided to use them in this card (nothing goes to waste).  I started with Crumb Cake for the cardbase and then added a piece of Old Olive cardstock that was embossed with the Big Shot and On Point Embossing Folder.  Next I wrapped a piece of Cherry Cobbler Baker’s Twine around the Old Olive cardstock and tied a bow.

The Coastal Cabana and Bermuda Bay cardstock pieces are from the card kit, as is the sled (I love this element!!!) and the glitter “happy”.  To finish the holiday greeting I used the Watercolor Winter Too Photopoloymer Stamp Set and stamped it with Cherry Cobbler ink on Whisper White cardstock and cut it out with Paper Snips before attaching to the cardfront with dimensionals.

This card is so fun and I’m glad I decided to play along with this color challenge.  These challenges are great as they get you to step out of your comfort zone and try new things.  If you’re looking for inspiration on your next project try using a layout sketch or color sketch and see where it takes you.  The Watercolor Winter Simply Created Card Kit is part of the Year End Closeout sale and is discounted so if you don’t want to miss out on it, you get product to make 20 cards plus extra elements that you can play with (it’s only available while supplies last so don’t wait!)

Below are the easy ordering links for the products used on today’s card:

Built for Free Using: My Stampin Blog


I hope you have a great day and enjoy!

Diana

Monday, December 15, 2014

Stylin' Stampin' INKspiration Scrapbook Sketch Challenge: Fall School Pictures

Good morning!  Another great weekend and we're now down to less than two weeks to Christmas, crazy!  Today I decided to take a break from my holiday projects for the Stylin' Stampin' INKspiration Scrapbook Sketch Challenge and have it completely not related to the holiday.  I love the sketch we were provided with this month and it is a great way to highlight a single picture so I decided to use Aidan's school picture from this fall.  I decided to go to My Digital Studio for this page and was actually able to make this while I waiting for Aidan at basketball practice this week (I love this flexibility!!!)
I decided to start with one of the predesigned templates and then completely changed it up to fit this sketch (this may take more time than starting from scratch but it's great to get some elements that you know work well together to get things started.
Below is the supply list for the items used on this page:
  
 Background
     Color = 255,250,226

Embellishments
    _Designer Kits/12x12 family album/stitching 2 (re-colored) Color = 230,WATERMARK 255,255,255
    _Designer Kits/12x12 family album/tag1
    _Designer Kits/12x12 family album/stitching 4
    _Designer Kits/12x12 family album/Family Album 12x12 Photobook - string and knot
    Brads\Basic Gray - brad
    Brads\Basic Gray - brad
    Brads\Basic Gray - brad
    Brads\Basic Gray - brad
    Brads\Basic Gray - brad
    Brads\Basic Gray - brad
    Brads\Basic Gray - brad
    Brads\Basic Gray - brad
    Brads\Basic Gray - brad
    Brads\Basic Gray - brad
    Brads\Basic Gray - brad
    Brads\Basic Gray - brad
    Brads\Basic Gray - brad

Stamps
    _Designer Kits\Free Label This\Free Label This - handsome hunter, Color = 216,182,65

Punches
    Basics\1.25 Square Punch
    Borders\Scallop Edge Punch, Fill Color = 255,250,226
    Borders\Scallop Edge Punch, Fill Color = 255,250,226
    Borders\Scallop Edge Punch, Fill Color = 255,250,226
    Borders\Scallop Edge Punch, Fill Color = 255,250,226
    Basics\1.25 Square Punch, Fill Color = POOL PARTY 169,221,199
    Basics\1.25 Square Punch, Fill Color = 255,250,226
    Basics\1.25 Square Punch, Fill Color = 255,250,226
    Basics\1.25 Square Punch, Fill Color = 255,250,226
    1.25 Square Punch,  Filled with: Designer Series Paper\_Designer Kits\Family Fun Photobook - designer series paper\Family Fun Photobook - pattern 15
    Basics\1.25 Circle Punch
    Basics\1.25 Circle Punch
    Basics\1.25 Circle Punch
 
Make sure to check out the other design team inspiration pages and then come play along in the fun!

Enjoy!

Diana

Friday, December 12, 2014

Sketch Frenzy Friday Sketch Challenge: Holiday Invitation

Happy Friday peeps!  Are ready for the weekend?  This is a big weekend….for the holidays I love to bake cookies and give them as gifts so I designate one weekend as my baking weekend and make anywhere from 6-8 different types of cookies and candies, package them up and then deliver them to friends, neighbors, and coworkers.  So I’ll be a busy chickee.  Before I get started on all the holiday fun, it’s time for our weekly Sketch Frenzy Friday Sketch challenge.  This week we were given a really fun sketch which is great for showing off all our fabulous designer series paper and how they coordinate together.  I started with Garden Green for the cardbase and then added a piece of Whisper White cardstock that is the base for all my DSP panels.  I used the Trim the Tree Designer Series Paper Stack for this card, such traditional Christmas colors, it’s perfect and the stack as so many different patterns it will fit all your needs (not just for the holidays!)
After attaching all the DSP panels I added the greeting, which is from the Holiday Invitation stamp set, stamped in Cherry Cobbler ink on Whisper White cardstock and cut flag tails on one end.  For the embellishment I decided to use the Wonderous Wreath Framelits and the Big Shot to cut the bow out of Gold Glimmer Paper (it’s just the perfect blingy touch).  I did add a red star to the center of the bow using Red Glimmer Paper and the star punch from the Itty Bitty Accent Punch Pack.
This is such an easy card to make if your still working on your holiday cards this may be a perfect layout for you, plus it’s mailable which the postman appreciates.  And you can use up lots of those DSP scraps that you’ve been holding on to so it’s cost effective and cleaning up your crafting space.


Below are easy ordering links for the products used on today’s card:

Built for Free Using: My Stampin Blog


Have an enjoyable Friday and hope you get some crafting time!

Diana


Thursday, December 11, 2014

Stylin' Stampin' INKspiration December Blog Hop: Everything Christmas!


Happy Thursday, it’s blog hop time friends!  I was so excited for this month’s blog theme since it’s all about Christmas and that’s the focus of my projects right now.  As you hop along, please be sure to comment and show some love on every blog! We are always excited to hear from our followers! You should have just left stop number (#2) on the Stylin' Stampin' INKspiration Blog Hop - (Jennifer at Happy 2 Scrap 4 Life). If so, you are in the right spot. If a link doesn't work or you get off track, you will find the full blog hop lineup below.
I know we’re all busy so I wanted to share a quick and easy card and matching gift package that will sure to impress.  I have to admit I’m loving the colors and products in the All is Calm Product Suite so I used it for the basis of today’s projects.  My first project is a card.  I started with Smoky Slate for the cardbase and added a layer of Pool Party cardstock that was embossed with the Big Shot and Stylish Stripes Embossing Folder.  Next I added a piece of All is Calm Speciality Designer Series Paper.  The greeting is from the Seasonally Scattered stamp set (it’s awesome!!!).  I used Stampin’ Write Markers to color on the stamp to achieve the random coloring and then used the Scallop  Tag Topper Punch to create the cuts on the left side.  A piece of Lost Lagoon 3/8” Stitched Satin Ribbon was threaded through the tag whole and then I tied a piece of Whisper White Baker’s Twine around the ribbon (of course I had to add a Snowflake Embellishment to the tie (LOVE that these snowflakes have a hole at the top so you can thread twine through it for easy attachment and still allows movement).  The final touch was to add some All is Calm Sequins in the top right corner for some extra bling.

Of course this time of year there are frequent occasions for gifts so I made a matching gift box to coordinate with my card.  I started with one of our takeout boxes (they are so awesome and really hold a lot!!).  I wrapped a piece of the Kraft Wrapping paper around the box (this wrapping paper is currently on sale as part of the Year End Closeout so make sure to get some now, you can use it all year!)  Next I wrapped a piece of Lost Lagoon 3/8” Stitched Satin Ribbon around the box and tied a big bow.   I created a tag using the exact same process as the card above and attached it to the ribbon bow with some Silver Baker’s Twine.  Of course I had to have some bling so I added some All is Calm Sequins randomly around the tag for sparkle.

I love having packaging like this ready to go this time of year so I can give a quick and easy gift (we all have times where our kids or husbands come down in the morning and declare they need a gift and card for a friend, teacher, or coworker and need it today, what do you have mom?  I can easily grab these, add some candy, cookies, gift card, etc. and we’re ready to go and will look like you spent a lot of time on the gift (SCORE!!) 

Below are easy ordering links for the products used on today’s projects:
 
Built for Free Using: My Stampin Blog


Make sure to check out the rest of the blog hop for lots of other great Christmas ideas.  If you click the “Next” button, you’ll go to Cynthia’s site but you can also access any of the hopper’s site from the full blog list below.


http://inkadoodlecreations.blogspot.com/2014/12/ive-been-voted-out-december-ssink-blog.html

 Blog Hop Participant List:
  1. Kim at Stamping with Kim
  2. Jennifer at Happy 2 Scrap 4 Life
  3. Diana at Stampin' Fun with Diana
  4. Cynthia at Ink-A-Doodle Creations
  5. Darcy at Dj's Stampin' Place
  6. Bree at Craft-Somnia Momma
  7. Donna at Organized Chaos
  8. Tonya at Stamp with Tonya
  9. Heidi at Stuck on Stampin'
Enjoy and have a great day,

Diana

Wednesday, December 10, 2014

Project Life by Stampin' Up! December Daily 2014: The Beginning....

Happy Wednesday!  How are things going with all your holiday festivities?  We’re having lots of fun with annual traditions, even if I know I’m way behind on my list of things to do.  As you know Stampin’ Up! recently partnered with Becky Higgins and Project Life for the Project Life by Stampin’ Up! product line.  These are some great products that provides a system for quick and easy memory keeping that anyone can do so you can treasure your photos and memories for years to come instead of having them sit on your phone, camera, or computer.  As part of this approach to memory keeping is a special project for the holidays call Daily December.  With this project you create an album that chronicles daily everything your family does in the 25 days of December leading up to Christmas.  Today over on the Stylin Stampin' INKspiration blog  the designers are sharing lots of ideas using the December Daily concept.  Stampin’ Up! released the Hello, December products (both card inserts and an accessory kit) to help us with this Daily December project and is full of cards and embellishments that are super fun and seasonally geared. 


Since I love the holidays and but we get started before December 1 with all our activities I decided to modify our album to start documenting our holiday activities that started in November and we may not cover every single day in December, but most.  I started with decorating our album.  In the Holiday supplement a special Cherry Cobbler 6x8” PL Album was released (while supplies last) and it was so popular that it sold out within weeks but we do offer the same album with an Early Espresso binding that will work just as well.  I used the Stars Mask and Whisper White Craft ink to add starts on the front of the album (make sure to let it dry).  Then I added half a paper doily and a strip of Trim the Tree DSP from the DSP Stack and wrapped a piece of Cherry Cobbler Chevron Ribbon around the album to cover the binding seam.  Of course I need a little bling so I used some Gold Foil Paper and cut the letters out with the Big Shot and Little Letters Thinlits (I used a retired die to cut the numbers since the Thinlits don’t have numbers).
I started worked on the layout of my pages in November so they would be ready to go in December but the great thing about the pocket pages is that you can easily swap things around to fit what you need.  I also prefer the rounded edges so I used the PL Corner Rounder Punch on all my inserts and photos.  I also wanted to dress up the “December insert” where you add the date so I stamped them with the Wonderous Wreath stamp set as a frame for the circle and really adds a punch of color.  Below are some of the pages I’ve worked on so far.  My plan is to print my prints on a weekly basis (I go to Costco every Friday so I’ve been sending them to Costco so I can pick them up when I’m there) so I can try to keep up with these.  I’m using My Digital Studio for my prints, I’ve created a 4x6 size document and created different pages either with 1 4x6 photo box or 2 3x4 photo boxes so I can easily drop the photos in, edit them as necessary so when I pick them up all I need to do is punch the corners, cut in half (if appropriate) and insert them in the pockets.
I’m still working on adding some decorative elements and will add some stamping when I have some time this weekend.
Decorating the Christmas Tree

Snowflake Stampede Run through the Christmas Lights
 
Writing Letter to Santa (I still need to have Aidan write his Christmas list on the card since we mailed our letter to Santa)

Visit to Santa


Work Dinner with Chris (yum Filomena's!!)

Stampin' Up Occasions and SAB Catalog Kickoff (it was fun to look at what fun things are going to be available starting after the New Year)

This is such a fun project I’m really enjoying it and looking forward to have my holiday album all finished by the end of December.  I highly encourage you to give these products a try, they’re so easy and fun (would be great to do as a family even).  I’ll share my finished album at the end of the month so you can see the final product.
The other designers on the Stylin’ Stampin’ INKspiration blog are also share December Daily project ideas today so make sure to go check them out.
 
Below are easy ordering links for the products used (so far) on my album:
 
Built for Free Using: My Stampin Blog


Have a great day!
 
Diana

Monday, December 8, 2014

Stylin' Stampin' INKspiration Card Sketch: Joyful Christmas Greetings

Good morning!  It's really starting to feel like Christmas, the decorations are up, we had a neighborhood cookie exchange this weekend and lots of holiday fun.  I love this time of year.  Of course I decided to make a Christmas card for this month's Stampin' Stylin' INKspiration card sketch challenge.  This was such a fun sketch and as soon as a saw it I knew I wanted to use the Wonderful Wreath Framelits for the great die cut words.  I started with Lost Lagoon for the cardbase and then added some Pear Pizzaz cardstock that I embossed with the Big Shot and Modern Mosaic Embossing Folder.  Next I took a piece of All is Calm Speciality Designer Series Paper and cut it out with the Windows Collection Framelits.  The next layer is a piece of Soft Sky cardstock and I stamped a star from the Many Merry Stars stamp set with Lost Lagoon ink before cutting it out with the Star Collection Framelits.  A dimensional helps the star pop up.

I used a piece of 5/8" Whisper White Organza Ribbon and ruffled it along the bottom of my design element (adding a piece of Sticky Strip makes it a breeze to ruffle the ribbon and make it stay in place perfectly).  The over the top touch was using the Silver Glimmer Paper (you know how much I love this stuff!) and cut out the "Joy" using the Wonderful Wreath Framelit.  I have to admit this framelit set has lots of fun elements and I had fun playing around with it this weekend.
 
Please go and check out the other cards the design team shared for inspiration and then come play along.  We love for you to share your creations so we can enjoy all the fun.


Below are easy ordering links for the products used on today's card:
Built for Free Using: My Stampin Blog


Have a great day!

Diana

Friday, December 5, 2014

Sketch Frenzy Friday: Mingle all the Way

Good morning and Happy Friday!  It has been a crazy first week of the holiday season and I can't believe we have less than three weeks until Christmas.  So much to do so we can enjoy all the special memories of this tie of year.  Of course I had to make a Christmas card for this weeks Sketch Frenzy Friday card sketch challenge.  This was such a fun sketch this week, I liked all the different elements to really help dress up the card.

I started with Pool Party cardstock for the cardbase and then added a piece of All is Calm Specialty Designer Series Paper for a fun design and the color inspiration.  Next I attached a couple pieces of Lost Lagoon 3/8" Silky Taffeta Ribbon (I have to admit I love all our ribbons but the taffeta is has always been my favorite!).


For the main stamped piece I used the Mingle All the Way stamp set and stamped the greeting on Whisper White cardstock with Memonto ink (this has become by go to black ink for it's crisp images and no smearing or bleeding when I color in the images).  I used Stampin' Write markers to color in the words and the little holiday cocktail.  The greeting is matted with Pear Pizzaz cardstock.

Next I took a piece of Smoky Slate cardstock and used the Scalloped Tag Topper Punch to create the accent and then used some Pear Pizzaz 3/4" Chevron Ribbon and Whisper White Baker's Twine for the final decorative accents.

I love how these soft colors work together for such a dreamy Christmas greeting, so fun!  Make sure to take time to check out all the other design team cards for inspiration and then play along and you can use this sketch for one of your holiday projects this weekend.


Below are easy ordering links to the products used on today's card:
Built for Free Using: My Stampin Blog


Have a great weekend! Diana

Wednesday, December 3, 2014

Paper Player's Tic-Tac Toe Challenge: Many Merry Stars

 Good morning!  I'm having a lot of fun this week now that I can strickly focus on getting ready for Christmas and all the projects I want to get done. Plus the decorations and lights are going up which always makes me happy (I love running early in the morning when it's still dark and being able to enjoy the peace and quiet and Christmas lights).  Today I'm sharing a fun card I made for this weeks Paper Player's Tic-Tac-Toe challenge. These challenges are fun since you pick the direction of your card so there are lots of submissions for inspiration.  I decided to use Star, Die Cut, and Glitter (with a little White and Embossing also thrown in there.

The cardbase is Crumb Cake and then I added layers of Coastal Cabana and Basic Black behind the Whisper White stamped layer.  For the stamped layer I stamped the large polka dot star frame from the Many Merry Stars stamp set first in Coastal Cabana as the frame for my cut out piece and then stamped different size stars in Crumb Cake and Coastal Cabana ink.  For the large star first I stamped a piece of Whisper White cardstock with the Hardwood stamp, then embossed it with the Star Embossing Folder and then cut it out with the Big Shot and Star Collection Framelits before attaching it to the cardfront with dimensionals.  I also added some small stars cut out of Champagne Shimmer Paper using the Itty Bitty Accent Punch Pack for a little bling.

For the greeting I stamped it on Coastal Cabana cardstock with Momento Ink.  Since the greeting was already curved I just used my Paper Snips to trim around it and add flag tails before attaching it with dimensionals.

I love how soft this card turned out, it reminds me of Christmas falling snow and how peaceful it is. Since this stamp set is Photopolymer it really makes perfect alignment a breeze which I love!

Below are easy ordering links for the products used on today's card:

Built for Free Using: My Stampin Blog


Enjoy and have a great day!

Diana